HOME | DD
 NaBaBa — Making of my drawing
[NSFW]
NaBaBa — Making of my drawing
[NSFW]
Published: 2014-12-08 00:43:49 +0000 UTC; Views: 70147; Favourites: 1122; Downloads: 1948
Redirect to original
Description
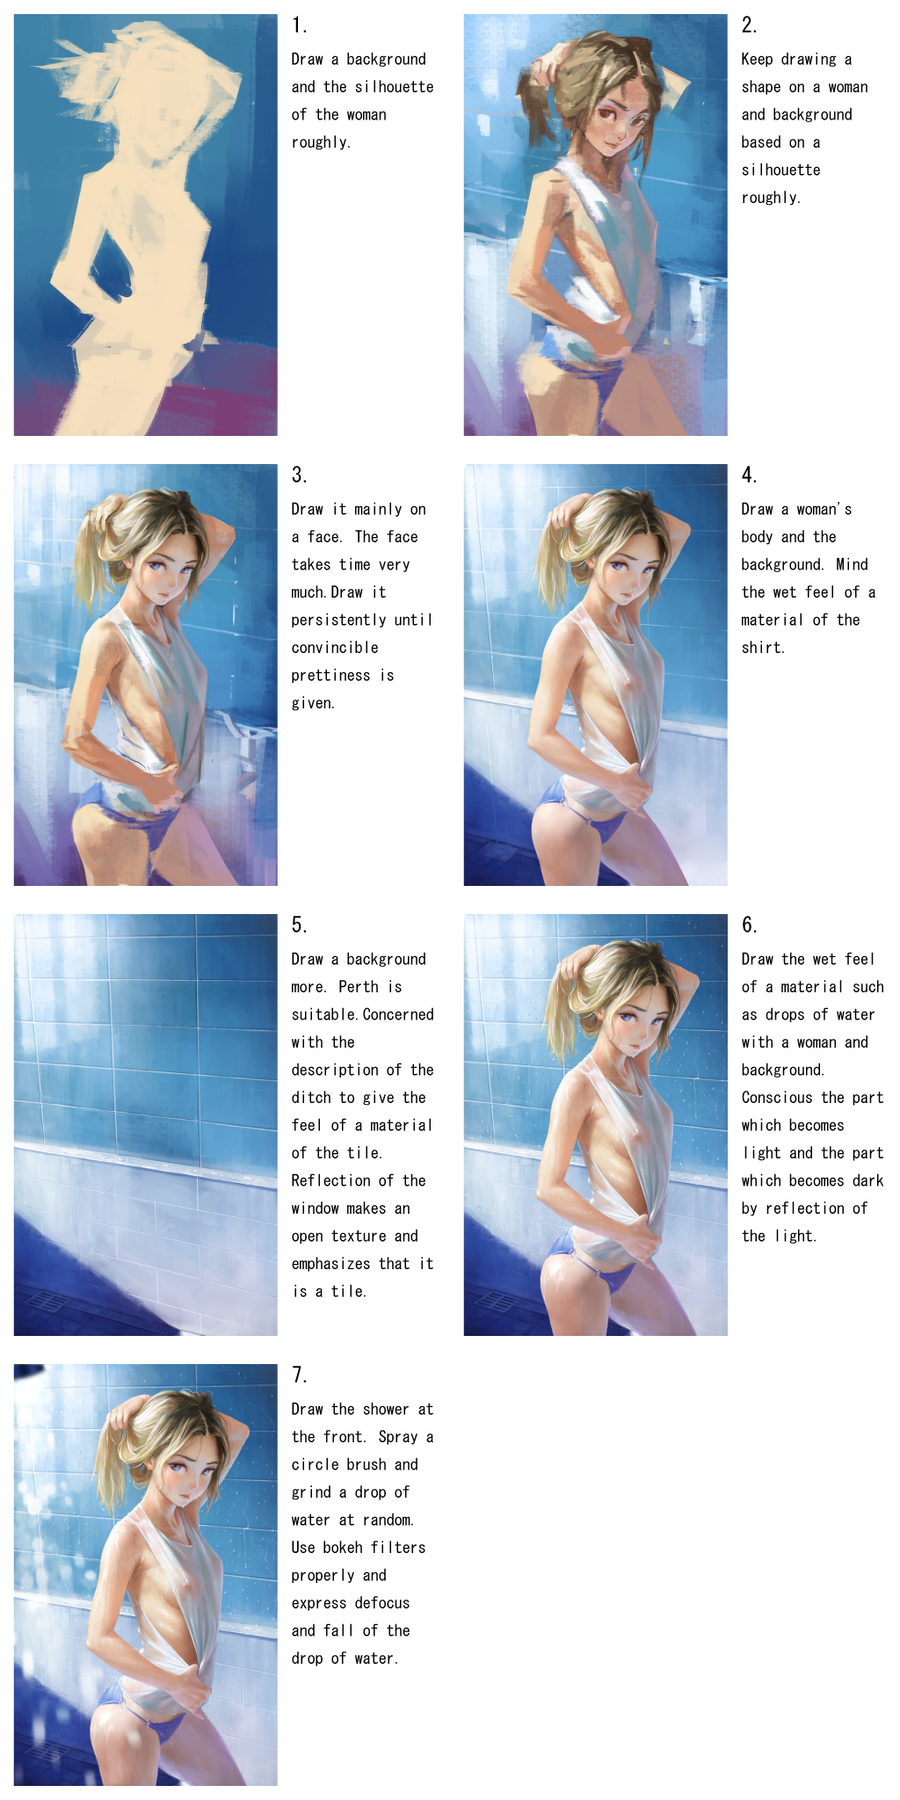
This is making of "Shower Room".Related content


Comments: 37

I agree with other posters this is per YouTube tutorial material awesome though
👍: 0 ⏩: 1

It's nice to see the order in which you proceed with your paintings.
The engrish is also amusing xD
👍: 0 ⏩: 0


"convincible prettiness" lol, cause we don't want any ugliness.
👍: 0 ⏩: 0

^o^ It would be great, if there was a video of your painting process. I tried to find one on youtube, but when I entered your artistic nickname, all I got was videos of the minions singing the babana song.

👍: 0 ⏩: 1


I ended up more confused
But I'm a super beginner at art, so I expected to understand nothing.
 (Wink)")
👍: 0 ⏩: 0


i'm already lost at step 1-2................ nice tutorial though!
👍: 0 ⏩: 0

I really love your style. May I ask you what kind of digital midia you used? Is it Painter 12 or photoshop?
👍: 0 ⏩: 0

how to draw an owl:
Step 1: draw some circles
Step 2: draw the rest of the owl
👍: 0 ⏩: 0

very nice to see the step by step process, love it!
👍: 0 ⏩: 0

espectacular, sos un fenomeno, esa imagen esta demaciado buena.
👍: 0 ⏩: 0

Clarification (for those who need it) :
1. Rough Sketch - Figure out the forms, colors, and other basics that seems promising to you.
2. Define and refine the shape; start adding additional colors and rough details, as well as basic color palette.
3. Starting out with the face, refine and smooth edges, blend shades, start to make the lines more distinct. A lot of time is needed to make these subtle lines, so don't rush.
4. Start finishing poses and begin to add basic textures and additional lines to pronounce the character and background more. Add light sources and reflections as needed. It's recommended to study and know what materials of the background and clothing you're working with to develop the correct types of highlights, dinks, shadows, etc. that your objects will be creating.
5. Refine the background and add textures and reflections as needed, smoothing or sharpening lines where applicable. Again, it is recommended to be familiar with the types of materials. For reflective materials, use context placement to emphasize the type of setting the scene is set in. For this one, window panes are needed for a light source. Note that most tiles reflect wobbly images, so your lines won't be as crisp as when you're directly viewing a windowpane.
6. Begin to layer on other textures and additional details. For a washroom, the artist added water droplets and streaks on both the character and the background to put an emphasis on dampness. Don't forget that water has its own highlights. Also, focus on out-of-view reflections and high contrast made from brighter lights and creases. Note the character's left thigh, arm, and chin-down have light being reflect onto them from the tiles beneath, and also note the folds of the wet cloth. Damp cloth behaves such that it will appear lighter when not in contact with an object (including other folds) (this is because light passes through the material and into air, which allows light to pass through and light up the other side; folds create layers that block out light from penetrating through).
7. If needed, add foreground material. If your focal point is not in the front, blur the material and keep the crispness of the focal point. In this case, the character is the focus of the subject.
Hope this helps you, , as well as you guys!
👍: 1 ⏩: 1

Thank you very much, your clarification helped a lot!

👍: 0 ⏩: 0

that english is hard to read, but nice behind the scenes
👍: 1 ⏩: 0

Wow, thanks very much for showing the process for this piece. It's a bit vague though. I would suggest describing how to achieve the textures and materials of the skin, wetness, walls more than just say "draw it". It will help more as a tutorial to describe how you achieve such a great piece instead of just stating what you did. Looking forward to more of these ^_^
👍: 1 ⏩: 0

I can see that every step is a hard work. I really love your style  (Smile)")
👍: 1 ⏩: 0

Even step 1 to 2 is too much for me to handle
But anyway, thanks a lot, this is very useful
")
👍: 1 ⏩: 0


If possible, I would request more 'making of' pieces from you.. Beautiful, beautiful work, as always!!!

👍: 0 ⏩: 0

Awesome!!! You should make video speed paints on YouTube it'd be cool
👍: 0 ⏩: 0

Very lovely tutorial and very nice piece!
The final artwork is beautiful.
👍: 0 ⏩: 0


Thank you so much, I love your style so much, never expected this, you are awesome!
👍: 0 ⏩: 0

Using an interesting unorthodox way to create your art!
👍: 0 ⏩: 0


Thank you so much for sharing! Your work is really great ^^
👍: 0 ⏩: 0


Waa thanks for the step by step, I love your color style.
👍: 0 ⏩: 0