HOME | DD
 nillia — Tutorial Painterly Digital Art

Published: 2007-11-09 21:19:48 +0000 UTC; Views: 18948; Favourites: 269; Downloads: 420
Redirect to original
Description
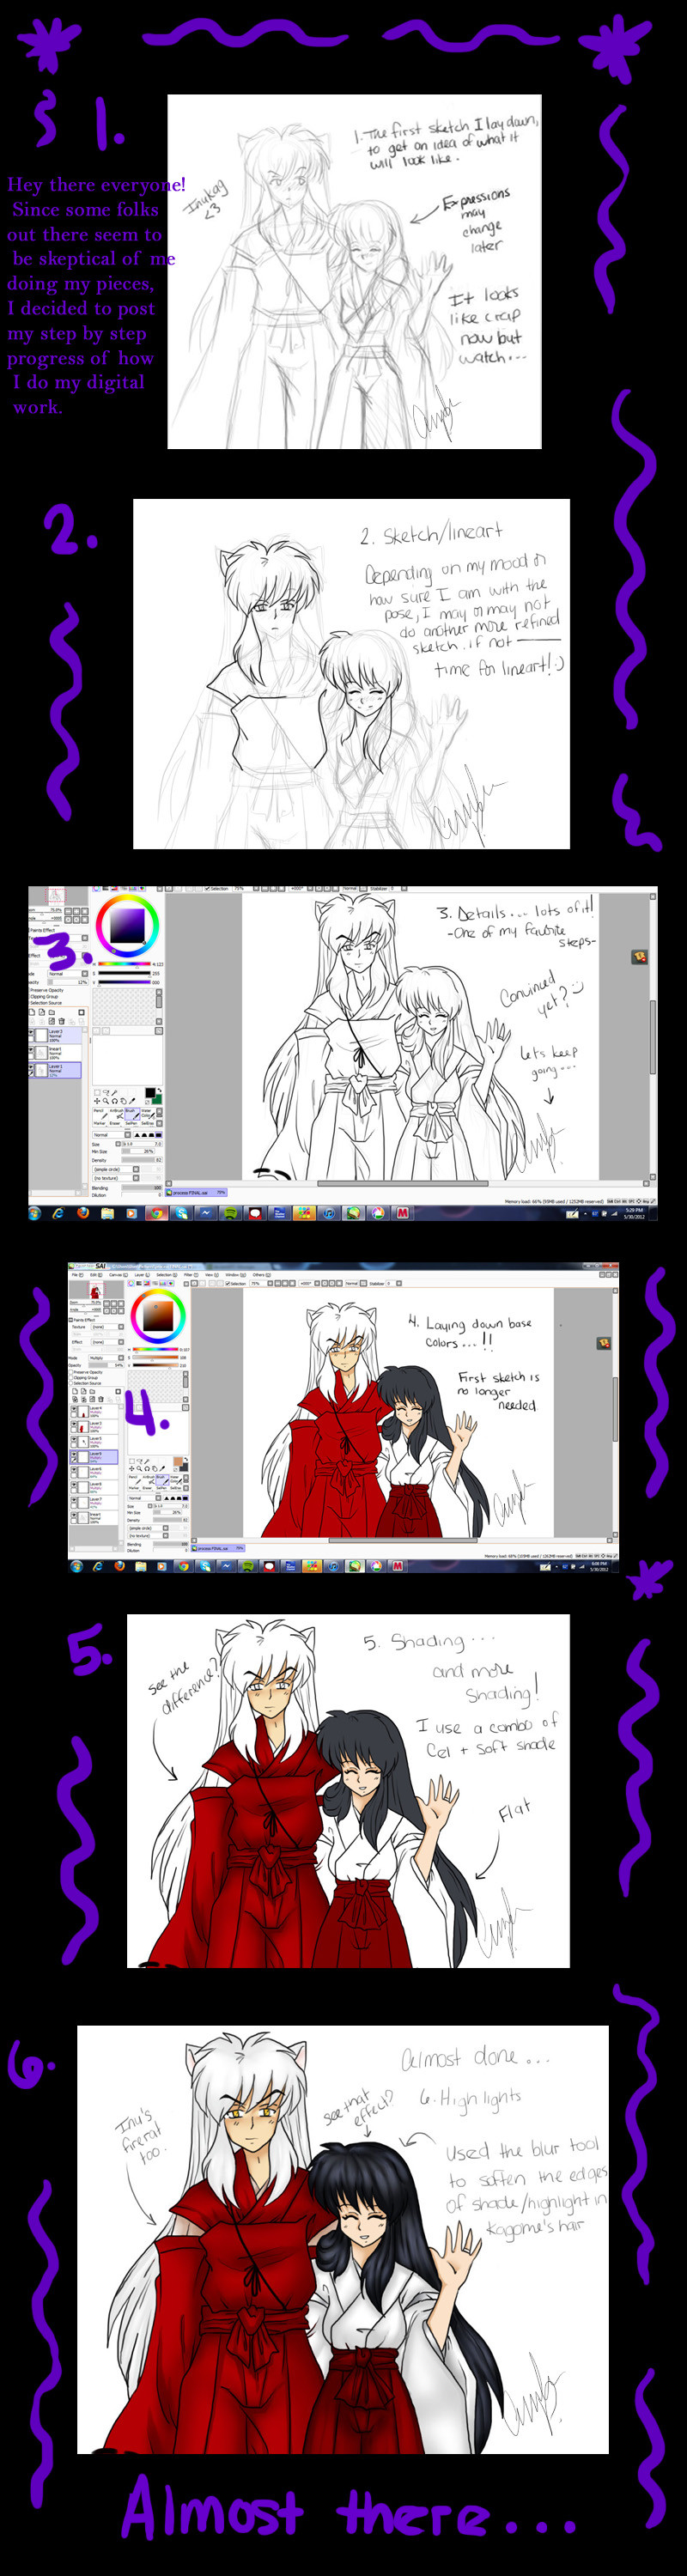
I've seen lots of tutorials that are HUUGE with lots of pictures. They're wonderful--once they finally load.So I was looking at this work-in-progress of mine and realized that you could see ever stage of my process. So here we go.
")
Settings:
A-- I work on only two layers set on Normal. The first is a background, and the second is the figures.
B-- Because I'm working at a very large size (10 inches at 300dpi) I have to use larger brushes. I usually stick to the basic round brush.
C -- I generally keep the brush set on "normal." It's much simpler, and the colors come out more like you want them to. There are exceptions in which I might use "screen" or "multiply"...but I haven't done that yet in this image.
D--Opacity is your friend. I change it often. I usually start out at a full opacity and then lower it to get more colors. Then I go back to full or near full opacity. Just play around with it.
E-- I usually keep "flow" set somewhere between 50 and 80. It feels more like pigment this way. When you want a REALLY sharp edge, put it to 100. If you want something that looks kinda watery, make it a low number.
F--
See that pointing figure? That's the smudge tool. Don't use it too much because you want some abrupt shifts. Only use it on parts where gradual shifts seem necessary. I usually use it with the round brush, at about 75% pressure.
Process
1. My first layer is just a backdrop of some dark color. This color will be seen through the finished painting somewhat, adding its own flavor to the rest of the painting. Make it a little blotchy, with slight differences in color.
2 On a new layer, use a lighter color to sketch out your composition. I like to use a color similar to the skintone I want to use. Because of the dark purple aura, I picked out a dull khaki color instead of a vibrant peach. You can still see some of these sketchy lines in places I haven't painted over or erased yet.
3 I pick out my base colors and lay them down with the round brush at full opacity. I keep my background color in mind In some places, I don't even fill in the base color, letting the background color BE the shadow.
4 This is a place in which I'm letting the backround be the shadow...but it was a little too abrupt. This is one of those times you use your smudge tool. As a result, you have a painterly gradient, and a bunch of new in-between values to paint with.
5 You have some in-between values now! But you don't want them all the exact same hue, so go into your color picker by doubleclicking your current color. Slide it slightly into a different hue. You don't want it to look like you're shading just by adding white or black to the same color. Bleh. Once you have two or three shades and hues, start scribbling them down. Keep working from there.
6 What an awful skirt! This is what you want to avoid as you build up more and more. I smudged too much, lost my lightest lights, and there's only one hue. I'm going to have to try again. The only part of the skirt that looks sorta decent is that bit of wrinkle by Inuyasha's hand. That is because it has a little value contrast.
7 Build on your first few colors until you come to a satisfactory level. The faces on these two are pretty much done. They're painterly, but resolved.
-You use your "shadow" colors like outlines.
-Try to end up with a nice mix of smooth shading and abrupt edges. There are more abrupt edges on Inuyasha because I wanted to accentuate his pained features. Kagome is smoother, because I wanted a serene feel.
-The last thing to remember is that the color should contantly be changing, of only a tiny bit. At first glance, Kagome's cheek looks like one color. Why does it look so "rich?" Because the colors are changing every so slightly all over her cheek. I will probably go back and add a little more color variation, but for the most part, I'm pleased with those faces.
I hope this helped, if only a little.
The most important thing is to practice and feel things out for yourself.
Related content


Comments: 34

your BRILLIANT!!
this could help if i wanted to go on Photoshop
 (Wink)")
👍: 0 ⏩: 0


Ooh! Can't wait to see the finished product! Awesome job.
👍: 0 ⏩: 0

Was this done with or without a tablet? You didn't mention it
Anyway, excellent work! Loved your gallery.
Salutations from Brasil!
👍: 0 ⏩: 0
LittlepinkSprite [2008-05-23 05:15:48 +0000 UTC]
First off.... Wow..... You really did a great job, I really love Inuyashas hair, and Kago-chans expression and just the whole flow of the picture. Though it is only my personal opinion that Inuyashas nose should be a bit higher.
👍: 0 ⏩: 0

You are a good teacher, I am clueless when it comes to making art myself but I understood and envy your talent.
👍: 0 ⏩: 0

Very nice!! 

👍: 0 ⏩: 0


👍: 0 ⏩: 0


")
👍: 0 ⏩: 0


what program do you use? i would have read your comment all the way but it kinda hurt my eyes....sorry. i would really like to know because im looking for a decent program becasue i dont think i can just keep using pens all the time. its to exspensive to keep buying them. nice job on the picture though. i really like it. Its inuyasha and kagome right?
👍: 0 ⏩: 1

um..it says Adobe Photoshop at the top of the image screen. O_o
👍: 0 ⏩: 1
oh.........thanks alot now i feel stupid.
👍: 0 ⏩: 0

It does make sense and I need to use my Adobe Photoshop CS2 more often than I do. Can't wait to see it when's it's done.

👍: 0 ⏩: 0

This might come in handy. I been meanig to get into this painting mode of photoshop.
👍: 0 ⏩: 0

That piccy reminds me of the one of the latest chapters of Inuyasha...'cept Kagome was conscious at the time O:
I'll fave this and use it when I (finally) get photoshop
 (Smile)")
👍: 0 ⏩: 0

Good tutorial, I cant wait to see this piece done!
👍: 0 ⏩: 0

This is really nice, Iv always wondered how you drew/coloured.
Im guessing you use a tablet?
👍: 0 ⏩: 0

wow
yeah i want to see the picture too... lol... i think previously i have had some delusion because when i saw the picture i was like "OMG!! That's so messy!!"
👍: 0 ⏩: 1

Lol, yeah. Only the faces are done.
👍: 0 ⏩: 1
so then you just use Smudge for most of the blending, right?
:[ I wish OC had smudge... the watercolor tool is wonky and difficult to use, and stamp really doesn't work either xD
👍: 0 ⏩: 1
No. Just a little at certain points. Smudge is like salt-- only use a pinch. Too much and the picture is ruined.
A lot of the blending comes from coloring on low opacity.
👍: 0 ⏩: 1
arr, i geddit. just go over and over and over for darker and darker colors?
👍: 0 ⏩: 0

Awesome tutorial 
👍: 0 ⏩: 0

Ohhhhhhhh, awesome! ::Favourites.:: A huge help!
You rock. Did you know that?
Well, if you don't, I'm telling you now. You rock.
Nillia=Lobve, yo.
👍: 0 ⏩: 1
Really! I'm so glad! Thank you!
👍: 0 ⏩: 0


Are you going to finish this? Or is this already a finished piece? I'd just really like to favorite it since it looks like such a great piece.
👍: 0 ⏩: 1
No, it's not done yet. I just took a picture of it in-progress cuz you can see all the stages.
👍: 0 ⏩: 0