HOME | DD
 nothought — hair,shading tutorial
by-nc-nd
nothought — hair,shading tutorial
by-nc-nd
Published: 2008-10-13 18:05:37 +0000 UTC; Views: 26273; Favourites: 309; Downloads: 1642
Redirect to original
Description
please download to view it!trust me it helps.
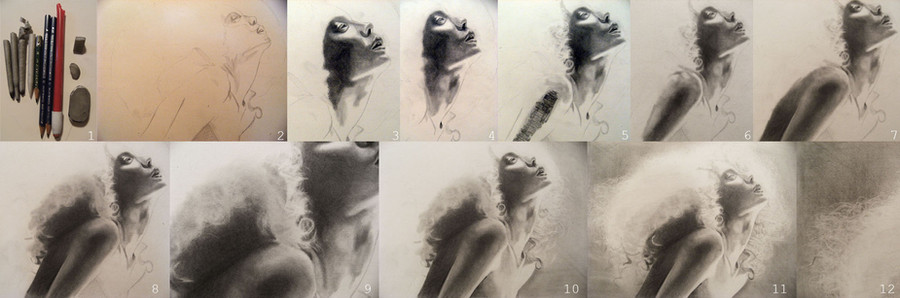
1. 4 tortillions/shaders/smudge sticks/rolled up paper, 3pencils(B, F, HB) a standford pink pearl pencil eraser(one of most useful erasers, and long lasting! get one if you don't have one), sharpened erasers...these are SOOOOOO helpful. use a knife to cut off small, sharp triangular pieces of a nice white/soft eraser.
2. sketch! i've found out it's really important to have a good sketch. this is what everything is based upon! this shows you where everything goes. try to keep your lines clean. it helps to shade lightly dark areas, so you can imagine the photo better. espeically for really complicated areas(ex, her face had a lot of contrast)
3. beginning shading. i usually start with a tortillion or a light pencil(2h, f). block everything in lightly(using the SIDE of the pencil, not the sharp tip! otherwise you'll end up with big scratches in your drawing that are hard to fill in and blend!). blend everything after each layer and add more layers if necessary.
some people shade the darkest areas first, others shade the lightest areas first. i usually start by shading lightly and adding on. if the other way works better for you, do that! it's all about which make you feel more comfortable.
4. adding more shading, darken areas that need it. i used a B pencil to color in the dark areas on her mouth, eye and nose. use sharpened erasers to show thin light areas, such as on the bridge of her nose , and the small bits of hair across her face. Don't wait to use sharpened erasers on your darkest areas...erase and THEN add more shading around the light part. it really hard to erase pure black(graphite gets v slick).
5. continue adding shading. here you can see the beginning stages of the shading on her arm. i used an HB or B and just the side of the pencil.
Remember, the darker the pencil, the more pigment/blackness. [link] I like to use an HB or HB for starting med-dark shading, they're soft enough to bend, but have enough pigment in them to spread the pigment.
i also started on her hair, erasing some of the overlapping shading from her face.
6. blending everything. erasing bits that need it. pay attention to thin highlights, such as on the 'edges' of her arm. use a sharpened eraser to make those areas pop. this is what creates your 'lines' and dimension(is that the right word? god if i know.) try not to outline much, unless you're going for a comicbook/anime style. people on the streets don't have outlines, but you still know where their arms and and their chest begins, right?
7. blending the arm more. making it smooth. adding dark shading to her back- the same way as i did with her arm.
8. i began shading the darkest part of her hair, and added light shading to other parts. for her hair, it is easier to shade lightly and then erase to ad strands, rather than try to lightly draw every strand.
9. close up of shoulder/hair. i used sharpened erasers to make her hair. don't worry too much about the drawing looking exactly like a replica when you are a beginner...it's more important to focus on it looking GOOD and realistic at the end. if you spend all of your time trying to make every single detail look perfect, you're going to get bored. if you pay attention to making it look right, eventually you'll become more patient and get better techniques for creating the small things! practice and don't be discouraged!
10. adding shading to her upper body and finishing her neck. also light shading for the background. use sharpened erasers to make her hair against the background. this may take a LOT of steps to get it to look okay. i usually make her hair, add light shading in her hair, for contrast, then blend, erase more strands and repeat until it looks good.
this isn't a race! don't worry if it takes a long time.
11. adding the rest of the background, using the sharpened erasers, yet again to create tiny strands of hair.putting down a few darker lines at the bottom left of her hair.
12. a close up of the top left of her hair. the lines are clean and thin, this is what you're going for with hair(fly-aways and such). they're not chunky or thick or uneven. it takes practice, but try your best...shade a piece of scrap paper- lightly, and then practice! outline strands if they need to contrast more. outlining individual strands also helps to make them cleaner.
good luck!!!!
if you have any questions, PLEASE ASK!!!!!!
also, if anything is unclear, let me know!!!
oh and
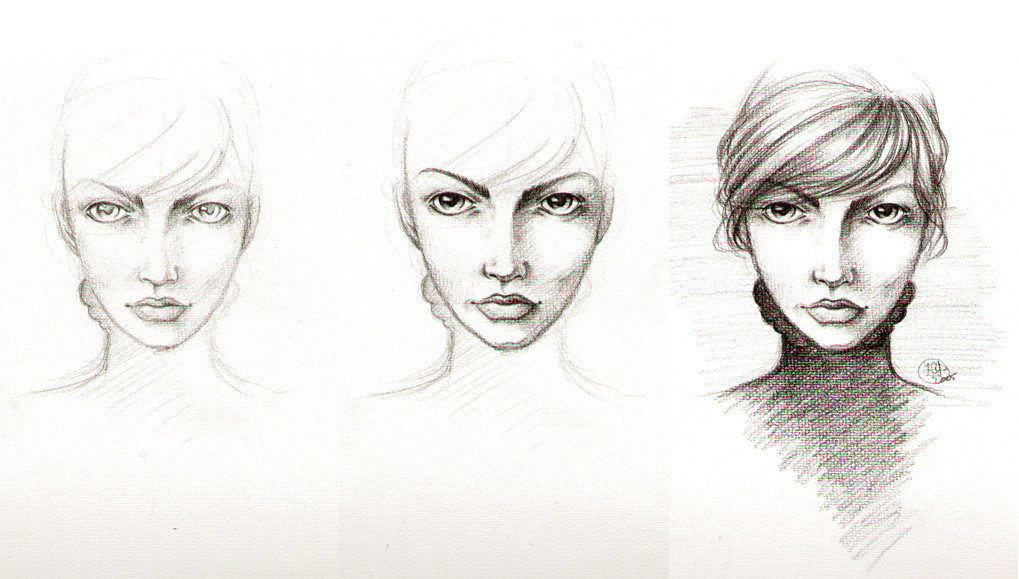
i'll put the finished piece up soon.
thank you so much for looking!!!
Related content


Comments: 18

I've been trying to find ways to get a super small eraser, and haven't had any ideas on how to shrink and sturdy it enough to make small strands, I never thought to sharpen it! Thanks a ton.
👍: 0 ⏩: 1

You can also buy a tuff stuff eraser.
👍: 0 ⏩: 0

this is amazing! I don't think i'd even be able to draw anywhere near that in a million years! you have so much talent![link]
👍: 0 ⏩: 1
srry that link is nothing. im new to deviantart so i wasnt sure what i was doing
 (Smile)")
👍: 0 ⏩: 0

this really helped me with hair. i was doing it wrong the whole time! it's about LAYERS and not doing individual strands. i was driving myself nuts trying to do it that way! thank you very much for posting this!!
👍: 0 ⏩: 1
i'm so glad this helped!
hair is still one of the toughest
things for me to draw; it's very time
consuming. just be patient! it's all about
the detail!
thank you.
👍: 0 ⏩: 0

genial! it will help me with hairs. Thanks for tutorial
")
👍: 0 ⏩: 1

you're weclome. i'm glad you enjoyed it!!!!!!!!!
👍: 0 ⏩: 0

i'm the one who suppose to thank u 4 this awesome tutorial,thanks u thank u,i don't no u deserve a dd 4 this amazing tutorial 
👍: 0 ⏩: 1
awwh thats sweet!
thanks.
yes i do... [link]
c:
👍: 0 ⏩: 0

I'll personally never use this tutorial thing..... but damn it's purdy!!!! I love the presentation of it... and no I didn't read through it at all not because I'm not interested ..... just once again I won't use it
👍: 0 ⏩: 1

i'm v glad.
thank you for checking it out.
👍: 0 ⏩: 0
