HOME | DD
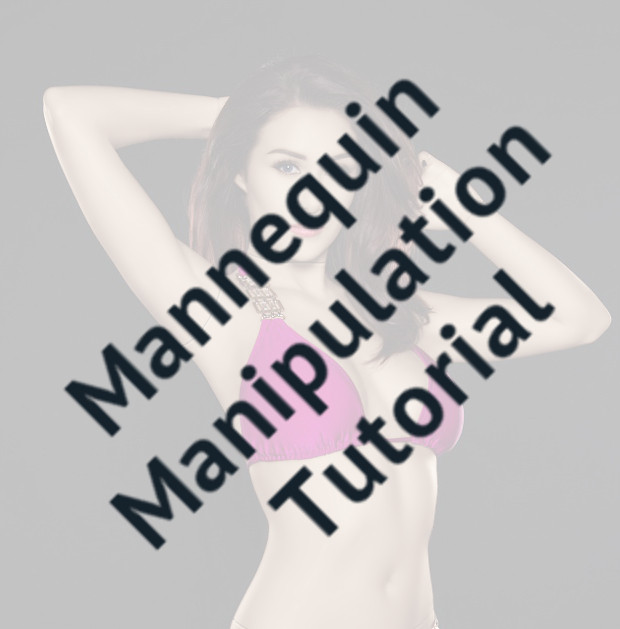
 ObjectifiedBeauty — ManipTutorial
[NSFW]
ObjectifiedBeauty — ManipTutorial
[NSFW]
Published: 2015-09-07 22:57:04 +0000 UTC; Views: 12284; Favourites: 70; Downloads: 226
Redirect to original
Description
I've decided to put together a tutorial both to address a few questions I've received along with having it available for my own reference in case I ever get hit on the head. Some credit is deserved by Eltomte and his tutorial (fav.me/d72iueg ) which got me started in the first place. Enjoy!
***
See my Discord server for discussion, source suggestions, request polls and works-in progress.
Related content


Comments: 13

Thanks for sharing this process. Your work is insane. Its much of what I;ve worked toward with my Rubber Asylum. Thank you Sir
👍: 0 ⏩: 1

Thanks - always nice to hear that!
👍: 0 ⏩: 1
I've never even tried working with layers with photos, I did with arc view GIS so I suppose its not much different
👍: 0 ⏩: 0

the Seperation points script link doesn't work any more, Sgt.
👍: 0 ⏩: 0

Amusing. That almost nothing like how I do my mannequin manips. I usually take the base image and use the selection tool to create a selection that includes the subject's skin, excluding lips, fingernails, and eyes. Use the Selection To Path function to store the "selection". Under paths I name the resulting path "skin". Next I copy paste the skin to a new layer. That layer get color "corrected" using hue/saturation to lighten the skin and reduce the saturation +30/-50 works with well lit images. Less extreme modifications for poorer lighting.
Next step is to smooth out the skin, use Path to Selection to turn the selection tool back on. Then use the airbrush with 25% brush and opacity around 50% to smooth out the skin (use the color drop tool to keep the color similar to the surrounding area. In this step, I reduce wrinkles, sags, harsh skin stretching due to the way muscles work (esp. around the neck), etc.
New layer, switch pure white and pure black, continuing to air brush, add highlights and lowlights. Mannequin skin is shiny.
New layer, using the path tool, create arcs for whatever separation points exist. Set the pencil tool to 1 px, 100% opacity 100% brush. Stroke the path with white. Select the move tool and move the path 1 px up (or in the opposite direction of the major light source of the image) and stroke the path again in black. Next stroke the path with Convolve (at about 5 px wide 25% opacity). Repeat until the separation point looks "right". Sometime I need to do this by hand.
Finally touch up "makeup" and that's about it.
Lately I'm a bit obsession with adding stands to the manips. Working them in requires layer masks.
Edit: example image: www.deviantart.com/browse/all/…
👍: 0 ⏩: 1
Yeah, there's no real right or wrong way to do it.
(FYI, your link only points back to my tutorial.)
👍: 0 ⏩: 1
Stupid cut paste
magicshoppe.deviantart.com/art…
👍: 0 ⏩: 0

")
 (Smile)")

Ohhh man, i was trying to follow the tutorial, it's really hard I am bad in English, because I am Brazilian and I am still learning, i made to step "Brush" and "Airbrush", something like this, so I got confused when translating the tutorial as it did not understand much hahahaah.
This is my first time using GIMP, so I'm taking a beating hahaha ^.^ But, i learned a lot about Photoshop, and i will learn about GIMP
Thank you for giving me this great opportunity to learn, you are an excellent instructor / teacher
Good night o/
👍: 0 ⏩: 1
You can probably use Photoshop, just the tools are different. Just keep at it and take it slow; it might look intimidating at first but it's really quite a simple and straightforward process once you become familiar with it.
There is a built-in equivalent to the Bevel and Emboss filter, and I'm pretty sure there's some equivalent of the plastic wrap filter (step 7) - those are really the only things that differ. If anything, the workflow in Photoshop might be a bit shorter as it allows you to do layer masks on groups.
👍: 0 ⏩: 1
Thank you, I will continue learning about GIMP, after all, it's always good to learn different things, even though difficult
I just need some time to get used to GIMP, I've never worked with layer masks Thanks again
 (Wink)")
👍: 0 ⏩: 0
I am extremely glad you posted a tutorial, there are no words that can describe how grateful I am. Thank you very much
Very nice tutorial, congratulations.
👍: 0 ⏩: 0