HOME | DD
 ObscuredForce — Collision
Published: 2005-04-22 02:11:51 +0000 UTC; Views: 3139; Favourites: 6; Downloads: 2024
Redirect to original
Description
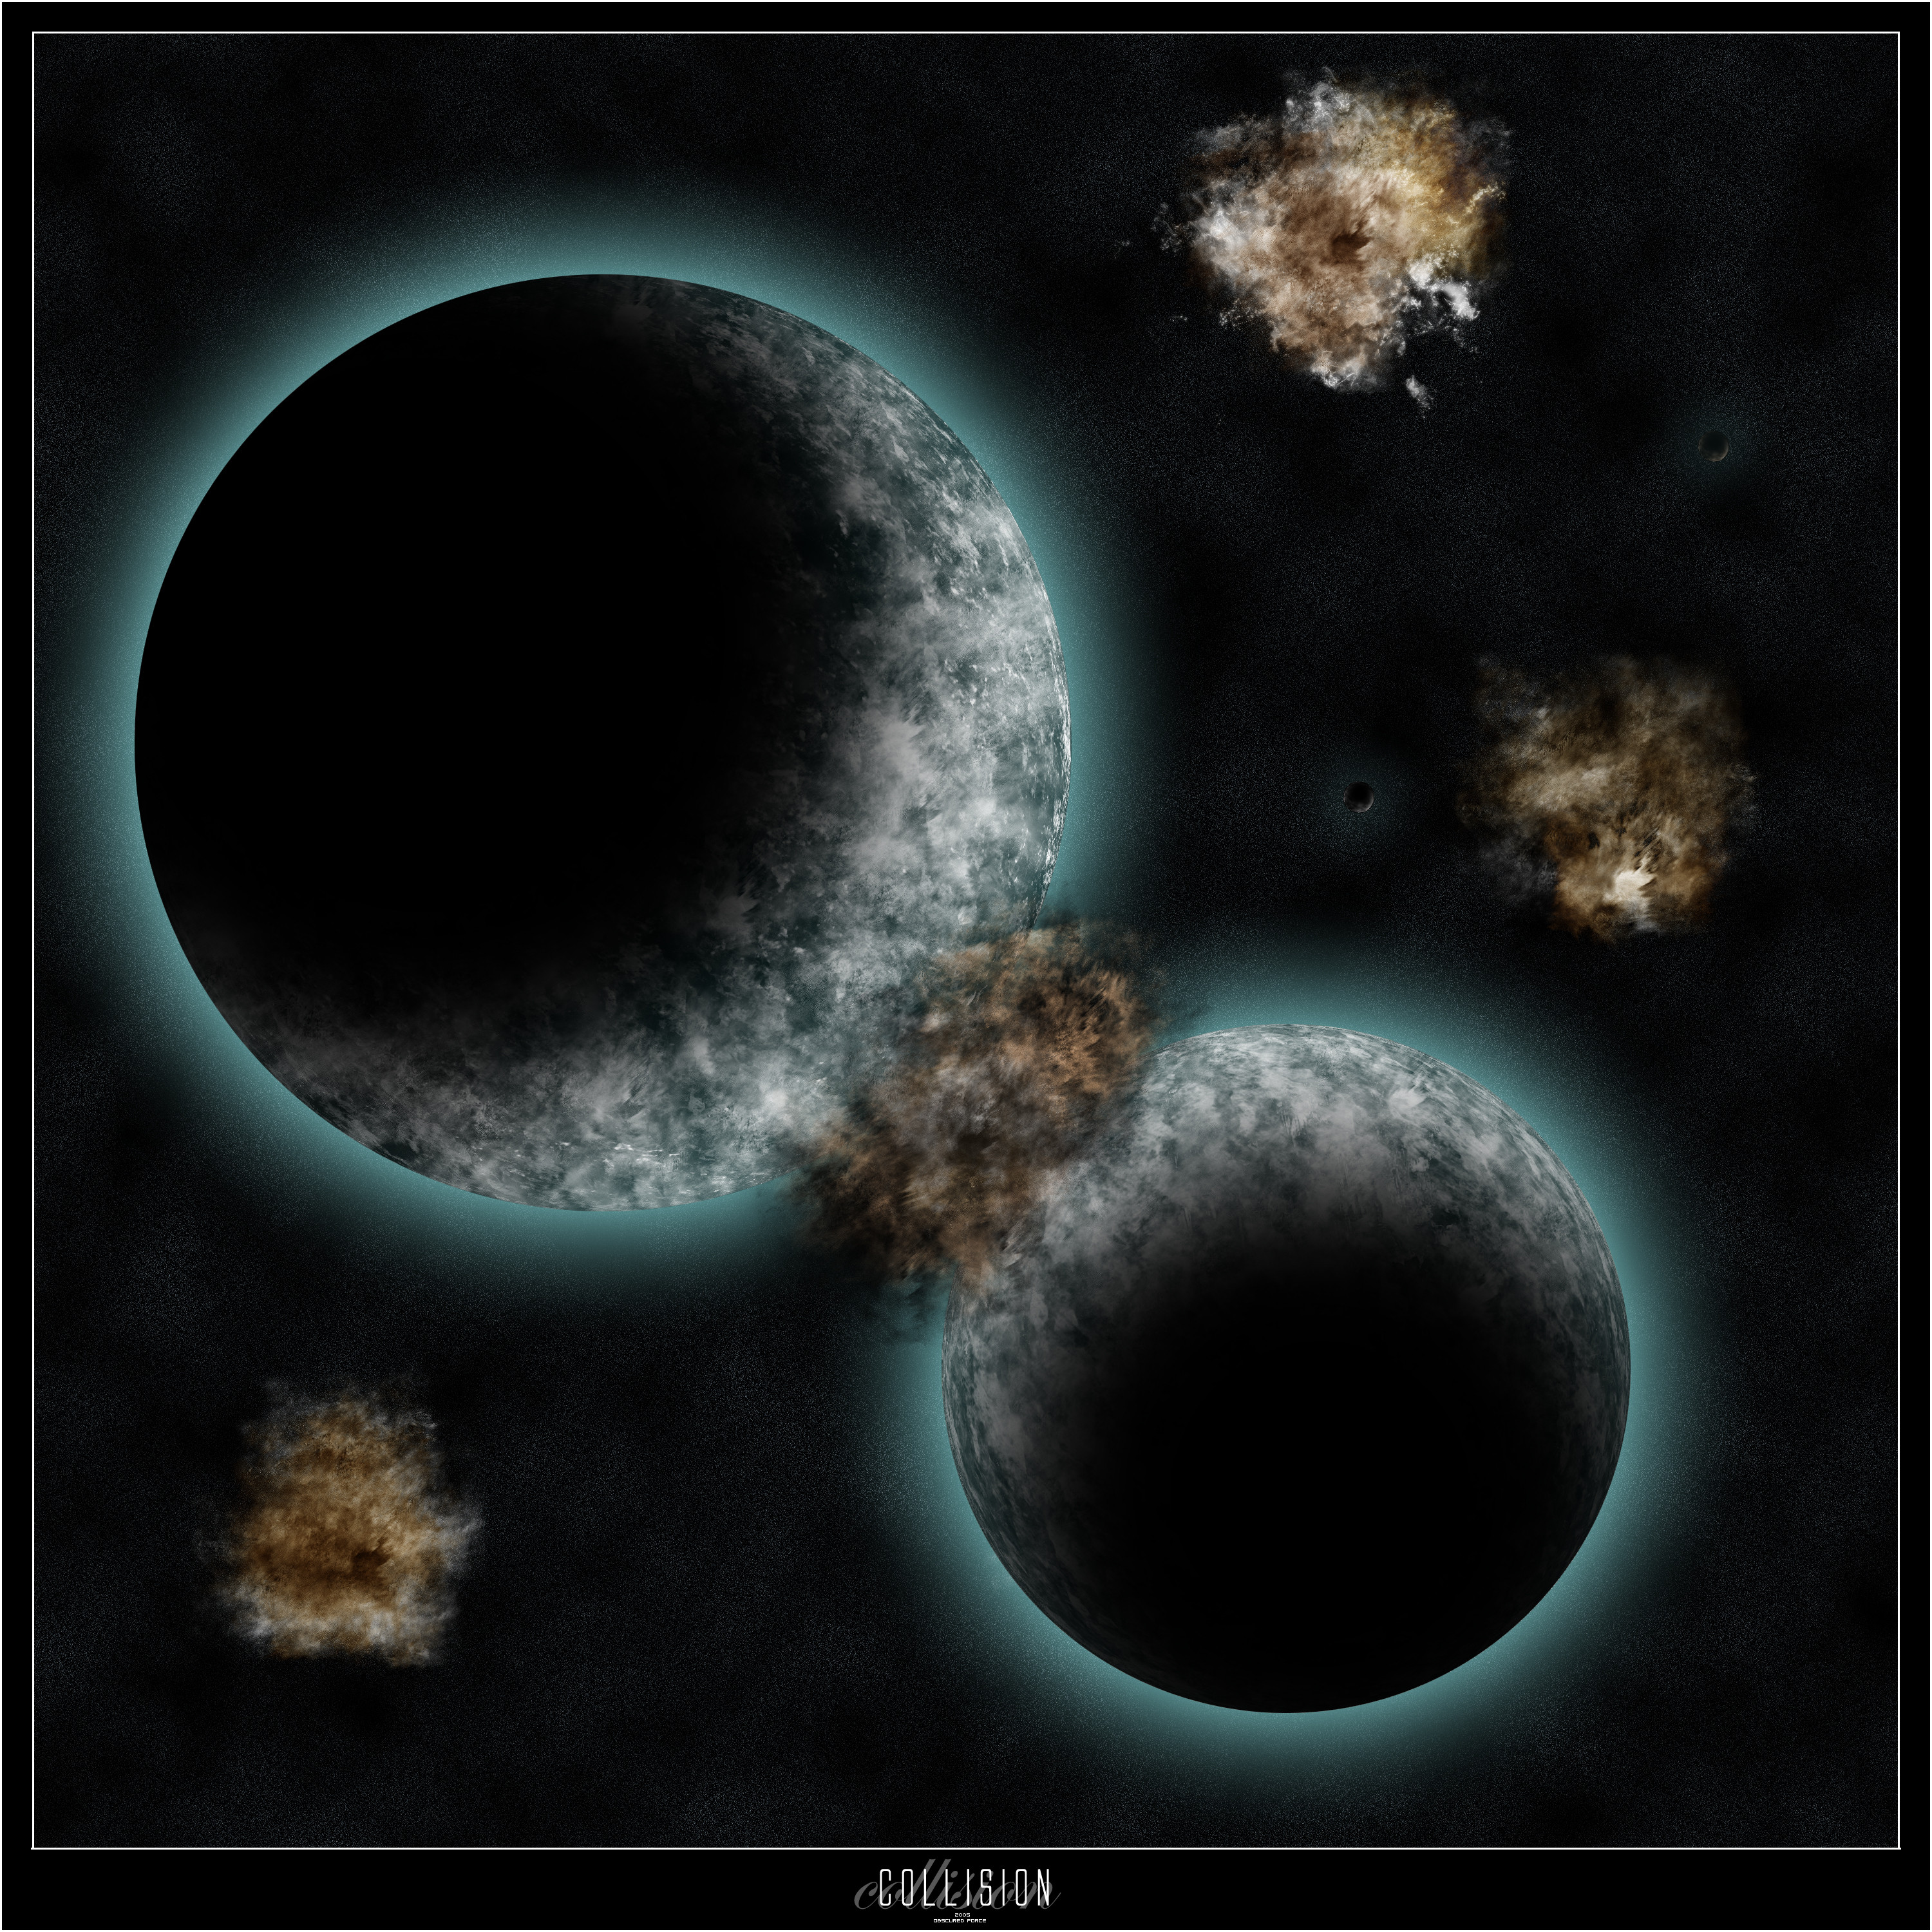
Collison________________________________________ ______
Well, my first scene that I am actually proud of. I have created a few, though haven't posted for the reason that they were only testing my skills. I feel this scene is the beggining of many great to come! Please comment, favourite, and suggest! Below is the making of this little peice, and for those people who do like this, tips and suggestions.
Stats:
- Time Taken: Three Hours
- Layers: 39
---------------------------------------- ------
Inspiration
Well, thanks to an online graphics buddy of mine, over which was harder, a planet or a layout. I wasn't used to creating weblayouts, but he showed me a beautiful peice created by `alyn, when that is when I took love into space and terraspace work. I immediatly downloaded and viewed tutorials, finding his one of the most informative. Viewing the [link] page, and saw what the two great artists were capable of. The space part of me wouldn't exist without their work. Thanks
")
Useful
Must inspiration comes from music, belealive it or not. When creating work, I usually stick in my favourite bands. HIM, A Perfect Circle, Creed, and many emo bands from a website (I shall not reveal
") ) bring most inspiration my way. Listen to your favourite music, whatever your into, when creating any work; be it space or lineart, music is awesome!
) bring most inspiration my way. Listen to your favourite music, whatever your into, when creating any work; be it space or lineart, music is awesome!To begin
- Adobe Photoshop 7.0+ : Photoshop is a designers best friend. Bringing tools for the application of time, work, and imagination. A must have for any type of digital art.
- Brushes : Brushes are important. You need to find brushes that are very detailed, with many qualities that are useful. Usually, by far the most popular type, grunge, is what is usually needed to add that extra effect towards the texture, look, and feel of your artwork.
- Textures : Textures are images or digital artwork that is used to apply to other images and artwork. The purpose behind a texture is to add detail to a certain thing. In the creation of planets, this is an important factor. You can get these simply by searching the DeviantART's resource texture gallery.
- Imagination : Imagination is the key virtue. You need to know what your going to create, using imaginative images. Picture other work, and decide what you want yours to be on. Don't just read a tutorial, then the apply it, thinking it's an original peice.
- Patience : The creation of space scenery is a long process. It can be rushed through, and have a final result semi-worthy to call a good design, and/or a total peice of crap, taking the term a bit heavy, maybe. Don't take an hour to brush just so you can say you spent time, because there is much needed. Many virtues are nessacary to create something nice. Take a passion in using this time, not just doing it out of bordem.
Before hand notes
Now, a thing that is important to know is, you will most likely be working on a large scale. Usually my scale sticks with 2500x2500 - 5000x5000. That, or sometimes creating a wallpaper version which is a bit smaller. Because of the large scale, it will take a while for things to operate. You may find a simple filter to take up to two minutes, that's alright. I'll tell you now though, if you go randomly clicking around because something is taking a while, alot of times you will receive a box stating that an error has occured, and the program must closed. Well, this is why you need to let the process sit and wait. I just though I'd warn you, beforehand.
Beggining Texture
A texture is something that is applied to something else, to give that something else a quality. Whether it be cracks, water, creveses, or whatnot. DeviantART's resource texture gallery provides much. What I do is find more than one texture, all bigger than my inital planet is going to be. Using them, mix them together using the stamp tool, the patch tool, blending modes, and other things. So, in this particular peice, what I did was find some textures that resembled a terrain from a birds eye view. A bird very, very, very high in the air, that is. Finding some that appealed to me, I saved and quickly opened them, copying the largest onto a new canvas. Making new layers, copying all the others into that document I began to deasturate them all, making them all black and white. This is when I played with blending modes of all sorts. Saving this document as a PNG, I re-opened it and minimized it as I awaited for the time to use it. I kept all the textures (the image themselves, before I pasted) minimized, as well; for the simple reason that they would come in use later.
Background Stars
First, I started a simple black background, the main colour of space, bringing the darkness. Usually, adding the stars would be right there. But what if later on I needed to work with the stars? In that case, I simply made another layer, filling it with black. This, basically meaning I would have two background layers: the main and the star layer. A common method of stars then came into play, a simple "Add Noise" filter. The noise itself usually is put around 10-20, 15 alot (if not all) casses. Guassarain was also checked in the settings, this for the reason being that I needed a nice stary background; not a colourful packed one. Making a new layer after that, I used by far the most common filter, clouds. This allowed me to give variation to the stars when I changed the layer mode! In otherwords, on the new layer with the clouds, I changed the blending mode to overlay, that way patches became more opaque, giving the greater view of a stary space scene. This of course wasn't enough though! It needed just a tinge of colour, for I knew of course that the final peice would have much colour, so I couldn't just have a plain, white and black star feild. So, I headed on to my colorize method! Usually I would always use color balance, though in space I usually don't. So, adding just a tint of blue, along with darkening at that same, tiny level, I found my star feild quite appealing. A good tip is to keep all your layers of a certain category into a layer set. So, I created a new 'layer set,' moving the "Stars" (black background/nosice) layer and the "Star Varriation" (clouds/colour) into a new set, I named "Stars!" Pretty nifty, eh?
Background Frame
Well, I realized that I would need a frame to place my text into. I was afraid I would end up putting a vital peice near the edge, so I made the frame first, so I could avoid it, and work more on the edges and middle of it. By doing this, I made a new layer and filled it with white. I then set the blend mode to darken, this would in effect turn the white into nothing. My signature method of borders came into effect here. With the foreground colour black, I made a fat border using the Edit > Stroke function. I then outlined (the outside and inside) with a white stroke, having the bottom peice ready for text. Though, I didn't bother with text at that current momment, just making the border. Done, I had three layers (Black chunk - outside white border - inside white border), so I formed a new set and named it "Border."
Planet Basic Shape
Here comes the fun part! Making a new layer, I formed a huge circle near the middle, though a bit atop and a bit near the left. This would come handy, because I had a short state of mind of what I wanted to create. Filling this layer with black, I spherized it two times. Duplicating the layer twice, I had three layers. My "Base," "Atmosphere," and "Shadow." Making the "Shadow" and "Atmosphere" layers invisible, I seleced the "Base" layer.
Planet Textures
Pasting my main texture above it, I played around with blending modes. Repeating this process, expcept flipped them and using diffrent modes, also, adding layers with new textures, too! Sperizing those, too, you can't forget! Making a new set, naming it "Textures," I grabbed very detailed brushes and brushed in the circle. This, was posing as a new texture. Along the way I added a few effects, as well.
Planet Atmosphere/Shadow
Making the atmosphere visible, I applied some effects to it, making the outer rim and a bit of light on the inside. Then, moving on to the shadow I applied a blur to it, making the sides opaque. Moving it to the other side I made it dark (upper left), because the lightsource would end up being on the bottom right (diagonal).
Planet Colouring
Very short. I simply went to the texture layers and gave them a tiny hint of colour, contrast, and levels. Very basic step.
Planet Two Repeat
Well, in this particular peice I needed a second planet, diagonal with the other one (lower right corner of the canvas), so I just repeated the steps! Diffrent textures and light sources, of course!
Nebula Full
Now, with two planets looking as if they were to collide, I added a nebula straight in the center of the two. This would be the rift seperating them. I began to brush, making layers and swtiching blend modes, adding colour to varouis, brushing more. Finally, I had the it done!
Finishing Touches
Well, I made small planets to be either moons, or well, small planets! I also added text, and, my peice was complete!
Thanks,
Silver Crescence
[link] - [link]
Related content


Comments: 8


Hmmmm, wtf are those brown spots? Excuse me for my language ^^ and ur blue outside glow can't been seen on a dark side, and the stars are a bit tooo many. try to erase them. keep practising and become a better artist
Haven't seen ur newest work btw, so maybe ur better than i think u are now.
 (Smile)")
👍: 0 ⏩: 0

well the stars are way too uniform, the planets and explosions are dull.. Srry mate, can't say i like this one.. but nice job on effort
👍: 0 ⏩: 0

Did you do a inner glow and shadow on the atmosphere layer and set it to screen? Also, do a bigger gaussain blur on the shadow layer cause that will probobly help to make more of a crescent shape.
👍: 0 ⏩: 0

Very nice, but I still don't think your doing the sphearize right. Look at This Planet . See how the terrain is spherical? Also, try to vary your stars. And put your atmosphere layer above the terrain layer and chnage it to "screen".
👍: 0 ⏩: 1

I spherized it... o.o; I had the planet selected and sperized it and every texture layer I had.
👍: 0 ⏩: 0

it's good. but you need to work on your explosions between the planets.
👍: 0 ⏩: 0