HOME | DD
 OneShotArtist — Servbot Head WIP steps - Semi Tutorial
Published: 2012-04-26 07:52:01 +0000 UTC; Views: 7910; Favourites: 57; Downloads: 67
Redirect to original
Description
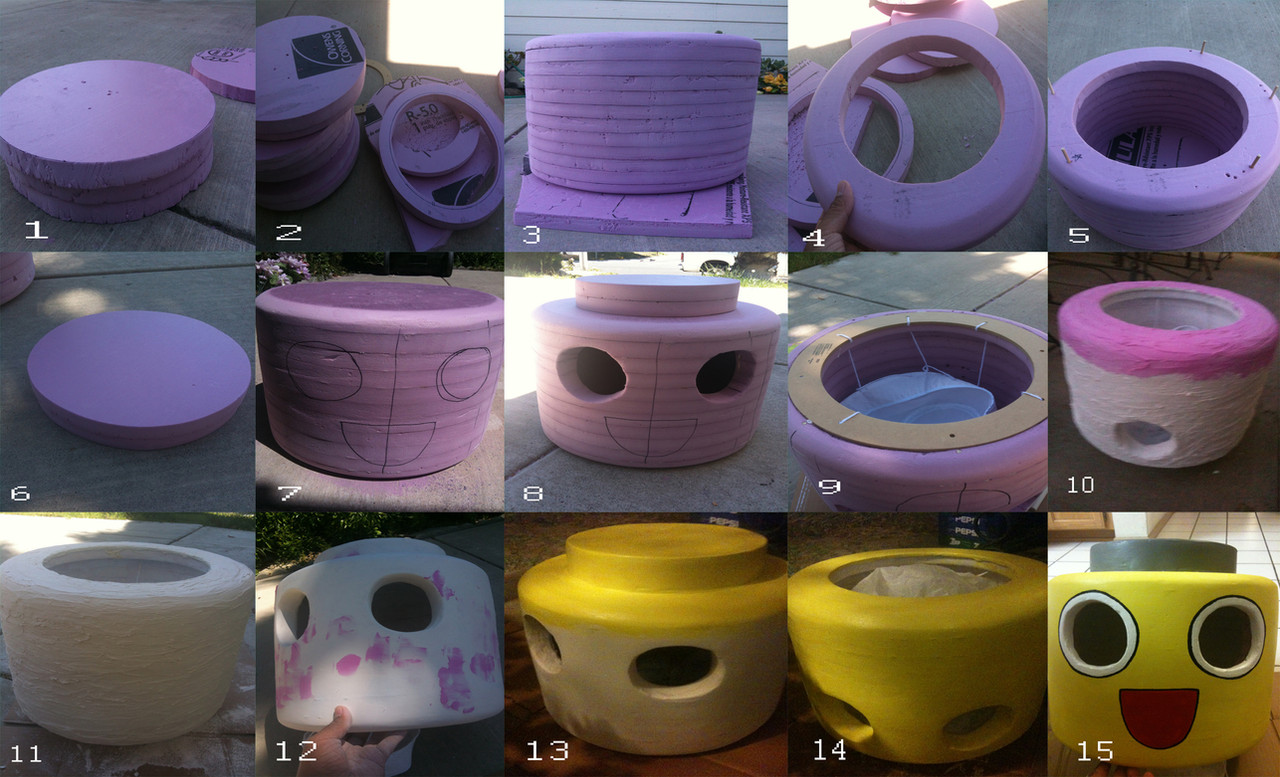
Here was my WIP for making my Servbot Head. By no means am I a professional at this. This is actually my first time making a prop like this. So some people may do things different than me, and if you have a easier way to do something than the way I did it I would love to hear it.I forgot to take pictures of the patterns, but pretty much all you do is measure and draw out your shape on the Foam board then cut them out. Any unevenness can be sanded down. I used that pink Insulation foam board that I bought at Home Depot. The Blue stuff works just as well.
1) once the circles are cut out I sanded them down to make them as round as possible.
2) I cut out the middle which I measured ahead of time. this of course is where my head will go. Make sure you leave one uncut in the center for the top of the head.
3) After that I aligned them to see how well they fit together.
4) I sand the circles down a bit more in the inside to make it smoother.
5) Once they're all sanded down I stack them together again and stick a few bamboo bbq sticks in them to keep them together so I can sand the whole thing till it's smooth.
6) The cut out for the top of the head. Which is also sanded down.
7) The head glued together with Gorilla Glue as well as some bamboo bbq sticks stuck in the inside of the walls to give some extra support and strength to the structure. (note make sure you put glue on the sticks to make sure they stay put). Also Gorilla Glue expands so make sure you clamp or weigh it down so the pieces don't raise up or become unaligned. Make sure you also use glue that is water based and not acid base because it will eat through the foam.
8) After drawing the layout on the face which you see in step 7. I went ahead and cut out the eyes and attached the top piece to the head.
9) In this step I made a cut out on the bottom to fit this wooden disc I bought at a hobby store so I can fasten some string and a hat inside the head. The hat is meant to keep the head from moving a lot when I wear it as well as allow the head to turn when I look a certain direction.
10) After I'm pleased with how the head is and structure is I go ahead and make and final sanding to the head then I move on to spackling all the blemishes away. Now you don't have to do what I did, and cover the whole thing in spackle I only did that because I wanted to insure that it would be even, and close to blemish free.
11) The Spackle will take about a whole day to dry in ideal weather conditions.
12) The next step is to pretty much sand it down till it's all smooth. Of course the way I did it you'll end up with a few small air pockets here and there. All you need to do is respackle those spots and let them dry, and re sand to a nice finish.
13) Once I was satisfied with the sanding and the spackle was 100% dry I moved onto painting the first coat of paint. I used Acrylic paint for this because when it dries it's more flexible so it won't chip or crack as easy.
14) I applied about 3 coats before I felt it was a good enough.
15) Once the yellow was done drying which took about a full day to dry I then went ahead and drew on the face. I actually made pre cut out stencils for this to make it as even as possible. Also wait for the paint to dry before applying any outlines like I did with the eyes and mouth.
Hidden steps) I forgot to take a picture of this, but it's pretty much how I did the eyes. I cut out a small piece from inside the head that was wider than the eyes. I did this so I can construct a ring I can put some cloth over for the eyes and have a way to fasten them inside of the head with Hot glue and Spackle.
Materials used for the eye cloth: I pretty much just used some black stockings. They work wonders if you want to be able to see out of your costume, but not let anyone see your face inside.
Final Step) Make sure you seal the paint with a lacquer to prevent paint chipping or damage to the paint. Also helps it become weather proof. ( I used some spray can stuff that you would use to seal wooden decks or plastic furniture). This will also help achieve a semi plastic look.
If my steps are a bit confusing I'm sorry. Just feel free to ask any questions, and I'll be happy to answer them.
Finished product:
Related content


Comments: 15

👍: 0 ⏩: 0

Hi! I'm so sorry to ask abou something that you did so long ago... But may I ask about the patterns you used? Can you maybe give me an idea about what you made them look like?
👍: 0 ⏩: 0

What did you use to cut your pieces and how thick are your foam sheets?
👍: 0 ⏩: 0

Thanks for the idea! But I need to think of a different material to use. You used fiberglass insulation (it can cut up your lungs if you breathe it in). I might try foam blocks or something
👍: 0 ⏩: 1
Nvm, it looks instead like you used insulation foam board (rectangular, and not fiberglass) and you cut out individual discs. Is this correct?
👍: 0 ⏩: 0

well i guess this will help me, what materials do i need?
👍: 0 ⏩: 0

Could you provide a quick list of supplies? This looks awesome and not too difficult!
👍: 0 ⏩: 0

My peripheral vision isn't the best, but I can see everything clearly in front of me just fine. If you require more sight, then all you need to do is stretch the stocking material more, so it will stretch out more and allow you to see out of it easier, but it will also cause the stockings to be thinner, which then leads to people being able to see inside the head easier.
👍: 0 ⏩: 0

also how much did you spend on this?
👍: 0 ⏩: 0


Aah, I was wondering how you'd done this. I'd been looking around for cosplays of Frank with the Servbot helmet and an idea how to make it. Couldn't imagine how you'd made it out of insulation foam, wouldn't have thought to do it like that.
Your finished product looks very nice. Hope it is/was well received!
👍: 0 ⏩: 0

Whoa, great job makin' the head! Love the step by step process!
👍: 0 ⏩: 1
Thanks man! Yea I figured I would do a step by step even if it was my first time making one, but hey it didn't come out as bad as I thought it would (Smile)")
👍: 0 ⏩: 1
Psssh, it came out incredible!! ^^
👍: 0 ⏩: 0