HOME | DD
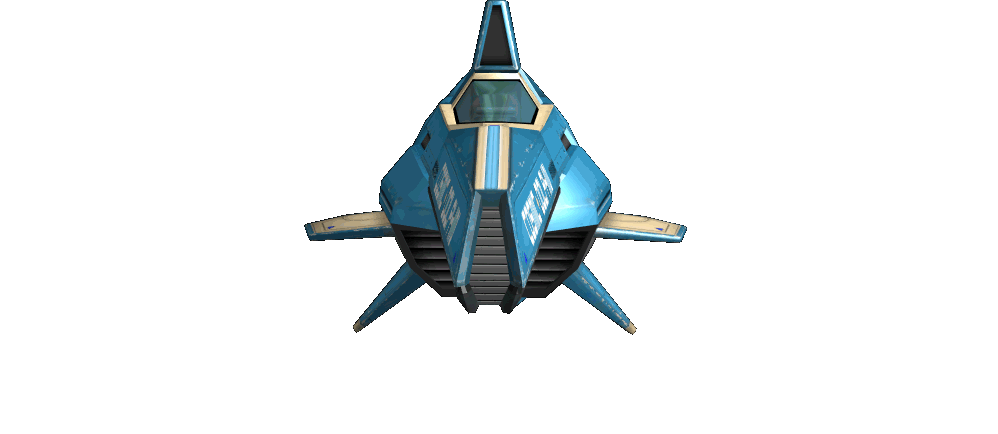
 PandaProduction — Falcon Interceptor

Published: 2012-05-14 17:32:24 +0000 UTC; Views: 664; Favourites: 6; Downloads: 9
Redirect to original
Description
Falcon Interceptorattempt at making a low-poly vehicle asset, a la AirMech (for inspiration)
1142 tris
1024 Diffuse Map only
Related content


Comments: 13


Not bad!
Really neat design... and the model is quite good as well.
👍: 0 ⏩: 0

The style of it really matches the designs from Carbon Games, really digging the coloring! What program did you use for this?
👍: 0 ⏩: 1

Yay! We're resurrected!
Modeling in Maya, and painting textures in Photoshop.
I would love to do specular, and maybe some normals (though I doubt I could do it for such a low-poly intended model), but I don't know which free program could help me on that endeavor easily.
👍: 0 ⏩: 1
I hear xnormal is pretty good with normal mapping and its free, but never used it myself to be honest. The only 3D program I know is Zbrush, so whatever I can suggest for 3D may not be the most efficient option
👍: 0 ⏩: 1
I would love to get Zbrush, but not a pirated copy, though talking to a LOT of people, they're just like "pirate it." (450 USD for student license)
Zbrush and Mudbox handle spec maps right?
👍: 0 ⏩: 1
Can't speak for Mudbox (never used it) but yes, Zbrush does do Specular maps (though never used that, too, as I've been practicing zbrush on a computer that can't handle that function")
I bit the bullet some years ago and bought zbrush at full price: no regrets. What I absolutely love about Pixologic is that they give you Zbrush upgrades for free after you purchase one of their editions. No idea if its the same with Student editions, but just throwing it out there.
I've had mine since 3.1 and now using 4r2 thanks to their email notifications that basically say 'new edition is out, here's a link and your upgrade code!' Their community is top notch, tools are provided for modders to adjust the program (that generally end up in the next edition) and there's an ongoing set of books by Scott Spencer that are the most helpful tutorial resources I've ever run across for any program.
👍: 0 ⏩: 2
NOOO! I imported the asset into Unity, and I got backface culling issues and normal issues like none other!
👍: 0 ⏩: 0
Know any good "Intro to Zbrush" online tuts? (Or are all of them good ")
I think I'm gonna do a 30 day trial and see what I can whip out.
👍: 0 ⏩: 1
Best I can suggest is watching Scott Spencer stuff on youtube: there's a 6-part rundown on headsculpting uploaded by imaginefx, and the entire series is roughly 4 hrs long, so it's gnomon-level detailed in its presentation. Zbrush was made with the intent that one of your hands is always holding a stylus, so hotkey placement and general interface interaction feels more like Photoshop than it does a normal 3D program. As for websites, I'm not sure what to suggest aside from the Pixologic forums.
As a general understanding of what you'll probably be messing around with a lot:
-Creating a new model is generally the first and most annoying hurdle you'll go through. On opening Zbrush, a menu of pre-created assets will drop down: just double click on something or click-and-drag to the left and right to see what other models you can play with.
--If you close this dropdown menu, the method to placing an asset involve clicking on the 'Load Tool' Button on the right-hand panel, or clicking on the 'Tool' Button (the big button with an image on it, usually a sphere), clicking-and-dragging a size on the canvas, and IMMEDIATELY clicking on the Edit button at the top of the screen. If you start to draw something on the canvas without clicking on the Edit button, you make another asset and the previous one becomes uneditable. If this happens, just click Document>New Document to clear the canvas.
-Bracket keys increase/decrease the size of your brush the same way as it does in photoshop
The brushes you're probably going to be use the most are: Claytubes, Clay, Standard, and Move (generally in that order from personal experience, claytubes and clay just have a more natural feel than standard)
-Alt key is used a lot: when you stroke your model its generally an additive process, however holding the Alt key down while stroking the model is the opposite, so its used to make your indents.
--You rotate the model by clicking-and-dragging at any section outside of the model, however holding down the Alt key and then click-and-dragging the empty space around your model will cause you to pan your view instead.
---To zoom in and out of your model, hold down the Alt key, click-and-drag outside of the model, and while holding down your left-click/keeping your stylus pressed down on the tablet, let go of the Alt key. It sounds confusing, but its intuitive and seemless in practice.
-holding down shift key is the hotkey for the smooth brush: the best way I can describe it in its use as a sculpting tool is that its like the dodge tool on a grayscale image.
-Zbrush brush intensity is, by default, set pretty high. This is really noticable with the Smooth brush as it deflates your details to nothing really quickly. Set it (along with other brushes) to a Z Intensity of 10: the slider for Z Intensity is where the 'Flow' Slider is on Photoshop, and changes depending on what brush you have selected.
-If your model suddenly disappears, its generally due to a glitch while moving around your viewpoint. Pressing F will reset your viewpoint.
-Your model will start off in its lowest subdivision level: to increase subdivisions, click on 'Geometry' under the Tool menu on the right side of the screen: this will reveal a dropdown. Click on 'Divide' in this menu and your model will increase in planes exponentially.
--When you do this for the first time, a slider becomes active at the top of the 'Geometry' menu titled 'SDiv,' which gets set to '2SDiv' and increases in number each time you click on that 'Divide' button. This slider allows you to change what subdivision level you want to work on: Many times, when you're working on your model at a higher subdivision level (like 4 and up), your brush strokes make weird movements and indentations, or build up in very unnatural ways. The reason for this is that the base model, the '1Sdiv' of the model, has the planes at very bad places, so its good to go down to lower SDiv levels and move things around.
-For saving, click on the 'Save As' button on the right hand side of the UI: this saves the model as a .ztl file. You can also choose to export as an .obj so the model can be messed with in another program like Maya. You can also import an .obj with the Import button, if you already have an asset you want to mess with.
Sorry for the long rant, but this is generally the basics of Zbrush in a nutshell. There's a lot more to the program, especially when you want to optomize your base mesh or going through the usage of ZSpheres for base model sketching and creation, but hopefully what I said helps and isn't confusing.
Happy sculpting!
👍: 0 ⏩: 2
Oh my gosh. They actually ended the ZBrush trial . . . non-existent. NOO!!!!!
[link]
👍: 0 ⏩: 1
Aw nuts!
Well, you can always ask those around you for a try
All things considered, the general interface has remained practically the same since 3.1, from how its organized down to how the UI is colored, its all pretty much a visual carbon copy. The jump to 3.0 to 3.1 and up, though, that's the big one. Certain tool locations, as well as how coloring is used in the program, is completely different, imo. Zbrush during this period felt more like a tool that was eager to stretch its 2D parts as much as its 3D, whereas now it's mainly a 3D program that can jump back and forth with Photoshop and has certain addons that are specifically for painting.
So if you can find means for 3.1 and up, that's as good of trial as any.
👍: 0 ⏩: 0