HOME | DD
 periwinkleimp — Pattern - Claudia the Vamp
by-nc-nd
periwinkleimp — Pattern - Claudia the Vamp
by-nc-nd
Published: 2011-03-07 23:50:46 +0000 UTC; Views: 11011; Favourites: 206; Downloads: 958
Redirect to original
Description
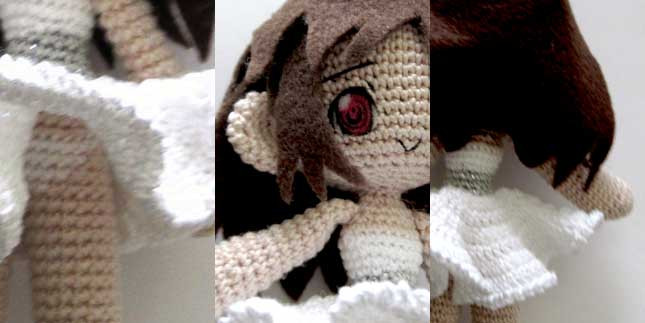
Let me apologize for the picture quality for this pattern. It's hard to photograph and write at the same time. Hopefully they're clear enough or that the description would help it make sense.I'm going to sell patterns in the future but since I'm self-taught, I'm not sure if a lot of the methods I use are common knowledge. This is a way for me to see if it all makes sense and what I need to do to make the instructions more clear. I used an instruction set similar to most Japanese patterns because they're easier to follow. The written out version has always been harder for me since I tend to lose my place.
This pattern contains some useful methods you could apply in other areas such as:
- Using iron on fabrics
- Creating a felt wig cap
Feedback is deeply appreciated. If you like this pattern or use it, please fave and leave a link in the comments for your version. I love to see other people's version of my dolls. Don't hesitate to send me a note or leave a comment here if you need help with the pattern.
Enjoy!
Edit: I was using Open Office to make the PDF and found that some rows went missing. All the necessary info is added back in along with some minor edits.
Correction 8-26-2011:
Big thanks to
Torso beginning to form underwear
Row 1: sc (join)(white) 4 sc, (skin) 9 sc, (white) 4sc, (skin) 9sc, (white) 4sc. sl to close the round.
Row 2: sc (join)(white) 4 sc, (skin) 7 sc, (white) 6sc, (skin) 7sc, (white) 6sc. skip the sl stitch from previous round on this row.
Row 3: sc (join)(white) 4 sc, (skin) 5 sc, (white) 8sc, (skin) 5sc, (white) 8sc
(Decrease based on shaping the underwear)
Row 4: (entire row in white) 3sc, sc2tog, sc, sc2tog, 8sc, sc2tog, sc, sc2tog, 9sc (26sc)
Row 5: (entire row in white) 3sc, sc2tog, 9sc, sc2tog, 10sc
Related content


Comments: 57

Is there any way you can do a video tutorial of how to put the legs together? (Or a video tutorial of the whole thing.xD)
I can just not get it in to my head how do do it!
Love the doll and love your work.
")
👍: 0 ⏩: 1

Sure! I've been meaning to but I don't have proper video equipment. T_T
👍: 0 ⏩: 1
Aa! That sucks.")
Can you use your Phone or just your webcam?xD
👍: 0 ⏩: 1
I have neither available.
This copy of the pattern is a little updated but there's some updated illustrations and instructions available here: [link]

👍: 0 ⏩: 1
Thank you so much for your time.
I will give it a try!
 (Smile)")
👍: 0 ⏩: 0
Thanks for trying it out!
👍: 0 ⏩: 1

no ty for the pattern
👍: 0 ⏩: 0

Hey! I'm wondering if you have any suggestions on getting the doll finished with all the stitches facing the same way? My head and arms came out fine, but since I had the legs turned right side out before I joined them, the whole rest of the piece going up is wrong side out.
👍: 0 ⏩: 1
I'm not understanding very well.
Based on the photos I have for this tutorial, all my stitches are facing right side out. All the pieces are worked that way. Most of the ending stitches should land at the back of the finished doll.
Were you reversing the stitches to have the wrong side facing out after you joined them?
Could you give me a photo for reference so I have a better idea of what you'd like to do?
👍: 0 ⏩: 1
[link] This is where the legs are joined to the rest of the body. When I made each leg, I turned them and worked them with the right side facing out from the beginning, but when I joined the yarn to make the rest of the body, all the stitches from there are worked wrong side out without a natural place to sort of flip the piece so they're right side out.
👍: 0 ⏩: 1
Scroll down to the update where there's diagrams on how to do the leg join - [link]
You should have the right side facing you at all times, even after the leg join. Let me know if the illustrations are clear. I'll try to do a video if it isn't.
👍: 0 ⏩: 1
I think what might have occurred is that when I joined the legs, I went around backwards because I crochet left handed. So the join made the right side face away from me instead of towards me.
👍: 0 ⏩: 1
That makes sense. That's a really pretty doll btw, do you have a photo of her finished somewhere? I wanna see!
👍: 0 ⏩: 1
[link] I just finished her today actually. I'm thinking about redoing her mouth with some actual embroidery thread though. The pattern is really excellent, it was easy to follow even though I made a silly left handed mistake.
👍: 0 ⏩: 1
Yup, using embroidery thread is usually best. It looks like it's drawn on and less bulky.
Thank you for your input! It really helps me write patterns better. I need to watch out for lefties now! I don't know why that never occurred to me!
👍: 0 ⏩: 0


I think the link is wonky since it led to your DA page but if you're referring to the power puff looking doll, yes, it's absolutely adorable. =3 I like that horsey too!
I really ought to work in that scale but my wee fingers don't like it.
👍: 0 ⏩: 1

Defiantly the power puff girl doll. Thank you so much. It's really hard to get them to stay stable at that size. I just took a lot of time to do it, so it wasn't so bad on my hands. I was thinking about making myself something next.
👍: 0 ⏩: 0

Alright I finished the first doll
[link]
Thank you very much for posting the pattern. I think this will be one of many more dolls to come.
👍: 0 ⏩: 0

Wow!! Thank you so much for this! It's going to help me so so much!
👍: 0 ⏩: 0

Thank you for adding this here! I have recently decided to start this hobby for myself, but I'm a novice at crochet. Did you have a lot of skill beforehand? I can't wait to get started!
👍: 0 ⏩: 1
I've been crochetting since I was in grade school. Despite many years of experience, I don't think I qualify as "advanced" in crochet. If you are starting out, amigurumi is a very good place to start. You only need to know the basics and you essentially do just the single stitch for 95% of the patterns out there.
Let me know how the pattern works out for you. I like to get feedback from beginners and advanced levels to know how I can write these patterns better.
👍: 0 ⏩: 0

my mother's name is claudia, and her hair is actually that colour!! (so ironic!!!)
👍: 0 ⏩: 0
So I am working on this pattern and I got to the part with the underwear and I was having trouble with it until I realized that it says there should be 30 sts in the round but the numbers add up to 32.
👍: 0 ⏩: 1
I've added photos to the pattern here: [link] Let me know if the illustrations help or if you need more help. I'll figure some way to record myself while I'm making this round.
The stitch count is also there so that you can revise your work however you need to without relying on my directions. You could go back and probably do a decrease on the front and the back of the first leg torso round to remove those extra stitches. If it's possible, please show me a photo of your first torso round. Thanks in advance!
👍: 0 ⏩: 1
I'm sorry I meant in the pattern it says on row 2 after joining the legs Stitches 30 then in the notes it says (white) 3sc, (skin) 7sc, (white) 8sc, (skin) 7sc, (white) 7sc and that adds up to 32 stitches. So I was a little confused and row 3 also adds up to 32 stitches.
👍: 0 ⏩: 1
Thanks for that. I must've been drunk when I wrote this down. I thought I double checked it as I was working this pattern.
Could you try these instructions?
Torso beginning to form underwear
Row 1: sc (join)(white) 4 sc, (skin) 9 sc, (white) 4sc, (skin) 9sc, (white) 4sc
Row 2: sc (join)(white) 3 sc, (skin) 7 sc, (white) 6sc, (skin) 7sc, (white) 7sc
Row 3: sc (join)(white) 2 sc, (skin) 5 sc, (white) 8sc, (skin) 5sc, (white) 10sc
👍: 0 ⏩: 1
ok so I followed the new rows and this is what I came up with
back [link]
front [link]
👍: 0 ⏩: 1
Let me know if this version works out for you.
Torso beginning to form underwear
Row 1: sc (join)(white) 4 sc, (skin) 9 sc, (white) 4sc, (skin) 9sc, (white) 4sc. sl to close the round.
Row 2: sc (join)(white) 4 sc, (skin) 7 sc, (white) 6sc, (skin) 7sc, (white) 6sc. skip the sl stitch from previous round on this row.
Row 3: sc (join)(white) 4 sc, (skin) 5 sc, (white) 8sc, (skin) 5sc, (white) 8sc
(Decrease based on shaping the underwear)
Row 4: (entire row in white) 3sc, sc2tog, sc, sc2tog, 8sc, sc2tog, sc, sc2tog, 9sc (26sc)
Row 5: (entire row in white) 3sc, sc2tog, 9sc, sc2tog, 10sc
Thanks for trying this out for me.
👍: 0 ⏩: 1
Yes! This one works. Thank you and You are very welcome.
👍: 0 ⏩: 0

WOW!!! This is so helpful!!! Thank you so much for putting this up/1
👍: 0 ⏩: 0

About how big is it supposed to come out?Because I started with the head and it just seems like it's going to be huge....
👍: 0 ⏩: 1
I used size 10 crochet thread which is normally used for making lace crochet and a 1.25mm hook. It's really small. The resulting doll from this pattern is about 5 inches tall.
If you're using regular yarn, she will end up being big. Probably around 8-12 inches tall?
👍: 0 ⏩: 1
Okay, thanks. I stopped working on the head and went on to the feet, and they came out big too, so as long as it's all big it's good. Thanks!
👍: 0 ⏩: 0

This is adorable! I look forward to trying it out. ^^
👍: 0 ⏩: 0


I've made her!
Working with your pattern was a delight!
Thank you so much for submitting the pattern!!!!

👍: 0 ⏩: 1
Hurrah! Please post pictures!
👍: 0 ⏩: 1
I have ^-^ [link]
I hope you like her.
👍: 0 ⏩: 0

Of course! Just skip the skirt instructions on Row 7 when you're working the torso.
👍: 0 ⏩: 1
I faved it....after five minutes I was all like..."wait...wasn't there the word 'pattern' in the title?!"
I downloaded it and...your pattern are amazing!
I'll definately try them!!!
👍: 0 ⏩: 1
lol, let me know what you think and if it makes any sense! ^^
👍: 0 ⏩: 1
Of course I'll do ^-^
And I try making a Kyubey...it's so amazing cute!
👍: 0 ⏩: 0


this looks reeeeally good!! the way you've done the eyes is amazing - they're so detailed!!
👍: 0 ⏩: 0
| Next =>