HOME | DD
 pichuspokeball — Basic Tips wif an eye- GIMP
Published: 2014-02-15 05:51:16 +0000 UTC; Views: 1184; Favourites: 26; Downloads: 0
Redirect to original
Description
SUPER DUPER DETAILS") NOT JUST FOR THIS PIC, LEARN ABOUT OTHER TOOLS AS WELL
NOT JUST FOR THIS PIC, LEARN ABOUT OTHER TOOLS AS WELLLOOKS LIKE A LOT, BUT ONCE YOU GOT IT DOWN ITS THE EASIEST THING ON EARTH. LIKE MATH. I JUST WANTED TO BE OOBER CLEAR, FEEL FREE TO ASK QUESTIONS
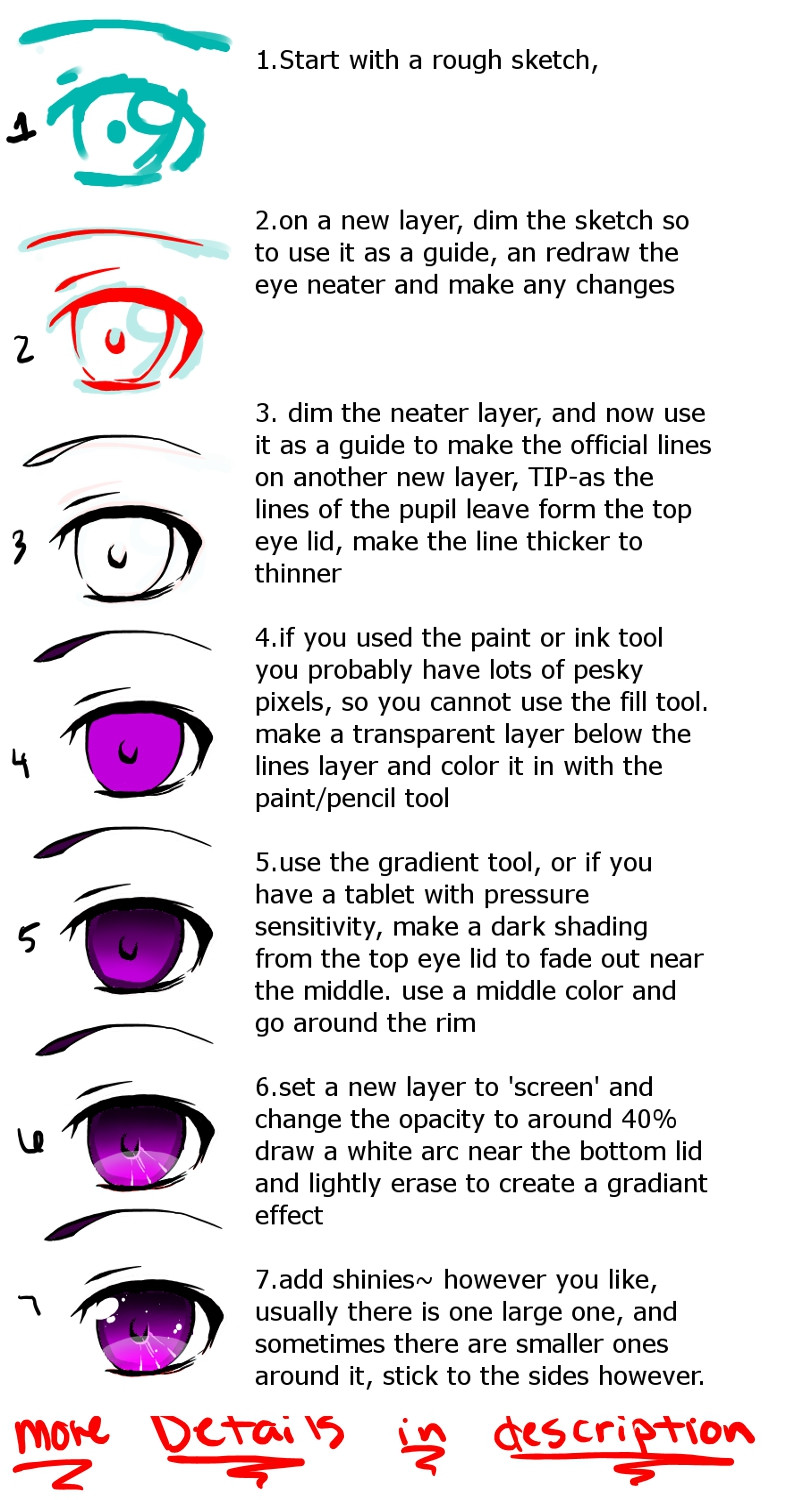
 1.just a rough sketch, i suggest use a transparent, or see through layer for each of these, its much easier to add backgrounds and such afterward if you dont have to worry about getting around the white. find the layers tool, normally located on the right of the screen its a floaty box labelled layers, channels, paths, undo here you manage your layers. yours will be set to Mode: normal the arrow to the right of 'normal' changes this setting. below that says Opacity thats how see through everything on that layer is. 100% is solid, 0% is invisible. you will only edit whichever layer is currently highlighted, add layers using the create new layer button on the little line of buttons directly below the layers, it looks like a paper with a folded edge.2.change the Opacity of the sketch layer low enough for it not to be the focus, but enough to use as a guide. create a new layer and make a cleaner version of the drawing. add any changes or details but if this is not your final lines then dont worry about gettin cray cray with the details. 3.draw official lines, normally in black. do this on a new transparent layer, and dimming the red layer, so basically just repeat step two, but this time make the details fancier cause these are THE lines. the upper lid is usually thicker than the bottom lid. add an extra line on the side of the eye where it curves upward just a hair away from the part of the eye, this adds dimension, as if you can see their water lines. also, when drawing the curved top of the eye lid its good to have the line go off a little bit before it turns downward, as you can see the top of the eye has a tiny line that fallows the arc until it gets a little over halfway and then it detaches, this can be seen as an eye lash, or however you see it. draw a smaller arc above the eye to show the lid folding, dont draw it to close or the eyes appear wider, to far and they appear to have a huge eye ball.4. make a new layer, transparent. you can erase the guide layers, or the first two that we used as guides. keep the black lines. if you used the ink tool, the paint tool or the air brush tool you'll have some nasty pixels to work around, no fill tool for you. on your new layer, move it below the black lined layer by dragging or by using the green arrows beside the new layer tool. use any of the drawing tools and color it in, you'll see that the black lines are not affect by this, so its pretty easiy, just make sure to stay inside the lines.5.use the color select tool, its near the top of the left hand tool box, simalr to the layers floaty box. it looks like a little orange hand poking at a blue red and green boxes. select that tool and click on the color of the eye, make sure you're on the colored layer, not the lines layer. this will select only that color on that layer, this is also helpful when coloring a more complicated piece and you're like, 'oops, that color sucks but i used it all over the place D:' then just color sect it and you can make changes to only that color much easier~ anyways, select the color and you can use the gradient tool, (looks like a box with a sideways white to black coloring) or if you have a tablet you can do this also, take a much darker shade of your color and make it go from darker at the top to lighter at the bottom. with the gradient tool, you'll have to have the darker color be the main select, and the original color that you need it to fade into as the second color. just click and drag, a little line will appear in the direction that the colors would go. by middle color, i mean select a color from the eye thats not entirely light or entirely dark, and draw evenly around the rim even if the bottom of the eye is cut off at the bottom, go around it where the pupil meets the bottom lid.6. use a much lighter shade and add accents to the eye however like, i used simple lines. sometimes less it more. aslo there is now a light arc that goes across the bottom, first i made a new layer and moved it to the top, i then drew a simply white arc over where i wanted it, and changed the mode: normal: to mode: screen and changed the opacity to about 40%. using the earser i made a gradient effect, so that the bottom of the pupil wasnt as white as the top of the arc, this makes the eye appear shinier, if you like. change the opacity as you see fit, make the arc more noticeable or just an accent. (setting the mode to 'multiply' and using a dark blue or purple, and lowering the opacity is really good for shadows) 7.something else you can do, that i do a lot, is select the dodge/burn select dodge, and set it to highlights, make the bottom of the eye lighter and the top darker. set it to burn for darker. then add shines. there is usually one big or main shiney, and sometimes an oval-ish one slightly connected or near the larger one. if you want to get all fancy you can add more smaller shinies, adding a ton of tiny ones can make it like its sparkling, but dont overdo it you can even shape them to give it more personality, make hearts or stars even little rectangles instead of circles can make a huge difference.
Related content


Comments: 2

This really helps me, I'm new to gimp and was looking for simple tutorials
👍: 0 ⏩: 1

im so glad it helped you!
👍: 0 ⏩: 0