HOME | DD
 poojipoo — Naruto vs Sasuke II - Quick tutorial
#animated #animation #anime #explanation #fight #gif #sasuke #steps #tutorial #vs #naruto
Published: 2014-08-31 17:47:47 +0000 UTC; Views: 88267; Favourites: 1519; Downloads: 435
Redirect to original
Description
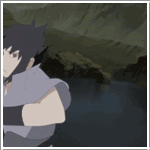
I've finished a bunch more scenes from my Naruto vs Sasuke animation and figured I'd post a short shot with a little step-by-step process explained! It's not much, but I hope it helps.
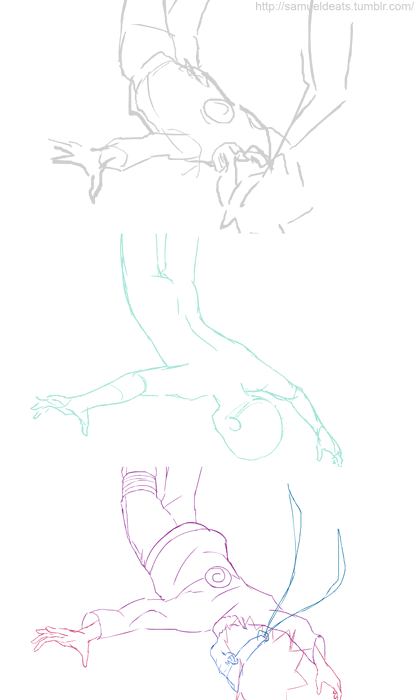
As you can see above, I have 3 separate animations at different stages of the process. Here’s a breakdown:
[1] I always start out with a scribble test to get the general idea of what I’m doing. It’s ugly, it’s dirty, but it’s a very important first step! You never want to start out straight in to detailed drawings with animation. Make sure you’re happy with the motion first, then worry about good drawings.
[2] I then did up a naked mannequin rough to figure out what I’m doing with the body. No details on the face or clothes yet, just want to make sure I have my general proportions and anatomy where I want them. I also worked out a lot more of the motion. I made tweaks in the final, but I’m setting things in stone here.
[3] Finally, I dress it up, tie it down. If you look closely, different parts of Naruto’s body are different colors. This is because I worked in passes. In cases with this many moving parts, it’s best to focus on one thing at a time for the best motion. First, I started out with his clothes. This allowed me to experiment with how I had the cloth flapping around in the wind without worrying about the rest of what’s going on. After that, I worked out the hands and face. Getting the volumes of the face right can be a bit tricky when turning it in space, but there’s a few tricks I might do another little tutorial gif on in the future. Finally, I did the hair then bandana in a similar fashion as the clothes.
Hope that’s helpful to some folks! Let me know if you have any questions!
Related content


Comments: 84

👍: 1 ⏩: 0


Red-sprites [2017-08-29 14:03:42 +0000 UTC]
Never mind, I looked at the files speculations and read that it was '24-25'fps. I will just say that it is 24 because that is "Kosher" for animators.
👍: 0 ⏩: 0


Wooow! This is so cool!
but I have two questions bothering me.
Do you recommend to re-draw every frame even if is slightly different? Like for example in a simple dialogue only the jaw goes down when speak. I'm not sure when you should "recycle" drawings for saving time without it feels unnatural.
And: any tips for making the clean-out lines straight and smooth? Sometimes I have problems with the thickness because of the pen's pressure when joining lines and the animation looks too sketchy...
thank you a lot for this tut!
👍: 0 ⏩: 1

Hi there! Thank you for the kind words!
To answer your questions: 1) NOPE! Unless you're doing Disney style traditional animation with $100,000,000 budgets, you're probably going to have a lot of held drawings. That means, you animate characters in to a pose, then hold them there for a while. For a lot of dialog sequences, it's recommended that you only animate the mouth (and likely jaw) once you get in to a held position. How often you "recycle" or reuse drawings depends largely on the budget of the project. For super low budget projects, reuse becomes a necessity. For higher budget projects, you can do more and more unique drawings and overall animation.
I often work in Flash, so for clean lines, I can use smoothing tools to fix up my janky lines. In Photoshop, I generally make broad, quick strokes to counteract the shaky sketchy lines i might get, then erase away any overlapped lines I might have from overshooting.
Hope that helps some!
👍: 0 ⏩: 1
ohh, I see that makes sense!
Thank you for the answer, you saved my sanity jaja xDDD
I'll try to do that and put it into practice! Again thaaanks~
Keep doing that great job, I'd love to see more!
👍: 0 ⏩: 0


Oh! This is great, I'm trying to learn to animate myself. I have a hideous habit of not properly fleshing out my skeletons before I get things going and then sit there scratching my head like "How comes this doesn't look quite right?" Because you didn't lay a proper foundation and now you wanna know why the house is tilted you dummy! XD
👍: 0 ⏩: 0


Very awesome work sir !, Thank you very much for explaining to us the process.
👍: 0 ⏩: 0

Haha, I will try to at least have a clip or two in full color some day.
👍: 0 ⏩: 1

Ok waiting  (Smile)")
👍: 0 ⏩: 0

")

Part 3, is a personal problem for me and hearing your reason why you have them different colors sheds a whole knew light on how to breakdown properly. Your clean up is simply fantastic by the way.
👍: 0 ⏩: 0

Very interesting and helpful, thanks! It's nice to see the scribbly first pass of the animation. I feel that it's something I really need to work on—to focus more on the motion than the drawings themselves. Reminds me of some of Glen Keane's rough animations, such as: 25.media.tumblr.com/585adce93c…
👍: 0 ⏩: 0

How are your lines so thin and neat
I'm just getting into flash animation and i have no idea where to start, this tut helps a lot btw
If you have any tutorials that i can learn from like interface tricks and stuff, i would love to take them from you.
im guessing its a flash aniamtion, if not i would like to know what program you use : 0
👍: 0 ⏩: 0

It's awesome! Could you tell me which software you used to do it please?
👍: 0 ⏩: 0


Thank you very much. Hope more tutorials from you!
👍: 0 ⏩: 0


Good work, it be nice if you did more tutorials. Did you put more in-betweens in your final animation? It looks smoother.
👍: 0 ⏩: 1
I totally plan to! I've been swamped with some pretty bad crunching at work lately and haven't had a chance to put anything together unfortunately. As soon as the new year hits, though, I'm all over it!
I did do some adjustments in the final for sure. I can't remember what specifically, but I tweaked the timing and probably did an inbetween here or there, yup.
👍: 0 ⏩: 1
That's great, I like to consider your tutorials for my group page. There is so few tutorials on creating anime style animation out there in English.
Thanks for confirming about the adjustment, now I can stroke my ego a little for picking that up lol.
👍: 0 ⏩: 0

Thanks for doing a quick tutorial, someday I should try to do some short animations
👍: 0 ⏩: 0

This is really helpful! Do you do each detail in a different layer or all the details on the same layer?
👍: 0 ⏩: 1
I break the details down in to segments. If you look closely, I've colored different parts of Naruto to keep track of each segment I'm working on. So, his clothing is one, then his hands two, his face three, hair four, and finally his bandanna. Depending on the shot, I may break it down less or further than that, but for the most part this level of deconstruction works well.
👍: 0 ⏩: 1
Hey, thanks for the reply. Another question: If you were to clean this up would you do this all in one layer and in one go, or separate the clean-up process into different passes again?
👍: 0 ⏩: 1
That also depends on the shot, but it's more likely I would break things in to layers during clean-up than even in roughs. Particularly in the case of subtle movements. You don't want your volumes to shift around too much during a subtle motion; it's much easier to tell when something is off when it's moving slowly. So in those cases, it's better to go in passes, I think. It also lets you focus on a minor detail at a time, or break some details in to layered parts to easy chop them apart and move them around. During a high-action shot, though, I might just go at it in one or two layers. Again, depending on the shot.
👍: 0 ⏩: 0

Which adobe flash do you use? Like one that is reasonably priced! I want to animate so bad, yet I can't find out a good tool to use! Also, I don't have any money.
👍: 0 ⏩: 1
I'm working in Flash CS6 here, but I also use CC at work quite often. I think you can get Adobe Creative Cloud for fairly cheap if you're a student, which gives you access to Flash and a bunch of other cool software to play with.
👍: 0 ⏩: 1
Thank you so much! You're the first person to actually give me some useful information!
👍: 0 ⏩: 1


wow .... and i thought it was easy to make short animation clips... how wrong i was
👍: 0 ⏩: 0


Yes, for sure! I got a little swamped with work so I had to take a little break from my side project, but once I'm back on it I plan to use some future scenes for tutorials.
👍: 0 ⏩: 0

H-how long does it took until you get this...comfortable?
👍: 0 ⏩: 0


Wow the process, I wanted to see how you developed this through your animation techniques from bases to finish. You are quite brilliant.
👍: 0 ⏩: 0

| Next =>