HOME | DD
 QTMarx — Convert a brush in Clip Studio Paint to an eraser
by-nc-sa
#csp #eraser #tutorial #clipstudiopaint #clip_studio_paint #clipstudiopaintbrushes
Published: 2014-03-14 18:23:48 +0000 UTC; Views: 23140; Favourites: 72; Downloads: 83
Redirect to original
Description
NEW VERSION: Since DA stopped supporting SWF, you can't see the old video. If you came here looking for how to create a dedicated eraser from an existing brush, a video outlining the process can be seen by clicking on the link to a new DA post below:BELATED EDIT: Okay, call me a dumbass (go ahead, the comments are right down there) but about a year after I made this... which is some time ago now!... someone pointed out to me that it's possible to paint with transparency in CSP, which was news to me at the time. I'd come from about 20 years of working with Photoshop and to the best of my knowledge, that's still not possible in PS. Anyway, the upshot of this is, if you simply create a quick switch from paint to transparency, you can instantly turn any brush into its own eraser and back again without going through the steps below. I've got the left-click on my Wacom pen set up to toggle paint/transparency. THAT SAID, if you still want to create a dedicated eraser brush with very specific characteristics, the steps below still apply and will enable you to do that. Thank you, and good night.
I started using Clip Studio Paint a couple of months ago because someone recommended it to me as the next level up from SAI. I've loved SAI a bunch but there are just so many things to love even more about CSP that I hardly know where to start.
One of the thing that's bugged me, though, is how chintzy the erasers are, especially frustrating when you're working with masks. But I came to a couple of realizations in the past day or so and I wanted to share them in case anyone else is considering moving over to CSP (or Manga Studio; I think they're pretty much the same thing), or else already has but is having the same problem.
So the video shows how it's done. There might be faster ways of doing this but I only just stumbled upon it today so... it is what it is. Here goes...
[Note that this seems to work for some tools, but not every drawing tool gives you the option to change its combine mode, which is central to this.]
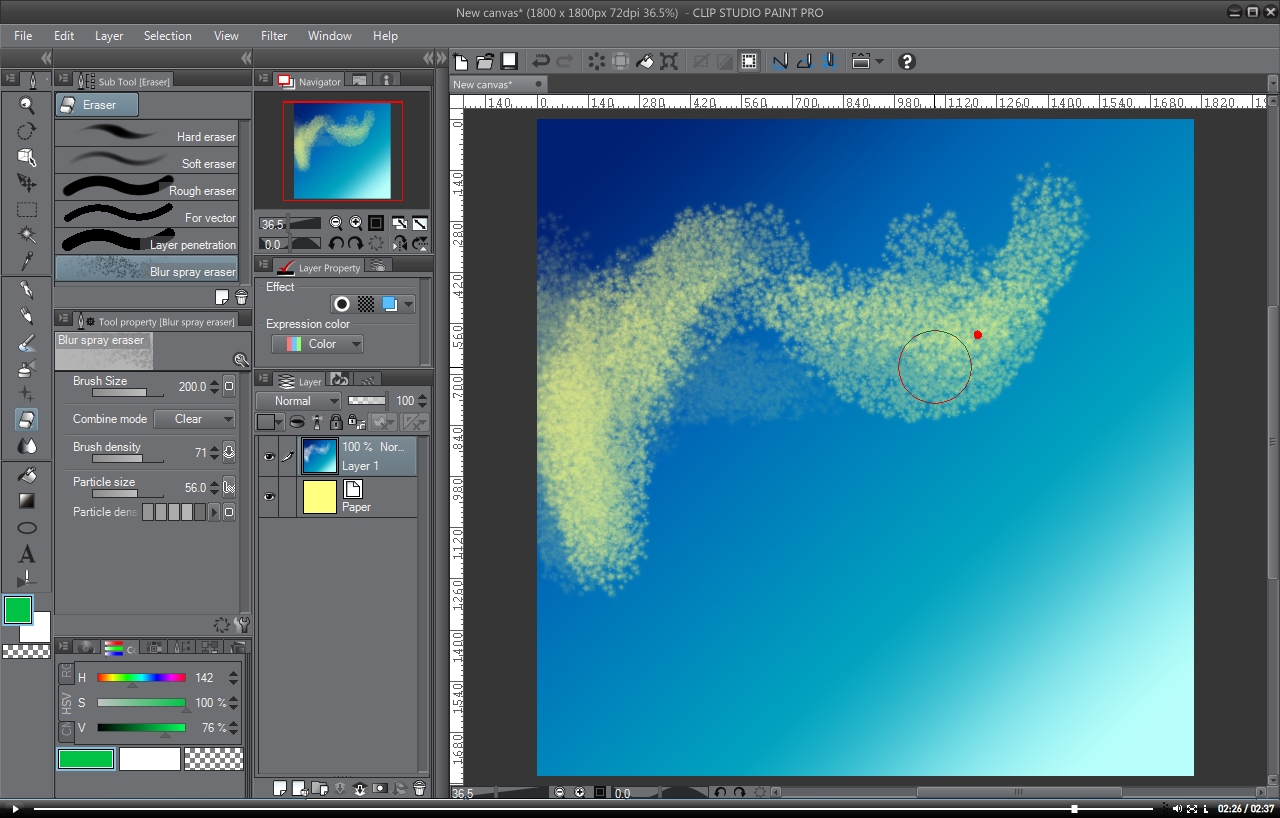
1) Choose the tool whose characteristics you'd like to use as a brush (in this case, I chose Blur Spray in the Airbrushes tool set).
2) Duplicate the tool by dragging it down to the the Create copy of currently selected sub tool icon.
3) Rename the tool (basically, keep the name and add "eraser" to the end of the name).
4) Change the tool icon to Eraser.
5) Click OK to close the dialog.
6) Set the tool's Combine Method to "Clear".
7) Optionally, you can lower the opacity of the tool so that you can use it to build your erasure in levels, rather than 100% all-or-nothing.
8) Click the Sub Tool panel's menu tab and select Export sub tool.
9) Save the tool in a place you'll be able to find it, and with a name that will clearly identify it.
10) Delete the tool from its current location (you don't want it there; you want it in the erasers palette).
11) Choose the Eraser tool.
12) In the sub tool panel, click the menu tab and select Import sub tool.
13) Navigate to where you stored the new eraser brush and select it.
14) Click OK.
You now have an eraser with the characteristics of one of your brushes. Doing this means you don't have to keep changing the brush's Combine Method back and forth from Normal to Clear.
Related content
Comments: 16

👍: 0 ⏩: 1

👍: 0 ⏩: 1

👍: 0 ⏩: 1

👍: 0 ⏩: 0

👍: 0 ⏩: 0

A much simpler method of converting a brush to an eraser: Switch the color to Transparent Color (hotkey: C). It instantly puts the brush into Erase mode.
Also worth noting that this transparent color mode can be best remembered as being right next to X, which is the switch color key (between Primary and Secondary).
As a visual reference: Check the color selector you're using (in this video, the HSV color selector in the lower left corner of the screen). At the bottom there are three boxes: first is Primary color, 2nd is Secondary, and the checker-boxed third is the Transparent (equivalent to Erase).
Thought I'd mention this since I found your post via Google search. I was also frustrated that I couldn't seem to set a brush to Erase directly in Clip Studio Paint (got used to the minus key in SAI), then I noticed the third color option below the color selector. Tested it out, works exactly as expected
👍: 3 ⏩: 2

hOly crap thanks for saving my time with this eraser method //v\\ b
👍: 0 ⏩: 0

Thanks for saying so. 
👍: 0 ⏩: 0

Another very simple way to work with a brush as an eraser is to paint with transparency: just click the transparency in the tool bar (right at the bottom) or press C to switch between color and transparency. Now you can just use every brush as an eraser! This is especially cool when working with rougher brushes, where a normal eraser would not fit the style. Just switch to transparency and then switch back to color again in one keystroke.
Another thing that is useful to know, is that you don't have to save, delete and import your tool: you can just drag the new tool into the correct category in the toolbar. This way you can also easily create new categories.
👍: 2 ⏩: 1

You're right; it's a much easier way to do it. I wasn't aware of it at the time and didn't have a use for that odd little transparency chip under the paint chips. Sometime last winter I finally figured out that selecting it made any brush into an eraser, and it's like the angels sang. I made a video recently that partly touches on that, in conjunction with setting a button on the tablet's pen to toggle between painting with colour and painting with transparency. But I think this tut still stands just in case anyone wants to actually build a dedicated eraser of some kind.
👍: 0 ⏩: 0

Ah, that's really nice! 
👍: 0 ⏩: 1

Yeah, the longer I use it, the more interesting things I find to change in it. Wish the manual were more instructive!
👍: 1 ⏩: 0


