HOME | DD
 RobotCatArt — RobotCat's Simple 3-Layer Cel Shading Tutorial
#nekohat #nekomimi #thighhighs #tutorial
Published: 2017-03-03 09:59:23 +0000 UTC; Views: 61776; Favourites: 2356; Downloads: 1182
Redirect to original
Description
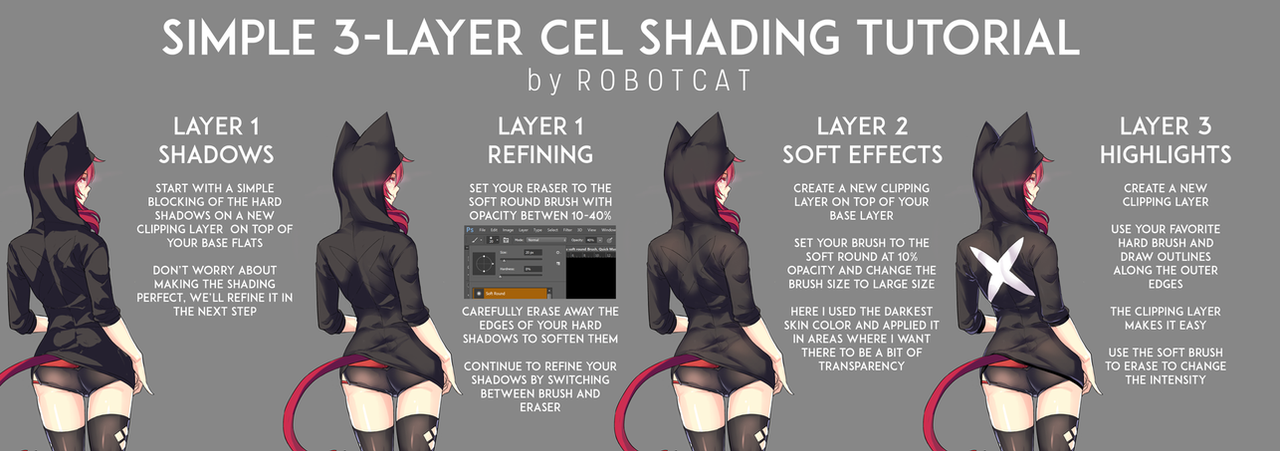
Instagram |Twitter |Facebook |TumblrSince a lot of people have asked, I've decided to make a quick tutorial highlighting my process for coloring my Neko Noire Template:
This really is just a simple modification to a basic cel-shading setup. The idea is to use the soft round brush to soften up the hard transitions you have in normal cel shading coloring without relying on applying gradients everywhere with the selection tool or masks. Its very fast and you don't have to be very precise with it, which is what makes it simple.
You can expand on the ideas here by including more layers. For starters, I'd increase the shadow layers to least 2. One for ambient occlusion effects and one for hard shadows. Here I combined the two but in my more detailed paintings I keep them separate. I do a lot of other tricks in those too but for the Neko Noire deviation, all the clothing skin was done using this technique. The hair I also used a layer mask which I'll talk about in another tutorial.
It's been a while since I made a tutorial but hopefully this was clear enough to help people who need it. If you have any questions just leave it in the comments.
Related content


Comments: 125


 (Smile)")

The tips are great, thanks^^
👍: 0 ⏩: 1

Starting to make me feel like i wasted money on Csp... :<
👍: 0 ⏩: 1

I think all the same options are in CSP, maybe just under a different name. I know they just added opacity to the brush options.
👍: 0 ⏩: 1


wow, thanks for the tutorial ^^.
Is very useful ")
👍: 0 ⏩: 1

Thank you Sensei ! (By the way what do you call "Base flat" ?)
👍: 0 ⏩: 1
Base flat is just your base color, in this case its the light grey. I keep it on its own layer and apply the clipping masks to the 3 cel layers above to the base layer, so that it keeps my coloring inside the area constrained by the base layer.
👍: 0 ⏩: 1
Okay got it, I didn't think clipping layers were that important... You can see that I still have got a lot to learn ! Thank you again

👍: 0 ⏩: 0


<= Prev |