HOME | DD
 rubendevela — photoshop layers tutorials
Published: 2011-01-24 01:18:26 +0000 UTC; Views: 13082; Favourites: 316; Downloads: 352
Redirect to original
Description
Someone sent me a note, via how we use layers (Smile)") Since she and I have similar (but now slightly divergent) layer techniques, I answered for her.
Since she and I have similar (but now slightly divergent) layer techniques, I answered for her.I wrote the note down to reply, and I wondered if anyone else might be interested in it, so I decided to upload it
")
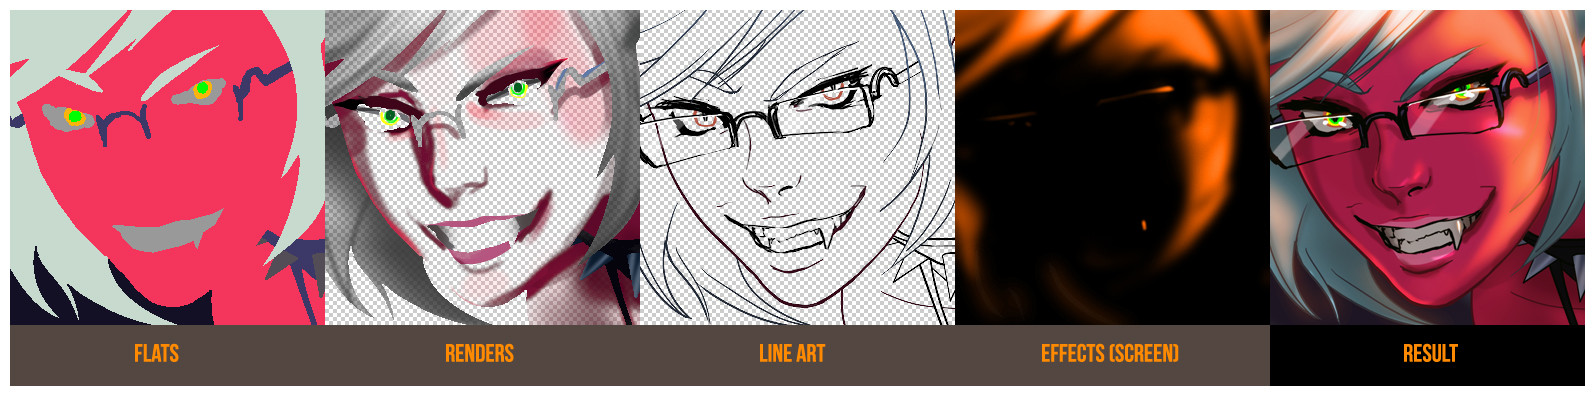
Here is a basic overview of how I use layers in Photoshop
The flat colors are at the bottom of the layer stack. It is a completely opaque layer, and should look like a paper cutout collage. There should be no blending in between the shapes, and the shape boundaries should be absolutely perfect: no smudging or blending or little messy pixel boundaries of any kind. This is achieved through the "pencil" tool and using the "lasso" selection tool with "anti-alias" turned OFF and then filling in the colors with the Paint Bucket, also with anti-alias OFF (very important!). It's okay to have this layer look jagged and cut out, as long as the boundaries are precise. This is a lot harder than it sounds, and it takes practice and research to learn how to make quick and precise flats.
The purpose of the flat color layer, or the"flats" is to give the main shapes in the picture their basic colors, as well as function as an easy masking tool for the shading. If, for instance, all the areas with wood in the picture were a particular shade of brown, clicking any wooden area on the flats layer with the "magic wand" tool (with anti-alias turned off) will select all similar areas, if the "contiguous" tool option is Unchecked and the Tolerance is set close to zero.
Pressing CTRL+U while having something selected will make it easy to tweak the colors you have selected.
The renders layer is on top of that: instead of being a completely filled layer, it is initially a blank, see-through layer. This is where all the shading, the light and shadows go. Use it by making selections (magic wand, anti-alias OFF, tolerance set to 0 or close to 0) in the flat colors later, clicking the renders layer, and then painting in the highlights and shadows. Extreme care must be taken that the highlights and shadows are not painted on to the flat colors layer (this can be done by locking the flat colors layer).
Again, pressing CTRL+U while having something selected will make it easy to tweak the colors you have selected.
On top is the line art (sometimes called the Inks). Set it to Multiply if it has a white background, or Normal if it will be drawn in via Photoshop. These can be colored or traditional black inks.
At the very top are the various light and color effects. Light blooms, Screen/Color/Overlay layers can go here to affect the whole picture. If these effects should NOT affect the line art, place them under the line art layer. I have included here a Screen layer I used for the picture (there were various other effects in the picture)
Hope that helps, fallowfrenzy!
Comments and questions are more than welcome.
Related content


Comments: 44

Looks like something to try out, I'll definitely keep this in mind.
👍: 0 ⏩: 0


i use photo and cant i cant do the same shit XD daam
👍: 0 ⏩: 0


it's a really good tutorial
👍: 0 ⏩: 0

Panty and Stalking with Garter Belt is AWESOME!!!!!!!!1
👍: 0 ⏩: 0


Do you actually put all your flats in just one layer or did you just show them as one layer here for convenience? It's interesting that you put the renders on a different layer! Is there any reason for that?
👍: 0 ⏩: 1

Yup! my flats are all on one layer, with anti-alias off.
👍: 0 ⏩: 1
Interesting! My flats are separated into sections in different layers and I do the shading on the layers themselves. I might want to try out this technique of yours just to see what it's like
👍: 0 ⏩: 1
Not at all! Use it by making selections in the flat colors later (magic wand, no alias, tolerance set to zero or close), clicking the renders layer, and then painting in the highlights and shadows. Extreme care must be taken that the highlights and shadows are not painted on to the flat colors layer (this can be done by locking the flat colors layer).
Also, pressing CTRL+U while having something selected will make it easy to tweak the colors you have selected.
I could show you the next time you're in Manila
👍: 0 ⏩: 1
Oooooooh that makes SO much sense! Awesome I will definitely try this next time!
(Oh, and I've been in Manila since June XDDDDD)
👍: 0 ⏩: 0


I had to read it twice to understand it, but now I get it.
The render layer is going to be the tough one to make however, I still dunno the precise brush techniques used. >.>
👍: 0 ⏩: 1
Yeah, each layer here can be expounded into whole other tutorials! Hope it helps, though.
👍: 0 ⏩: 0

Ya know... in this cropped close up.. she looks like an evil
EEEEEVILLL!!!!

👍: 0 ⏩: 2
I'm... I'm staying out of this

👍: 0 ⏩: 0

Me: >C NO KADDELS FOR YOU!
👍: 0 ⏩: 1
SEE! SO EEEEVIL! BAWWWW!
👍: 0 ⏩: 1
Me: You deserve it >C
👍: 0 ⏩: 0

Chatatoue turned me on to this, and I will refer to this to see what I can do to improve my coloring technique. I love the resulting picture you have here!
👍: 0 ⏩: 1
Thanks!
👍: 0 ⏩: 1
I'm sure it will...
A step by step of how you use your FX would be awesome, if you're so inclined!
👍: 0 ⏩: 0
It's hard to control, and hard to predict. I did use it to highlight her cheek, near the eye, but that's about it
👍: 0 ⏩: 0

are all flats on one layer or several? does it matter?
👍: 0 ⏩: 2
Yes it does, the only way it will work as required is if all the flats are on one layer
👍: 0 ⏩: 1
bc i usually have each color on a different layer. That makes it hard for me to separate the colors while laying them down, but having them on diferent layers makes it easy for me to change the color of the paint on an individual color
👍: 0 ⏩: 2
Oh I forgot to say: If it's all on one layer, you can switch the flats easily by just clicking with Paint Bucket
👍: 0 ⏩: 1
There's no real difference if it's flats, magic wand is just 1 click
👍: 0 ⏩: 0

Here's a flatting trick I found in poor man's Photoshop: use the magic wand tool to select areas you want to fill with a specific color in the ink layer, convert the selection into a path, and trace the path with the desired color using an non-anti-aliased tool on the flatting layer. Then you simply bucket fill the now enclosed area with the same color.
This isn't perfect, but it makes the big spaces with complex boundaries easier. YMMV of course. Here's one of my (crude) attempts: [link]
👍: 0 ⏩: 1
Yeah, it leaves little gaps
👍: 0 ⏩: 1
Keep in mind any gaps are completely concealed under the ink layer.
👍: 0 ⏩: 1
Yup! There have been a few occasions when that's messed me up, though, like when using that selection for a light effect or to color the line art.
👍: 0 ⏩: 1
Oops, yeah, I don't know enough about doing that to really comment I guess. Still, hope you get a little use out of it.
👍: 0 ⏩: 0


thank you for posting this. I am starting to get used to photoshop now and I have been having problems coloring in PS. BTW this picture was awesome.
👍: 0 ⏩: 0