HOME | DD
 RubensGameloni — Tutorial - Beam
Published: 2005-01-31 08:49:58 +0000 UTC; Views: 14303; Favourites: 181; Downloads: 2618
Redirect to original
Description
Tutorial de BeamEfeito usado na imagem Destruction Beam...
///Feito a pedidos do mano Ed (Xuxa)... Hehehe
")
----- ENGLISH -----
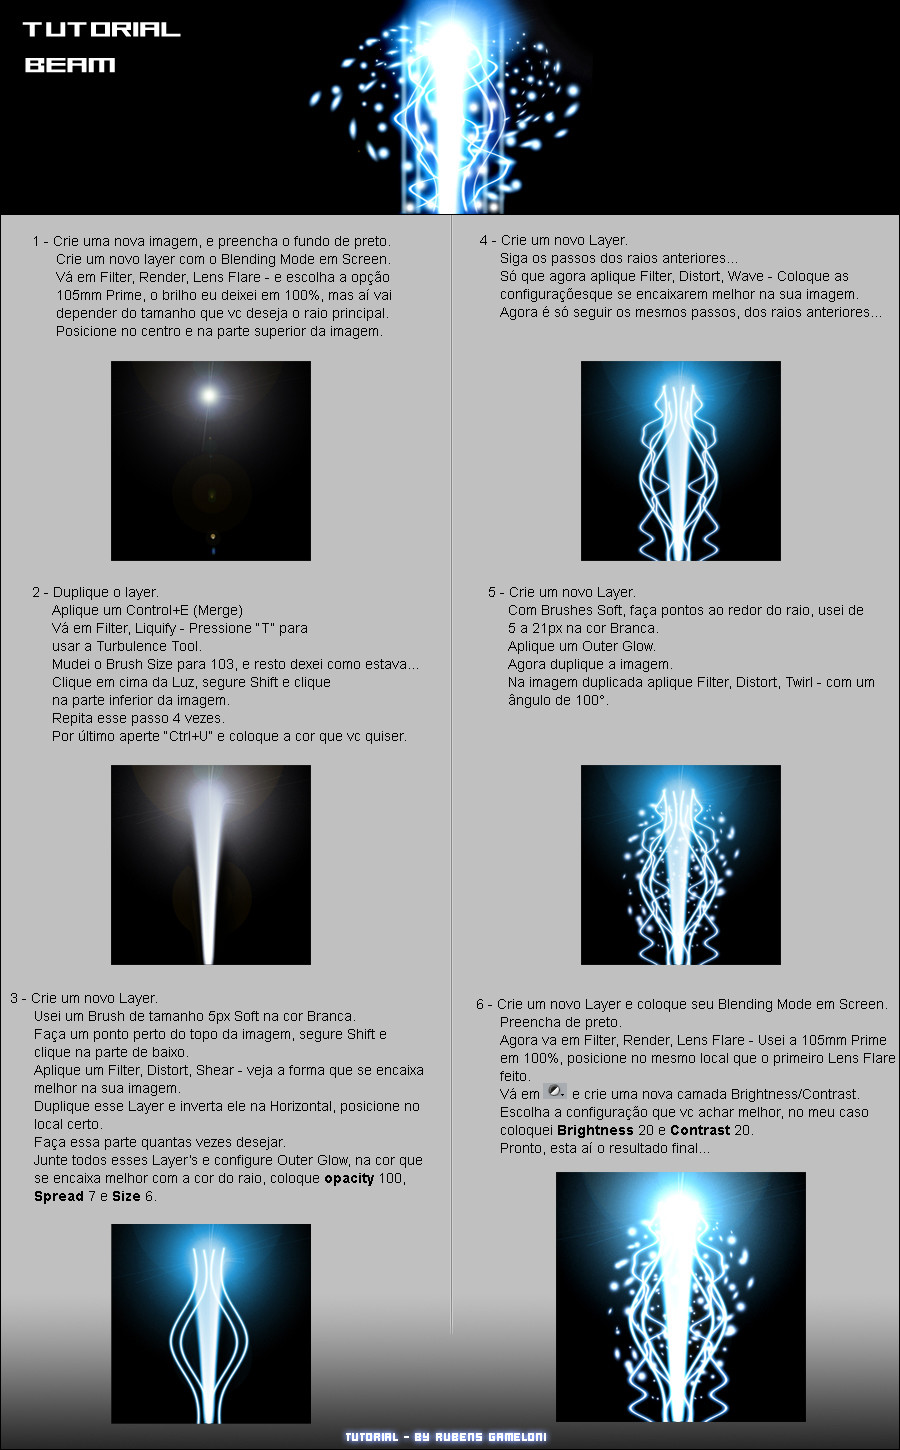
1 CREATE A NEW IMAGE, CREATE A NEW LAYER, SET IT TO SCREEN, GOTO FILTER-> RENDER-> LENS FLARE 105MM pRIME TO 100% SIZE DEPENDS ON THE SIZE OF THE IMAGE, PLACE IT ON THE CENTER TOP PART OF THE IMAGE
2 duplicate the layer and merge (control E) go to Filter->liquify-> Turbulence (T) set brush to about 103 and the rest at default settings, clic on top of the flare hold shift and drag to the bottom about 4 times, hit control U and set it to any color you wish
3 Create a new layer and with a white 5px soft brush create straight lines from top to bottom, go to filter->disort-> shear and adjust for desired effect, duplicate the layer and flit it horizontaly to obtain equal rays with the same curves, repeat as many times as you wish or feel nessesary merge all the new "rays" on a sigle layer double click and check outer glow, opacity at 100% spread at 7 and size at 6
4 Create a new layer and create new rays using step #3 only this time apply filter-> disort-> wave do as many as you wish
5 Create a new layer and with a white soft brush place spots around the rays using 5px to 21px brushes, apply the same outer glow as you did to the rays, duplicate the image and apply Filter-> disort-> Twirl with a 100º angle
6 create a new layer and set to screen render another lens flare, just like the first one, in the same place, create a brightness/contrast mask with brightness at 20 and contrast at 20 adjust for desired result
take note, do not speak portuguese i speak spanish, its difrerent, so i may have missed some words, but this is the basic idea, really good tutorial
Made for MrR0b0t0
Related content


Comments: 34

Uau! Muito obrigado por este tutorial. Wow! Thank you very much for this tutorial.
👍: 0 ⏩: 0

Hello, I featured this here [link] 
👍: 0 ⏩: 0


Now how do you get the color is that already explained. I must have missed something.
👍: 0 ⏩: 0


this is very helpful!! just what i needed ^^ thanks!
👍: 0 ⏩: 0

Fantastic - thank you for the english translation 


👍: 0 ⏩: 0

Yeaaah primeiro tut que vejo em portugues
Thank you thank you
Vou exprimentar!

👍: 0 ⏩: 0


[link]
i credited your tutorial on my work i hope i did ok
👍: 0 ⏩: 0

Ahhhhhhhhhh looks like good tutorial .. needs to be in english
")
👍: 0 ⏩: 0
that tutorial is great! thanks for the english part too
👍: 0 ⏩: 0


this looks awesome, thank you very much for the english translation
/me opens up pshp and becomes inspired !

👍: 0 ⏩: 0

Dando uma volta nos tutos do DA me deparo com um em português que surpresa!!!Huahauahua maneiro o tuto
👍: 0 ⏩: 0

muito show o tuto rubens.. vlw aew.. quando tiveh uma chance vo tentar..
👍: 0 ⏩: 0


CéééértO!!!!!!!
muito bom véinho.... assim eu vo apredendendo esses lances lokos que vcs viaja....!!!
hehehe
o tutorial vai ser util, pode cre que vai
 (Smile)")
👍: 0 ⏩: 0


1 CREATE A NEW IMAGE, CREATE A NEW LAYER, SET IT TO SCREEN, GOTO FILTER-> RENDER-> LENS FLARE 105MM pRIME TO 100% SIZE DEPENDS ON THE SIZE OF THE IMAGE, PLACE IT ON THE CENTER TOP PART OF THE IMAGE
2 duplicate the layer and merge (control E) go to Filter->liquify-> Turbulence (T) set brush to about 103 and the rest at default settings, clic on top of the flare hold shift and drag to the bottom about 4 times, hit control U and set it to any color you wish
3 Create a new layer and with a white 5px soft brush create straight lines from top to bottom, go to filter->disort-> shear and adjust for desired effect, duplicate the layer and flit it horizontaly to obtain equal rays with the same curves, repeat as many times as you wish or feel nessesary merge all the new "rays" on a sigle layer double click and check outer glow, opacity at 100% spread at 7 and size at 6
4 Create a new layer and create new rays using step #3 only this time apply filter-> disort-> wave do as many as you wish
5 Create a new layer and with a white soft brush place spots around the rays using 5px to 21px brushes, apply the same outer glow as you did to the rays, duplicate the image and apply Filter-> disort-> Twirl with a 100º angle
6 create a new layer and set to screen render another lens flare, just like the first one, in the same place, create a brightness/contrast mask with brightness at 20 and contrast at 20 adjust for desired result
take note, do not speak portuguese i speak spanish, its difrerent, so i may have missed some words, but this is the basic idea, really good tutorial
👍: 0 ⏩: 1


Thank's for the translation...
I will use in the description.
👍: 0 ⏩: 0


 (Wink)")

Nossa!! Q legaaaaal! Tá super bem explicadinho!
Parabéns!!!
👍: 0 ⏩: 0


