HOME | DD
 Shotomanexe — Tutorial: Kamehameha
Published: 2010-07-20 06:56:03 +0000 UTC; Views: 6488; Favourites: 62; Downloads: 565
Redirect to original
Description
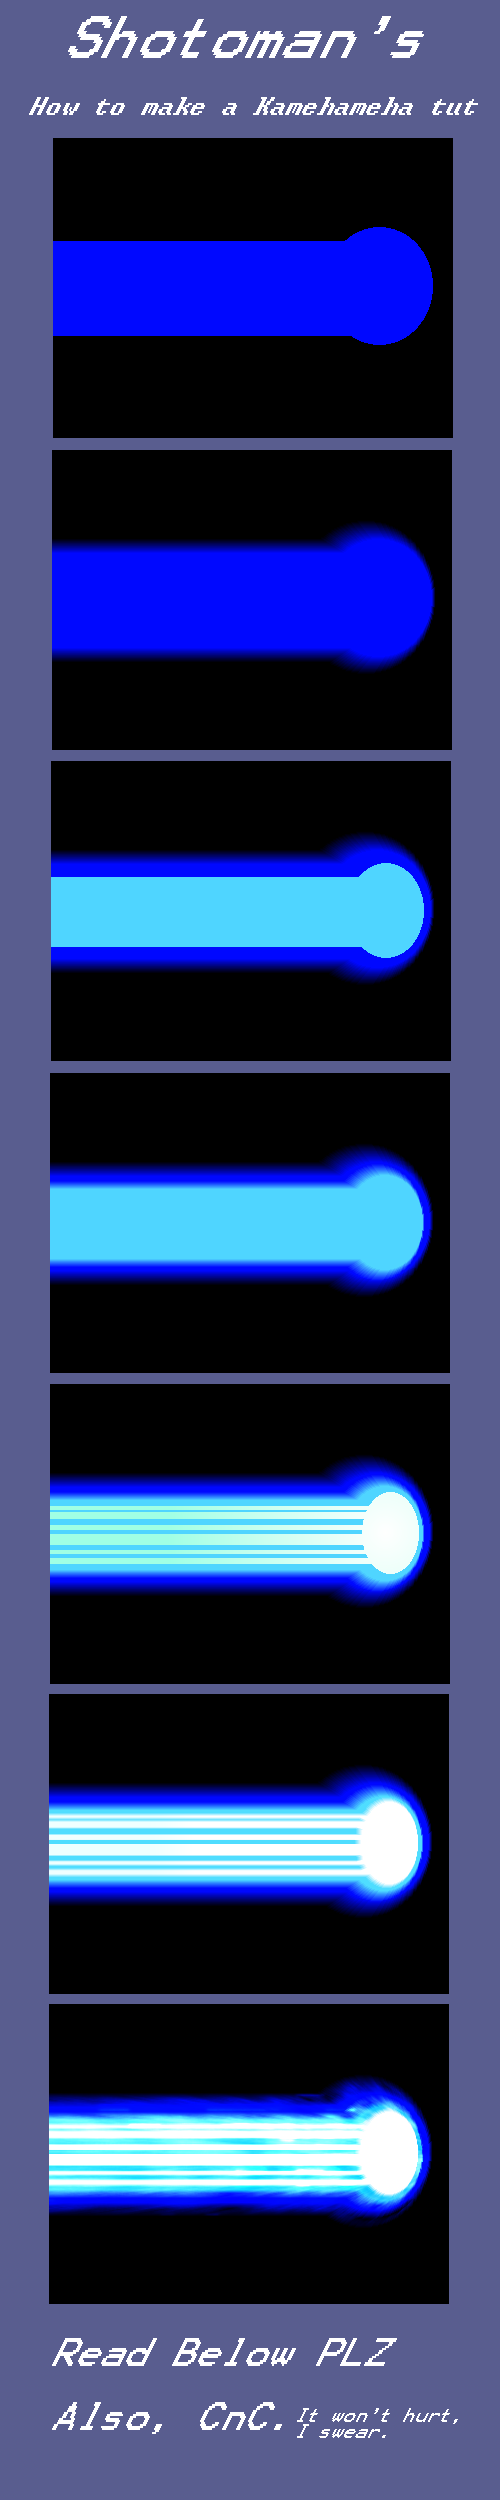
Alright guys and gals, todays lesson is on how to make a *drum roll* Kamehameha wave! Please note that this tutorial can be adapted to make pretty much any "blast" or "beam" style attack, so listen up! Also, if you noticed, there's no text in the pic, just step by step pictures. Down here is where all of the tutorialish stuff is coming from, so... here we go!1. Alright, open up a canvas on whatever digital editing program you're using(I usually use photoshop, but this was done in paint.net). Make sure it's size appropriate. Make a new layer. Then(by using any means), draw out the basic beam shape you desire in the darkest tone of the color you desire(dark blue in this case). Be sure to create a point of origin(the ball-ish shape in this case) where the blast came from.
2. If you're using photoshop, this is where you use Filter/Blur/Radial Blur, set it to zoom, and then place the "blur origin" point where you're blast's point of origin is located. Blur it a good deal, but not too much, in the end, its you're call. But don't move that point, you'll be using it many more times in the near future. Please note that in Paint.Net, using this filter is much easier.
3. Draw a smaller, similar shape like the first one on a another layer(preferably a new one). Make it a lighter color than the first.
4. Guess what? Time to blur again! This time cut the blur down a few notches so that its not as strong as the original blur, keep the position the same though.
5. Alright, this is the point where you want to add alil more variation. Still make the origin point slightly smaller than the last, but this time, make the trail of the beam segmenty(I guess, use the pic for reference). Now here's where it gets tricky. Instead of simply making it a lighter tone, we're gonna do it like a gradient. Once again, use any mean's necessary(cept murder) to get that effect, and use this as a reference.
6. Basic repeat of step 4, lower the blur a few notches though.
7. Tweaking... this is completely your call, its the thing that really make or break the effect, and there are all kinds of things you can do. Just monkey around with it, you'll find something that looks good with it. If you want to know what I did, I simply added another layer, used the clouds filter, then I blured it again, but at a higher value.
Hope this helps. Shotoman out!
Related content


Comments: 15

Farin mah lazar indeed.  (Smile)")
👍: 0 ⏩: 0


I'm firin' ma lasaar BWAAAAAAAAAH
(this tutorial is awesome  (Wink)")
👍: 0 ⏩: 1


Hmmm... I should be able to adapt this to GIMP... I'll have to give it a try when its not... holy crap its 4am.
👍: 0 ⏩: 1
[link] Here's my little attempt. Applied it to some ripped sprites from Jump Superstars to make it look moar pretty.
👍: 0 ⏩: 0

Great tut. You should do more. E.g Fire/Fireball. That would be very usefu,l to me.
👍: 0 ⏩: 1

Maybe... depends on how easy it is to do fire.
👍: 0 ⏩: 1
