HOME | DD
 TigrisTheLynx — Moving Jaw Tutorial

#craft
Published: 2010-03-16 05:47:10 +0000 UTC; Views: 24773; Favourites: 216; Downloads: 474
Redirect to original
Description
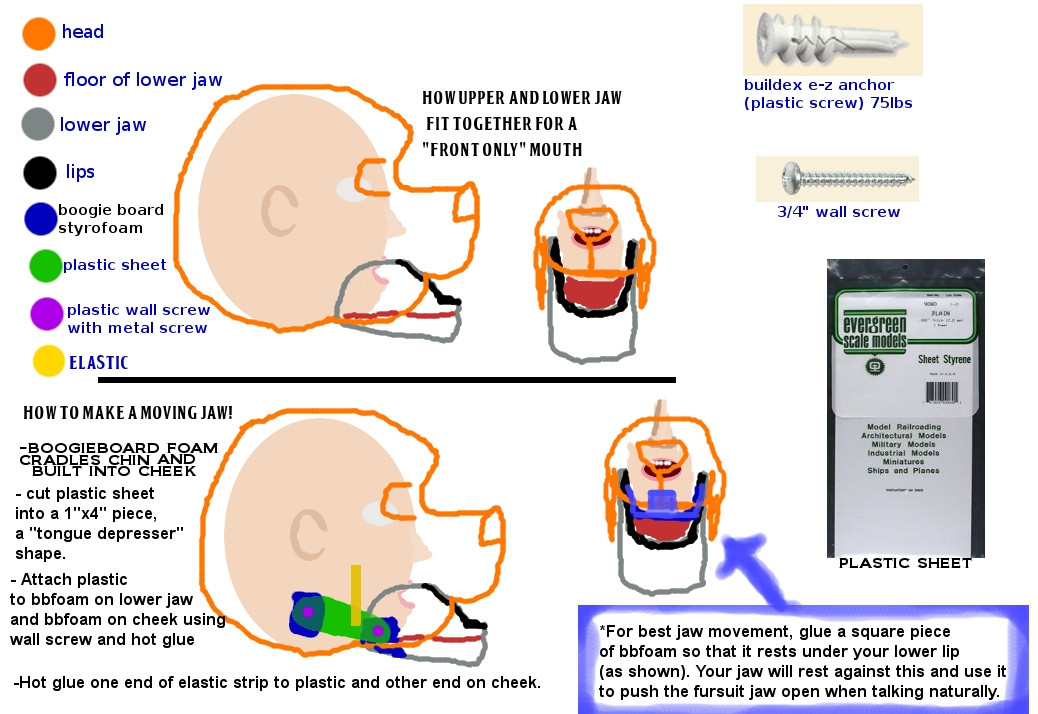
Photos of the mouth and example videos: fav.me/d4sa21sDiagram A: How to make a front-only mouth on a fursuit head! "Front only" means the sides of the muzzle are blocked so that it appears that it opens only from the front, as a human mouth would. It is similar to how puppets work.
Diagram B: How to make a moving jaw in your fursuit head! It uses Diagram-A as an example of how to build a working movable jaw in a "front-only" head. You may use this method in ANY fursuit head though, the same technique can be applied to mouths that extend up the sides of the muzzle as well (like with Moondog and Provo).
Our friend calls the foam that we use "Boogieboard foam". It is white, light as styrofoam, the texture is rough like sandpaper, does not chip apart when struck or cut, and it is as hard as a rock. I have yet to know what this type of foam is called or what it's really used for since I cannot find a place that sells it. Our friend ordered this stuff years ago and we mooch foam off of him. lol
ANYTHING that your face touches directly like your nose bridge and your chin should be covered by soft fabric. I use Darice brand "Foamies" sheets from craft stores to line those sections because they are quick-drying, hold up over multiple uses and it's soft to the touch. Also, try to cover the heads of screws with Foamies as well so that the screws don't scrape your face or snag your hair. Boogieboard foam has a rough texture like sandpaper so make sure to cover that.
---------------------------------------------------------------------------------------------------------------------------------------------------------------------------------------------------------------------
OTHER MOVABLE JAW TUTORIALS
Everyone has their own way of building movable jaws. You may borrow ideas from multiple fursuit-makers, follow one particular design or find an option that works best for you. The things that all of them have in common is that you use your chin to open the fursuit mouth, there is a pivot point with a wire or screw allowing the jaw to rotate open/closed, and uses something stretchy like elastic or springs to close it. Here are a few examples:
Many ways of making them - www.livejournal.com/tools/memo…
Balaclava hood with movable jaw by Matrices - www.matrices.net/balaclava.asp
Tani DaReal's movable jaws - fursuit.tanidareal.com/daiquir…
--------------------------------------------------------------------------------------------------------------------------------------------------------------------------------------------------------------------
TROUBLESHOOTING MOVABLE JAWS
"The entire fursuit head pulls down when I try to open the mouth and the jaw stays closed!" -- Check that your elastic straps are loose enough so that the mouth opens without resistance. The elastic is only there to return the jaw to it's closed position and it doesn't take much to do so. The elastic should be vertically straight like ||, so if it's diagonal or almost horizontal it will give you a lot of resistance and won't function properly.
"When I open my mouth, the front half of the jaw is pushing upward and the back half as pushing downward!" -- Your pivot point may not be correctly placed. Try moving your pivot screws forward, back, up or down slightly to see if that helps. Your pivot point should be somewhere below your human ears when wearing the fursuit head, somewhat close to the pivot point on your own human jaw, but it may not line up perfectly because your fursuits mouth may not line up with your own.
"My fursuit mouth hangs open a lot and flops around!" -- The elastic needs to be tighter. Try pinning the elastic inside before gluing it and try it on to make sure it works.
Related content
Comments: 13

I think I get how to make a moving jaw from this tutorial, but I have a few questions; Firstly, do you know where to find something similar to "Boogieboard foam" and what I could use as a replacement. Also what size should I cut the "Boogieboard foam" for the pieces for making the jaw mechanism parts?
Thank you in advance,
~ Brionna
👍: 0 ⏩: 0

Will look into that. I want to do an animal-headed costume like Anubis or the Minotaur.
👍: 0 ⏩: 0

He's an all-foam head built on a foam base. Here's an in-depth tutorial of how to do them; she has video tutorials in there as well: www.matrices.net/foam.asp
👍: 0 ⏩: 0

thank you this could help projects that I want to try out
👍: 0 ⏩: 0

I put a few photos together. [link]
👍: 0 ⏩: 0

You shouldn't pull on it when gluing it in. Make the strip long enough to reach each point and make sure the elastic doesn't bend or bubble out when you glue it in. The elastic is only there to return the lower jaw to its closed position and if its extra tight, it may not allow the jaw to open at all, so be careful. If you are unsure, you can experiment with it by using stickpins instead of glue to see if its the right location and if it needs to be tweaked.
👍: 0 ⏩: 2

is the floor of the jaw seperate from the main mechanism, where i build the jaw around it to move around it? it's hard to tell
👍: 0 ⏩: 1

This may help too. [link]
👍: 0 ⏩: 0

okay, Thank you I'm going to make my first mask soon
👍: 0 ⏩: 0

Thanks for this, helped me realize somethings was trying to find a bit of diagrams to pinpoint a bit of details I was working out in my head that just didn't seem to be coming out right in function when trying to create it. This simplifies the design quite a bit.
👍: 0 ⏩: 0


