HOME | DD
 torrendraiko — How to make a plushie

Published: 2003-06-08 01:37:29 +0000 UTC; Views: 5605; Favourites: 43; Downloads: 270
Redirect to original
Description
well, first of all, its easyier than you think. All you need is lots of freetime, some money for fabric (or scraps of clothes, Rip was made entirely
from my Alucard plushie's leftovers... which sounds kind weird O_o) and if
you don't want to go insane, some kind of sowing machene. I sowed
Knives-sama by hand and was not stable for a good month
sleep and some hugs, I tought myself how to use out Singer sowing machiene,
which I found has NEVER gave me problems, at least ones that the manual
did't say it was my fault.
ok, materials
Several good pictures of the person ~ no matter how well, or how many times
you've seen them, it will help with picking fabric. Make a tally of buttons,
enlarge details, and number how many diffrent fabrics you need
sowing machiene ~ lucky if you have one, might as well stop reading if you
don't
thread ~ and make sure you get EVERY color you need, tripple check too, when
I made rip, I was SOOO sorry I did't grab some extra peach
Fabric ~ I head-measure, in otherwords, I think about it, give it some
slack, and point to where I want the lady to cut and say "this much"
buttons ~ get extra, you WILL loose them
inkjet transfur paper ~ this is only if you plan to be printing out the face
or patterns (such as the hellsing coat of arms) also with this you will want
an iron, duh.
OR
Fabric paint ~ you can use it for the face or otherthings, it gets
everywhere, be patient for it to dry.
Stuffing ~ get extra, you might want it for later projects and its cheap
Wire ~ 12-14 gauge prefurably, this is for possiblility, but it can get to
be a REAL pain, trying to get the wire to stay where you want it, and make
sure it is packed inside a hefty about of stuffing, I recommend not using it
the first time.
Sculpy ~ its a very good clay for this sort of thing, cheap, easy, dosent
dry out, and you can buy it seperate. This is good to use for things like
Integra's cross, Rip's Gun, or anderson's pie cutters.
~~
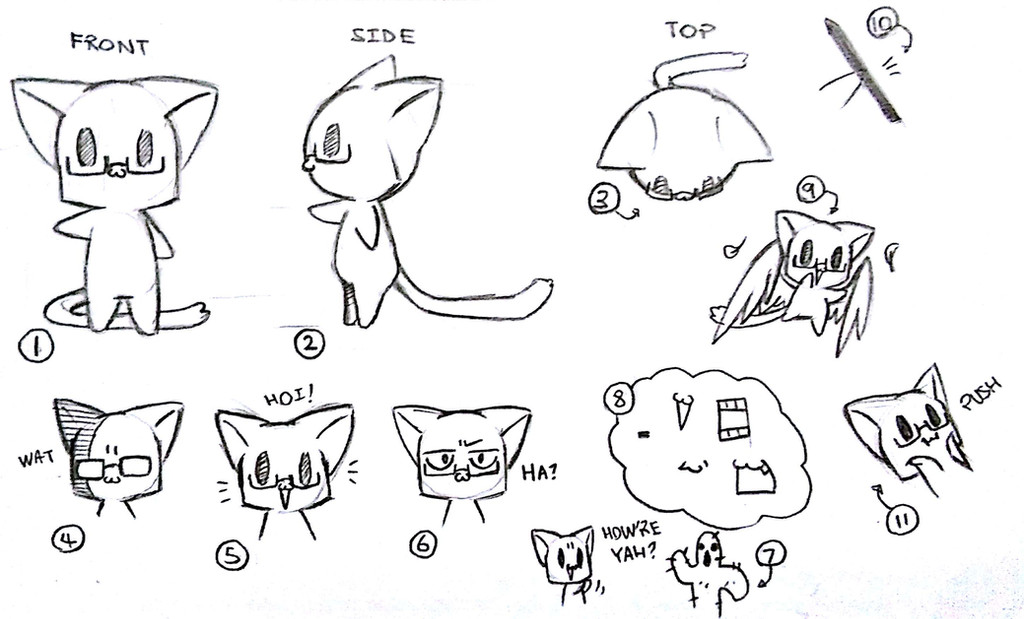
1. Draw out your pattern,
Figure 1 is an example of what mine looks like, its mostly in my head, I'll
draw it out, sow it, on the rare occation that it can't be trimmed to work
out, I re-do it
Remember to leave LOTS of outside for hemming and the fabric that wraps
around, a peice like this
|_______________________________________________|
will turn into this most likely
|_______________________________|
with good careful hemming, when you look at it from the front.
2: Sowing the head
Figure 2 shows how you place the fabric back-to-back, and sow along one
edge, you do the same for the other, giving it a soft-tortia like shape when
you are done.
Figure 3 shows how you put the two halfs together, The parts that will be
flipped to the inside when its time to stuff are both faceing out so you
can't see the part that will be showing.
Figure 4 shows how you will sow them together, leaving a small space for the
neck. its a pain sometimes to sow it because it pockets out to a side but
don't let it discourage you.
When you are done, flip it right side out and stuff, no hemming should be
vissable.
3: body
Draw a pattern that looks cute to you, sometimes I do fingers, sometimes I
don't, depends on what I feel like, same for feet. just remember to leave
alot of space for hemming, and ALWAYS remember, you can easyily make
something smaller, but if you make a hand, or the waist to small, your going
to have to start over, so leave lots of le-way. And Another peice of advice
is THINK it out. Sounds stupid, but because of just thinking about what to
do, I've done what alot of people older than I who want to be tought,want a
pattern, want someone to do it for them,except by myself, and without help.
Just expiriment, and keep lots of scrap fabric handy.
4:neck
Figure 5 shows sowing the neck and head together, folding the edges in, and
obviously this is going to be the part you have to do by hand. So good luck
and stick with it, because intill you get at least half way around, its
going to be kind of flopping all over when your trying to keep it
on.Remember to keep your stitching tight or else Its going to look sloppy.
5:eyes, facial stuff
IRON-ON:
Ok, this can be tricky depending on what you want to do.I personaly love
iron-on sheets which you can buy at walmart, staples, even some drug-supply
stores I've seen.First draw something up, I usaly use an oekaki bbs of
sorts, and I print it out a few times in b&w on regular paper to get the
right size, ajusting how big the pixels are for the print out as not to
decrease quality, I use paintsshoppro7 for this. then I print it out on the
paper, and fallow the insturucions, everone is diffrent otherwise I would
discribe this too.
2nd of all, you stuff it first, it might sound hard doing it on a round
object, but its better because you can see where its going to go, lightly
stuff it so it can press down, worry about shape later. When you have
everything down.
PAINT:
for fabric paint, simply stuff it and put it on with a toothpick, wait a
good 6 hours, better safe than sorry.
Ears:
Usaly I don't do ears but I did for rip. I used transparent thread... well
actully I used fishing line '_';;; but anywho, it worked, and I kinda winged
it. its about the same as adding toes or figers, pinch out the fabric for
the ear, and sow on the sides so it scrunches together and stuff it. I used
fabric paint for little lines.
Hair: Now personaly, I think you eaither HATE or LOVE this part. I have a
bad relation ship with it, in otherwords, I loved doing alucards and Rips
hair because all it was, was cutting felt out in stirps and glueing it on,
simple simple, and V. fun if you ask me. HOWEVER then there was knives, this
is the point when the boyfriend hauls off and smacks the girlfriend and
walks out, so to speak, because I did this with yarn, and it was NOT pretty.
so if your looking for advice on spiker hair, don't look here, but I do have
a site that will help you, just e-mail me, and I'll give you the address.
Clothes: This is kind of a light subject. I trace around the bodies, give
LOTS of space, cut, and sow. this also requires thinking as it can take
hours just to get one article done. As there is a wide variety of clothing
that I can not cover, simply mail me, and I'll post them as I go.
End:
I hope this helped, once agein, if you have ANY questions at all just mail
or post and I'll do my best when I have time.
Thanks ^^
Related content


Comments: 6

*Tackles you* OMG! I FINALLY FIGURED OUT HOW TO MAKE THE HEAD! THANK YOU!
👍: 0 ⏩: 0

Thanks so much...i'm going to make a layton plushie >.<
👍: 0 ⏩: 0

wow! this was so useful!
i have a bad relationship with sewing machines.
i almost lost my thumb lol...
👍: 0 ⏩: 0

This is really helpful. Too bad I found it after I already figured most of it out through thinking and experiment. Had to throw away half my felt. XP. But yeah. This is a really good tutorial. I use close to the same pattern and I found it through experimentation mostly. Thank god I got it onto paper. XP. I'm still working on my first plushie right now, but I hope to make many more and possibly even sell them in the future. ^-^.
P.S. Right now I'm sort of hating the hair 'cause I almost ran out of felt and it sort of looks weird. I don't have anymore to redo it either. ;3; Oh well. I'll make sure to have extra for my next one. ^-^.
👍: 0 ⏩: 0


I've been looking for something just like this! Thank you an ungodly amount for taking the time to make and post this. You've made one little freak VERY happy!
👍: 0 ⏩: 0