HOME | DD
 Unkillable-cat — Steampunk Monitor Large

Published: 2008-08-11 16:32:44 +0000 UTC; Views: 6625; Favourites: 19; Downloads: 1489
Redirect to original
Description
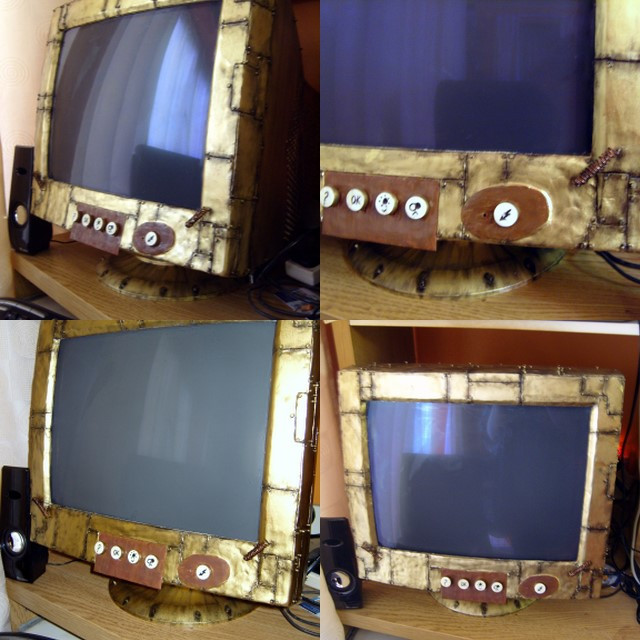
I was asked to upload a larger image of the monitor, so here it is, the original image is here: [link]This photo was taken before I toned down the gloss on the wood console so you will have to excuse how shiny it is.
For those wondering, yes I do plan on making the speakers tie in with the monitor, the monitor is the first stage of a full PC mod.
Related content


Comments: 20

So, after this, do you think you'd be able to make a laptop steampunk mod? ;D I want to mod my laptop, but I'm terrified to screw something up. xD
👍: 0 ⏩: 1

Actually I just bought myself an acer one that Im debating what I can do with since the thing is huge finger print magnet. The problem is making it robust enough to survive being out and about. The "rivets" for example on the monitor hold up well enough to domestic standard abuse but would barely last a few days on somthing thats knocked about like a laptop or netbook.
The lazy option would be to get some wood effect vinyl and take it from there. The big challenge is the track pad, and ventilation. I havent had chance to test out how a track pad reacts to being covered or painted yet, and carrying out a mod rather than skin/paint job would be difficult without blocking the important vents, the li'l sods run hot enough as it is.
If you skin and paint it so long as you protect the monitor, and remember your keyboards layout you shouldnt really be taking much of a risk of damage, just try not to drip paint between the keys.
You have me really pondering this now. I have upgraded so many parts of my desktop setup that I have abandoned the idea of modding it all but the netbook... hmmm
👍: 0 ⏩: 1
xD I'd never want to mod mine, just out of sheer fear, but I'll be happy to see your mod. ;D Personally, I'm just starting a steampunk style outfit. Steampunk is so under appreciated. ;3
the aviator's goggles are giving me some trouble: I can't really solder, do anything with glass or metal (except sea glass), and I like to make stuff with junky little things nobody cares about, so I don't really buy new stuff for many reasons. Got any ideas?
I have mason jar lids, paint, I'll be picking up some pleather, I've got beading, and some fairly light wire. nots of sea-glass (it's nice for details and pendants), I'll be picking up grommets, I've got a few buckles, some heavy-duty chain, a zipper, a few tiny faux flowers, and lots of beading stuff.
I'm the freakin' McGiver of costuming. >D
👍: 0 ⏩: 1
If you dont want to solder, your next option would be a decent epoxy resin. I use araldite which Im fairly certain is available worldwide, its a 2 parter but comes as a complete kit so you dont need a separate hardener. Its not as tough as soldering but its close, you could always paint any residue silver if you wanted to make it look like it is too lol. just make sure you buy the tubes rather than the syringe, for some reason it never turns out right with the syringed stuff.
Rather than use pleather if its only for small quantities, look at the idea of used leather jackets, you can get them cheap and its my main source of the stuff. hell just a few days ago I cut up an old leather jacket I picked up for £8 to make my own netbook case.
I know all about the McGiver method, I re-purpose just about anything I can before I look at using new stuff.
👍: 0 ⏩: 1
Apparently we DO have the stuff to solder, but I could also (theoretically)hot-glue things. I already have pleather now (I was using it for some other parts to my new steampunk outfit, which is looking amazing, and it much more lightweight) so I'm sure I could think of something... I just don't know how to begin, I guess. I don't see why everyone insists on using actual glass or plastic for their aviator's goggles, but that might just be because I have glasses and would find it bloody inconveniant. xD (I'm sorry, I don't know the conversion rate from euros to american dollars, so your price is a little out of my understanding. 
👍: 0 ⏩: 1
£8 is $13.50 though its pounds, the euro symbol is just imitating our old imperial mark.
Hot glue will work well for your pleather, but it will be a little less suitable for anything that will have exposed joins. Its fairly difficult to use neatly on fiddly jobs, and heat will weaken it, so being out in a strong sun, or leaving it by a window/in the car on a hot day may be risky. The reason I suggested a resin is that most are extremely heat and moisture resistant, but are also far less brittle than most strong glues.
Also remember that goggles dont need to be worn over the eyes, mine spend most of their time sitting on my hat. You could even get away with investing in a vintage pair of frames for your spec's anything pre 1960 seems to be close to the Victorian styles.
👍: 0 ⏩: 1
somehow I don't think I'd ever wear them over my eyes even if I didn't have glasses. ^^ you're right, they look better on the head, anyways. ")
I was thinking about maybe modding an old pair of glasses. Hard to find vintage specs for my cheap cosplaying style. I'm one of those "fourty dollar or less" types. xD by that, of course, I mean I'll spend as much as I happen to have on me and think budgetable. ")
👍: 0 ⏩: 0

That's amazing!! I've loved the idea of steampunking the larger tube moniters and your's is a wicked concept.
Can I ask what you used to make it look like welded metal? You mentioned wood..so is that all painted wood?
👍: 0 ⏩: 1
The main body of the monitor is hand shaped and pressed milliput which is an epoxy resin that I painted up, its similar to sculpey but hardens without baking. I found that by pressing it on by hand, or rather a wet thumb it gave a nice hammered effect. its was time consuming though since it takes about 6 hours to dry and to avoid damaging parts that were still hardening I ended up doing it in about six or seven sections. The brass base is plastikote (paint not spray) followed up with about a dozen thin washes of brown, green, and bronze, finished off with black dry brushing. The wood ended up being too fragile, so the "wooden" parts are plastic, painted up and buffed to look like wood.
The key with it was simply patience, a sharp knife, and not being afraid to experiment. I hadn't used any of the techniques before so just tried out things as I went, hell other than the knife I think the only tools involved in the entire thing were paint brushes, and sand paper.
👍: 0 ⏩: 1
Thank you for all the info! I've got a similar looking monitor that I've wanted to do up, but I've not had any idea how to, since all the screens were LCD (that I've found done up) So you've certainly given me a start in the right direction for at least knowing what materials would work.
Thanks again,
👍: 0 ⏩: 1
Not a problem. Just remember the CRT monitors are built far tougher than the LCD so dont be scared to experiment. So long as you dont block the vents, and dont drill into it you cant really go wrong. Obviously the glues, paints, and resins e.c.t will be different for you since Im using what I can get locally. Depending on what you want to do though I cant see much being unsuitable in terms of materials, you coulduse anything from leather to covering it in coloured beads without causing any problems, just remember that you should make a note of what your button layout is before you start, and keep it safe, I had to glue the buttons on after I had set the monitor back up because I had lost the paper I had written the layout on, and had to test them all out.
I managed to do mine without taking it apart, but if you intend to, just remember that they carry a lethal voltage even if left unplugged for a couple of years so read up on what you are doing. Its the main reason I used liquid paints instead of spray, the risk of doing something idiotic and killing myself if I took it apart was a little too high.
👍: 0 ⏩: 1
Sucky that you lost your original blueprints! But yea, I realize I do have to be careful when dealing with computer monitors (I deal with computers off and on a fair bit, but monitors..just too much can go wrong with the stored power)
Knowing my luck with certain things, I've a good plan of just photographing where everything went so I can refer back later ^.^
Again, thank you so much for all your incredible help!
👍: 0 ⏩: 0

How perfectly splendid old chap! I did once see a pic of a Steampunk laptop before, but this is the first Steampunk PC monitor I've seen. Sterling work!

👍: 0 ⏩: 1
Thank you my good sir. Now that dust, and niccoteen have started to have thier way with her Im' happier with the final result than I was but I still feel the final result is lacking somthing.
👍: 0 ⏩: 1
Might I suggest the addition of a modest sized steamengine attached to one side (complete w/ boiler, firebox, flywheel, pistons & fluted brass mini-chimney belching black smoke)? As well as looking damn cool this could also be used to power said monitor, making the dreadful drudgery of having to switch on the mains plug a Thing Of The Past. On the downside it would also mean that one would end up with a dark soot ring on the ceiling & (if adequate ventilation was neglected) users could end up keeling over dead with carbon-monoxide poisoning. But other than these minor drawbacks a plan with no ral flaws, I feel.
 (Wink)")
👍: 0 ⏩: 0

Nice idea! Modded PCs are cool. I once saw a victorian/steampunk one, with a typewriter-like keyboard, a it looked really interesting... I'd like to see your project finished, especialy the chasis - that's the best part!
👍: 0 ⏩: 1
Oh it wont be as ambitious as the typewriter mod, I saw that one myself and I honestly dont have the time or more importantly money to invest in such a grand project. Im glad you like what I have done so far though!
Besides I never go into a project with a masterplan, I get a vague Idea of a scheme and see where it leads me. The next project depending on time will be my speakers, with some luck I will be able to start them at the back end of next week.
👍: 0 ⏩: 0

Hello! This is to let you know I have featured this in my latest Steampunk news article, found here: [link]
Awesome work!
👍: 0 ⏩: 1
Thank you so much, I didn't expect such high praise so soon after joining DA!
👍: 0 ⏩: 1
Heheh - well welcome!
👍: 0 ⏩: 0