HOME | DD
 Whit3Fir3 — Light Test

Published: 2012-07-12 00:31:42 +0000 UTC; Views: 52; Favourites: 0; Downloads: 0
Redirect to original
Description
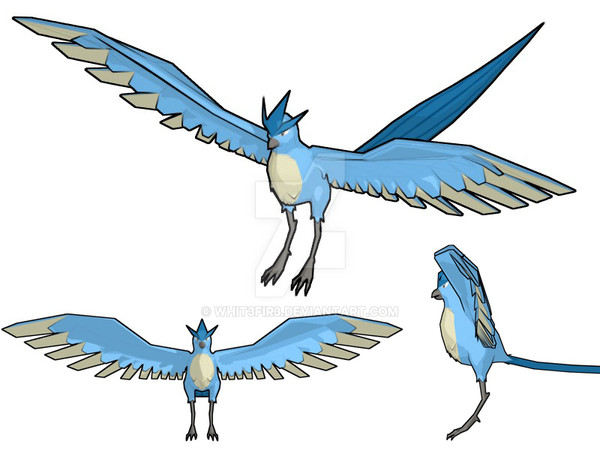
Ok, so this is a brief light test. Done in blender, time about 20 min. The whole setup only uses 1-2 lights, and uses material colors, no textures. The main light remained a pale yellow, while the backup light remained a pale cyan. Both were point lights on default intensity.1: The first image is only lit with one main light, and the material provides its own illumination to eliminate black black shadows.
Pros: fast to setup, and requires almost no tweaking for an elaborate scene. Get an illusion of depth without too much planning for lights etc. You get an accurate representation of the material color.
Cons: the depth is somewhat flat (which can be good if you're going for a hazy effect). There are really only two levels of shading. If you're using a texture+normal/bump, you lose some detail.
2: This image is lit with only one main light. There is no object illumination as is evidence by the jet black shadows.
Pros: easy and fast. Depth is apparent because of the great distance between values.
Cons: it looks boring, and fairly unrealistic. This isn't how light works in real life. The colors aren't accurate to the color expected.
3: This image uses two lights, a main and a rim. Already you can see the shadows start to come to life a bit more than they did previously. No object self illumination.
Pros: still fairly easy, however may require more setup in complex scenes with multiple characters all casting shadows. More realistic. Creates a sense of roundedness and reflected light on the character.
Cons: will need to use light linking to appropriately light a scene with many characters. Still not accurate color.
4 & 5: These both played with the material settings and left light settings alone. They are the same light settings as in 3.
4: This uses the veeeerrryyy slightest object self illumination to prevent black shadows.
Pros: fixes all the visual problems of 3. Still not any more difficult than 3. Also provides an easy solution to weird lighting problems that may arise in complex scenes.
Cons: begins to look flat again, like 1. Looses some of the depth of 3.
5: I personally think this is the nicest setting. I changed the material settings so that the shadows were not black, but instead a dark brown. The highlights have also been changed to be a light blue color which gives it a bit of radiance. Because of the change in shadow color there is no need for object self illumination.
Pros: It looks great! Gives a great illusion of depth and light reflection. You don't lose detail in textures with this because the shadows enhance the textures rather than cloak it. Not really any more difficult to set up than 3 or 4.
Cons: It takes some trial and error to find a good material setting.
Related content


Comments: 2

Ah, I see what you did in 4 and 5. When I run the shadows, I give the color of the texture map when I run that through. That way you can see a little more detail in the shadow than if it were just a straight black component. Thanks for putting this together. Might have to play with the rim light a little more.
 (Smile)")
👍: 0 ⏩: 1

I look forward to what you come up with!
👍: 0 ⏩: 0