HOME | DD
 YellowEleven — Shaped Bokeh How-To

Published: 2009-02-23 08:27:33 +0000 UTC; Views: 70203; Favourites: 670; Downloads: 1120
Redirect to original
Description
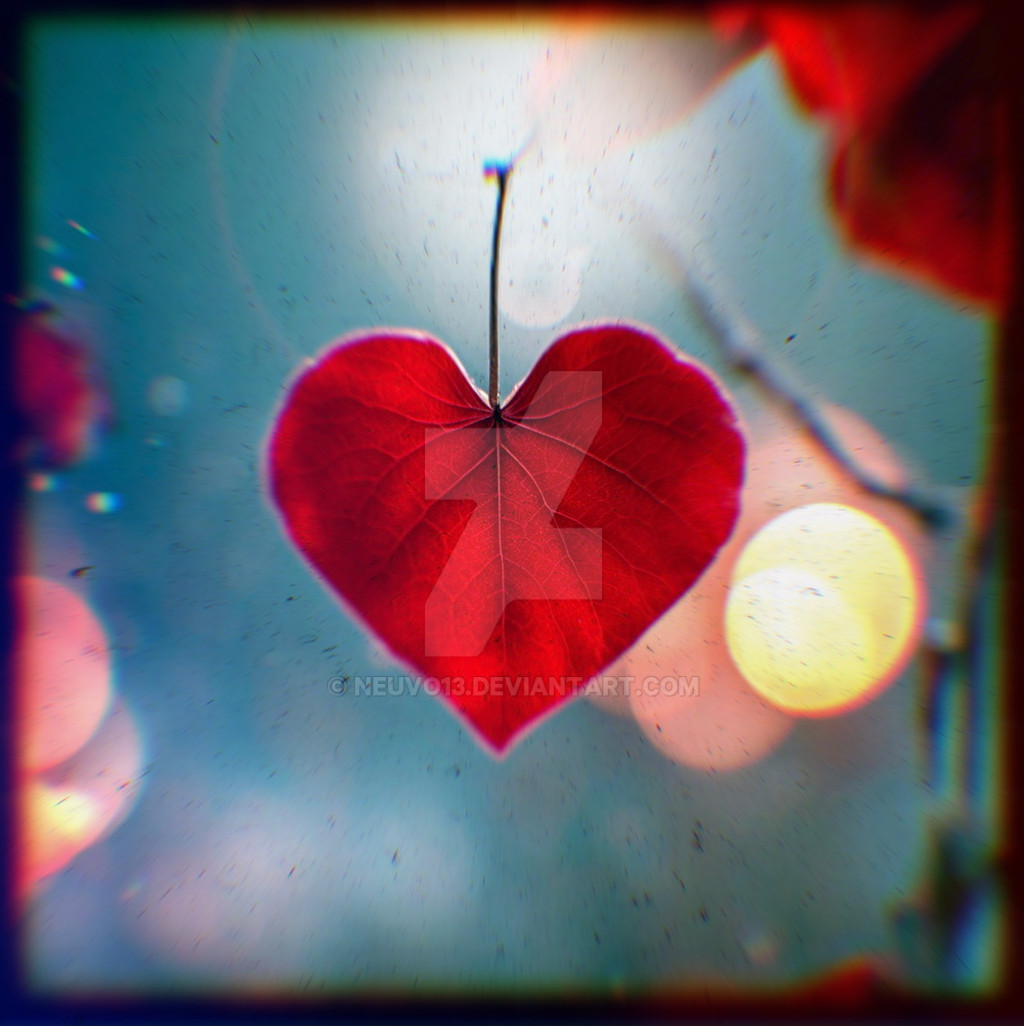
I think this is a fun technique! I've had several people ask me how it's done so I figured I'd post this!Here are two photographs I've done where I used this technique:
Please let me know if any of you have any issues with the tutorial image because it's so huge.

- Sarah
- - - - - - - - - - - - - - - - - - - - - -
EDIT: I've received several questions since I posted this tutorial. Typically, if one person has a question, others are wondering the same thing, so I'll share the questions here and will answer to the best of my ability.
First, I’ll go into a little more detail about the bokeh technique:
The dictionary definition of "bokeh" is: a Japanese term for the subjective aesthetic quality of out-of-focus areas of a photographic image. These “out-of-focus” areas, when you're attempting to capture a shape, are most easily captured by photographing light sources. In my tutorial, and in the example photos I posted above, I used Christmas lights.
You can experiment with creating bokehs (without even bothering with making it a shape) by simply playing around with your camera lens. My telephoto lens works best for me, and I hear wide-angles lenses work well also. Find a single point of light, perhaps a traffic light, and simply focus and unfocus your lens while watching the shape change in the camera’s viewfinder. The light will blur into a circular bokeh, not because the light is circular, but because the opening of your lens is circular. If you create one of the shaped lens hoods that I describe in the tutorial, then the traffic light will morph into the shape you carved into your lens hood instead of a circle.
This effect isn’t limited to very sharp light sources, but can also be used on more subtle light sources (though this can get trickier). Bokeh shapes can be obtained from dark and light leaves in a tree, raindrops on a window, dew drops lit by the sun in grass – on and on the possibilities go. You just have to continue practicing!
Here are a few more examples from my own photography:
The bokeh shapes in this photo are from the sunlit tree leaves:
These bokeh shapes were from the gaps between the leaves where the light from the sky came through:
In this photo, the bokeh shapes were from tiny beads of fertilizer that were scattered on the dirt behind the flower:
And finally, these small bokehs were from dew drops on the grass:
- - - - - - - - - - - - - - - - - - - - - -
Q: If I cut one shape on my paper, will more than one bokeh will show up like in your pictures, or to achieve multiple bokeh do I have to cut more than one shape on my paper?
A: The multiple shapes come from multiple Christmas lights. So if I was taking a photo of just one light, it'd be one heart (or whatever shape you chose to carve into your lens hood) but if I was taking a picture of a string of Christmas lights, then each individual light would change to match the shape of your lens hood. All you’re doing is manipulating the shape of the lens opening, in turn manipulating the shape of the light that is received into that lens. Remember that the photo of the light has to be out of focus to create the shape.
Q: Does this technique work with point-and-shoot cameras too?
A: Unfortunately I don't think it works with point and shoot cameras, although I've never tried it. It really needs to be a large aperture lens.
Q: If I wanted to take a photo with the bokeh behind something, would I have to do anything different, or is it simply not possible with this technique? Because it seems to me like the border would limit the size of the image.
A: The border has no effect on the size of the image when using a zoom/telephoto lens, it only limits the amount of light that's let into the lens (so you might have to alter the settings on your camera to make sure the photo isn't too dark).
Also, it most definitely is possible to get the bokeh shapes behind or even in front of a solid object! You can do this by physically placing your light source behind or in front of them. Remember, the light source will need to be blurred, so if you want your subject to be in focus, then the subject needs to be at a different distance from the light. For example, you could place Christmas light 10 ft behind a person, focus on the person, and the Christmas lights will be blurred in the background, giving you the bokeh shapes. OR, you could put the Christmas lights right in front of the camera, focus on the subject who is a distance away, and the lights will blur into a filter-like effect.
Examples of bokeh…
behind a subject:
[link] by =ClaireCollyer
[link] by ~chromerobot
in front of a subject:
[link] by ~nosurp
[link] by ~borderlining
behind and in front of a subject:
[link] by `hellfirediva
- - - - - - - - - - - - - - - - - - - - - -
Well I hope that helps! Happy photo snapping!

Related content


Comments: 80

 (Smile)")

hello,
i was wondering if you could help me, I have been trying to create a heart shaped bokeh and I am having a fair bit of trouble. I have a 50mm lens and my lowest aperture is 3.5
What size should i make my heart?
👍: 0 ⏩: 0

This is a lot of help, thank you for sharing it!
However I'm a little uncertain about something, if I wanted to take a photo with the bokeh behind something, would I have to do anything different, or is it simply not possible with this technique? Because it seems to me like the border would limit the size of the image...
👍: 0 ⏩: 1

The border has no effect on the size of the image when using a zoom/telephoto lens, it only limits the amount of light that's let into the lens (so you might have to alter the settings on your camera to make sure the photo isn't too dark). The bokeh shapes can be behind (examples: [link] [link] ) or in front of (examples: [link] [link] ) a solid figure (or both, example: [link] ) without any change to the bokeh effect.
👍: 0 ⏩: 1
Oh! That makes more sense ")

👍: 0 ⏩: 0

i've been trying this for a while with my nikon d40 and 18-55mm lens.
i've read other tutorials online as well, but i can't seem to get rid of the black border around the edge of the picture. i've tried cutting shapes as small at 2mm up to about 10mm, but nothing seems to work.
do you have any advice?
👍: 0 ⏩: 1
I use my 70-300mm lens. So if you have a telephoto or wide angle lens that may work better.
👍: 0 ⏩: 1
thank you. i don't have a telephoto lens yet, but i am getting one for christmas so i'll try it then
👍: 0 ⏩: 0


How do you exactly achieve bokeh in the first place? I've tried with a macro aswell as a 50mm f/1.8 and I never achieve those crisp sircles.
Does the light source have to be very intense or something?
👍: 0 ⏩: 1
I've edited the description on this tutorial to contain some questions and answers from people, and I also elaborated on the technique. Let me know if that helps you out!
👍: 0 ⏩: 1
Great adding so much to the decription. Very detailed!
👍: 0 ⏩: 1
Haha, yeah, now the description is a tutorial in itself.
 (Wink)")
👍: 0 ⏩: 0

This is so cool! Does this technique work with point-and-shoot cameras too?
👍: 0 ⏩: 1
Unfortunately I don't think it works with point and shoot cameras, although I've never tried it. It really needs to be a large aperture lens.
👍: 0 ⏩: 1
Ah. That makes sense, though. Thanks!
👍: 0 ⏩: 1

great tutorial! thanks for making it
👍: 0 ⏩: 0

wow this is really really useful! thanks a lot!! a mistery has been revealed...
👍: 0 ⏩: 0

Wow great technique, thanks for sharing
can you clarify something for me? So if I cut one shape on my paper, more than one bokeh will show up like in your pictures, or to achieve mutiple bokeh I have to cut more than one shape on my paper?
👍: 0 ⏩: 1
The multiple shapes come from multiple christmas lights. So if I was taking a photo of just one light, it'd be one heart (or whatever shape) but I was taking a picture of a string of christmas lights all bunched up, hence the multiple shapes. Remember that the photo of the light has to be out of focus to create the shape. Does that clear it up?
👍: 0 ⏩: 1

What a neat idea! Thanks for sharing.
👍: 0 ⏩: 0
")
What part don't you understand? I'll help!
👍: 0 ⏩: 1

i did everything but i dont know how to take the picture.. :s
👍: 0 ⏩: 1

i have the same problem, when i take the picture, there is nothing like bokeh, just i don't know how to discribe this in english.... not bokeh ;D no hearts...
👍: 0 ⏩: 0

this is a great tutorial... simple, clear and focused!
👍: 0 ⏩: 1
