HOME | DD
 Zairyo — Color Tutorial I
Published: 2008-06-03 19:37:17 +0000 UTC; Views: 14689; Favourites: 143; Downloads: 1427
Redirect to original
Description
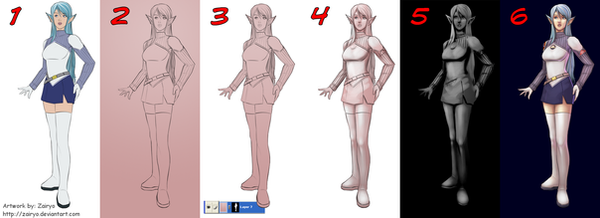
This is sort of a quick Tutorial on how I paint now.Tools:
Wacom Intuos 2 (6 x 8)
Photoshop CS (for the masking and final touches)
Open Canvas 4 Plus (sketching, inking and painting)
1. B A S E C O L O R S
This is one of those "up to you" things. I tend to work with many layers as I have every base color (that is next to each other) separate but it works if you merge them together too.
2. G R A D I E N T L A Y E R
Another "up to you" in terms of the color chosen. Make sure it fits the atmosphere. I use a desaturated color in a circular gradient layer, usually desaturated red as it gives the best effect for the skin.
3. M A S K I N G L A Y E R S
The best thing Photoshop has and no other program I've tried can even match it is the masking. If your computer can handle Photoshop well you don't even need to do the next couple of steps the same way I do them you could just edit the mask to fit your needs and go from there.
So I select every visible layer related to the character by Ctrl and SHIFT Ctrl clicking the on layers. Once the shape covers all I need I click the mask button while I have the gradient layer selected. At this point I need to go back to Open Canvas or else my PC would die (it can't handle PS all that well) so I click on apply mask, lock it and save the PSD.
4. S H A D E S & L I G H T S
Obviously select your light source first but keep in mind that objects around the character will reflect that same light in different ways. So lights and shadows are best when you have a Background that already guides you in the right direction, but if you have none just get creative and imagine it.
I start by using white at a very low opacity setting and I start sort of carving into the gradient to create a sense of volume and light on the character. After I have that I proceed with the darker areas then set the layer to multiply.
Some things are obvious at this point so I can just do them before heading back to Photoshop, like light reflecting in the eyes, lips and hair. So I create an Addition layer (linear dodge in PS) and paint the highlights for the eyes, hair and lips.
5. A L P H A L A Y E R
This is the newest addition to my technique and it is based on a Poser or a DAZ application plug in I saw advertise a few months ago. The Plug In renders the background scene in grayscale that you can then use in Photoshop to create a mask and give a sense of depth or anything else your creative mind can come up with.
So I select my gradient layer which is now sporting the lights and shadows I worked on earlier. I duplicate it, change the layer setting to standard/normal and move it to the highest spot possible so it blocks the lineart as well. I use desaturate which I believe is Shift Ctrl U in Photoshop which turns any colored layer to grayscale without changing the canvas setting. I tweak the brightness and contrast of the image to either make the shadows darker or the lights brighter or just to have a more realistic contrast. I create a black layer underneath because I'm going to create a mask from this alpha and I only need the character part visible.
Now that I have the alpha the way I needed it I go to Channels in photoshop and click on the select button. What this does is select all the white areas accordingly. For example if you have white, gray and black it will fully select the white, the gray would be selected too but if you threw a paint bucket after the selection was made you'll notice it will have a lower opacity and the black area will be ignored.
Create a new layer and apply the selection as a mask. Now the good thing about this alpha is that you can do 3 things with ease. Highlights, darker shadows and overlays.
For the highlights you can do a gradient of two opposite colors for a more interesting effect (warm and cold colors) and set the layer to linear dodge. Play with the layer opacity if necessary.
For the shadows you can use a desaturated blue and set the layer to color burn. It will look terrible so set the opacity to 30% or lower.
Overlays work like highlights except you need to set the layer to overlay. You might want to play around with the colors on this layer first.
The image in the sample only had the overlay and highlight layers so not always the darker shadows layer is needed or wanted. Keep in mind that just like Ctrl clicking a layer in Photoshop selects the content of that layer, Ctrl clicking the mask selects the mask so you can reuse it in other layers.
6. F I N A L T O U C H E S
At this point I go back to Open Canvas and create an Addition layer (Linear Dodge in PS) and give more life to those automated highlights I created in Photoshop. After that's done I could save it and be done with it or move it back to PS to add extra crap that is too annoying to edit in Open Canvas like tagging the image, the resizing etc.
Hope this tutorial helps you, I'm sorry I couldn't be more specific or explain things better. I might have an Open Canvas created image that I had saved as a "video". It's actually a replay of what I did since I opened the canvas but can only be seen in Open Canvas 4 so if you guys want me to post it (assuming I can) let me know and download the trial of OC in Portalgraphics.net
Disclaimer: This is the way I do it, I'm in no way a good role model to teach you how to paint as I don't know anything about painting. I do suggest you check out video tutorials in youtube and other related sites from people that know their stuff.
Related content


Comments: 10


This is quite informative. I'll give it a try in the future.
👍: 0 ⏩: 0

The result is very good, but beetween steps 2 and 4 is hard do understand what we need do. Is possible you detail more this steps ?
👍: 0 ⏩: 1

What in particular?
1. Masks
2. Shading
3. Gradients
Of the 3 I think only shading isn't a go look in Photoshop's Help Documents thing. I mean I learned about using masks by actually reading the help document and gradient... well by trial and error. (aka using it)
If it's something else then let me know and I might make another one more detailed.
Thanks.
👍: 0 ⏩: 1
The shading and gradient step process need more details
👍: 0 ⏩: 1
Well I don't consider myself good at shading but I can work something out with the gradient.
I'll work on that when I can, thanks for the comment.
👍: 0 ⏩: 0

Same here so at least with this method it should look good enough for people like us huh ^^
👍: 0 ⏩: 0

interesting!I'll try it  (Smile)")
I'm going to feature your tutorial in my journal. I'm featuring useful tutorials, I hope you don't mind.
👍: 0 ⏩: 1
Fine by me, I hope it helps. I'm not very good at painting and even less at explaining things but I think you can grasp the basic idea of what I did and apply your knowledge and more than likely end up with a better result. After all that's what we're looking for, new approaches that help us with what we already can do.
👍: 0 ⏩: 0