HOME | DD
 100chihuahuas — 3D Skeleton Wolf Tutorial
Published: 2012-12-06 20:01:54 +0000 UTC; Views: 16660; Favourites: 366; Downloads: 183
Redirect to original
Description
I decided to make a little walk-through of how I created my skeleton canines. I always like it when other people show their processes, so I figures some people out there would find this interesting, even helpful!It is meant for people with a basic understanding of the process used to make 3D characters. If there are any questions, just comment!
Related content


Comments: 92

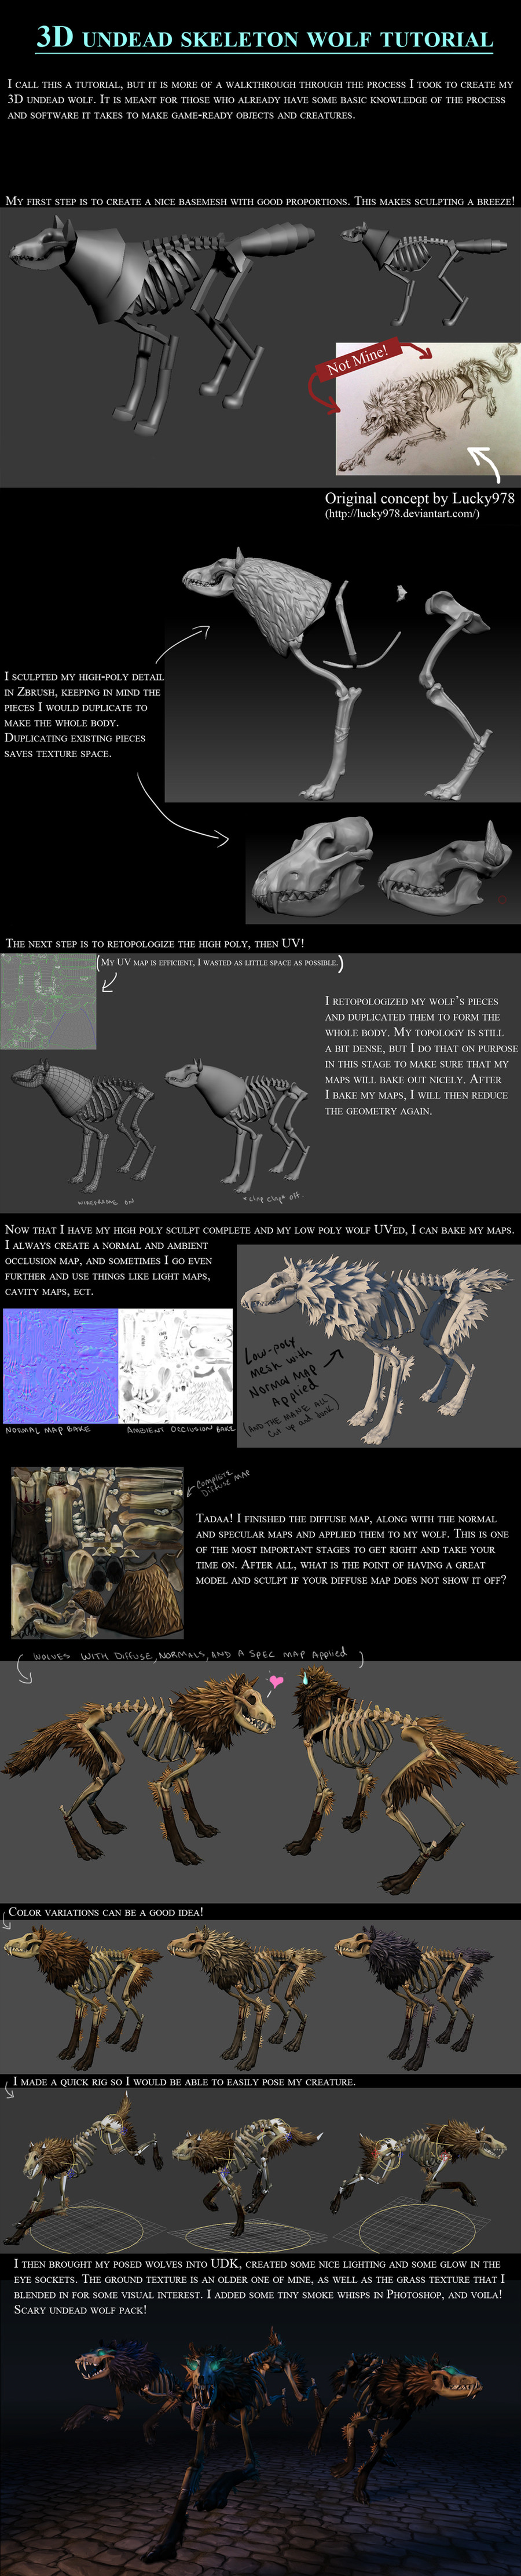
Here is my basic workflow.
1.High rez sculpt
2.Retopologize/reduce geometry (if needed. Sometimes you can use base mesh)
3. UV the new geometry (I use UVLayout and lay it all out by myself, but there are many programs to choose from. Use the one you like best)
4. "Bake" your high rez down onto your new low-resolution geometry. This is where you get the ambient occlusion, normals, ect.
5. Paint! This is my method for painting: In your 3D program, take a "Snapshot" of your UVs.Take this saved snapshot and in Photoshop, set it onto "Screen". Now it is like a coloring book, you can paint underneath the lines and, most of the time, you can tell where you are painting on the model. If you want to see how it is looking, go into Maya (with your model)and apply your photoshop file as the Diffuse texture. As you save your PS file, you can go update it in Maya to see how it is looking
Does that help? : D
👍: 0 ⏩: 1

This is such a great help, thank u SO much!!! orz 


👍: 0 ⏩: 0

Many! 3DsMax for base mesh, ZBrush for sculpt, Topogun for Retopology, UVLayout for UVs, Photoshop to Paint, Marmoset and UDK to render ; )
👍: 0 ⏩: 1

Ahhh It is just the coolest thing ever seeing my sketch come to life <3
And this tutorial is wonderful!
👍: 0 ⏩: 1
Glad you like it, Lucky! I only did it because your undead wolf inspired me so much!
👍: 0 ⏩: 0

That is so Sick , Loves it I really want draw like that
👍: 0 ⏩: 0

it has to do with getting 3D sculpted detail (on a mesh with millions of polygons) onto a cleaner mesh with perhaps several thousand polygons. This way, it can be animated and thrown in game engines. A quick gogle search will give a lot more info!
👍: 0 ⏩: 0

How do you turn the hair spikes from simple sculpting to geometry that affects the silhouette?
👍: 0 ⏩: 1
yeah, I did not explain what I did for the mane. I sculpted it as one piece, then baked it down and textured it. Once I was done, I duplicated that piece a few times, used my cut tool to cut along some rings of hair tuft, delete the polygons below my cuts, then scaled the vertexes out.
👍: 0 ⏩: 1
jaja good idea! that's a really nice model!!
👍: 0 ⏩: 0


This is helpful, thankyou! ")
👍: 0 ⏩: 1
I would quick google search Topogun. That is the program I use, it is pretty straightforward. If I am not mistaken, Zbrush has some kind of retopo feature now too
👍: 0 ⏩: 1
Thankyou!
Man before I get into that, I need to figure out how to extract a nice looking Normal Map haha, Mudbox does it awfully
")
👍: 0 ⏩: 1
Try Xnormal, it is free and I love it!
👍: 0 ⏩: 1
Yeah that worked a treat thanks!
👍: 0 ⏩: 1
I find topogun fairly simple! Besides drawing on my topology, the only other thing I ever do is symmetrize ; P
👍: 0 ⏩: 0

 (Smile)")


It is amazing!thanks alot for sharing.
👍: 0 ⏩: 0

Oh my god.... This is so beautiful. 8O
👍: 0 ⏩: 1


Pretty cool! I was wondering with the hair around the neck is/was it all one piece with some transparency to break out the jagged hair tips or did you model some extra hair pieces with jagged edges?
👍: 0 ⏩: 2
I was a bit unclear about the mane. I basically sculpted it as one big piece, uved and baked it that way. Then I broke it out into different "rings" of geometry, so the mane has no Alpha on it. I know it is not quite as tri-count-efficient, but I had more control over my texture space that way. Here are the wireframes! :thumb341385943:
👍: 0 ⏩: 1
Ah, that's a cool little workflow! Another question did you paint it before cut it up so you wouldn't have to paint the separate rings, did you run into any UV overlapping issues after moving around the geo? Also did you have to build new geo to connect the rings?
...Wait I think I see how you did it now. You actually cut the geo up so you could use all of the UVs and painted texture you you manipulated the verts using the texture as a guide to pull out the hair clumps. Very cool!
👍: 0 ⏩: 2
You nailed it! After I was done, I separated out the original mane into several smaller pieces, then pulled out verts to look like hair sticking outwards. I would have to make sure there were no visible gaps, so I took the tops of each segment, scaled them down slightly, and translated them (with respect to uvs) wherever I needed to fill the gaps.
👍: 0 ⏩: 0

You paint the texture first and then cut the geo out around it so you get the exact look you want.
👍: 0 ⏩: 0


<= Prev |