HOME | DD
 100chihuahuas — 3D Skeleton Wolf Tutorial
Published: 2012-12-06 20:01:54 +0000 UTC; Views: 16660; Favourites: 366; Downloads: 183
Redirect to original
Description
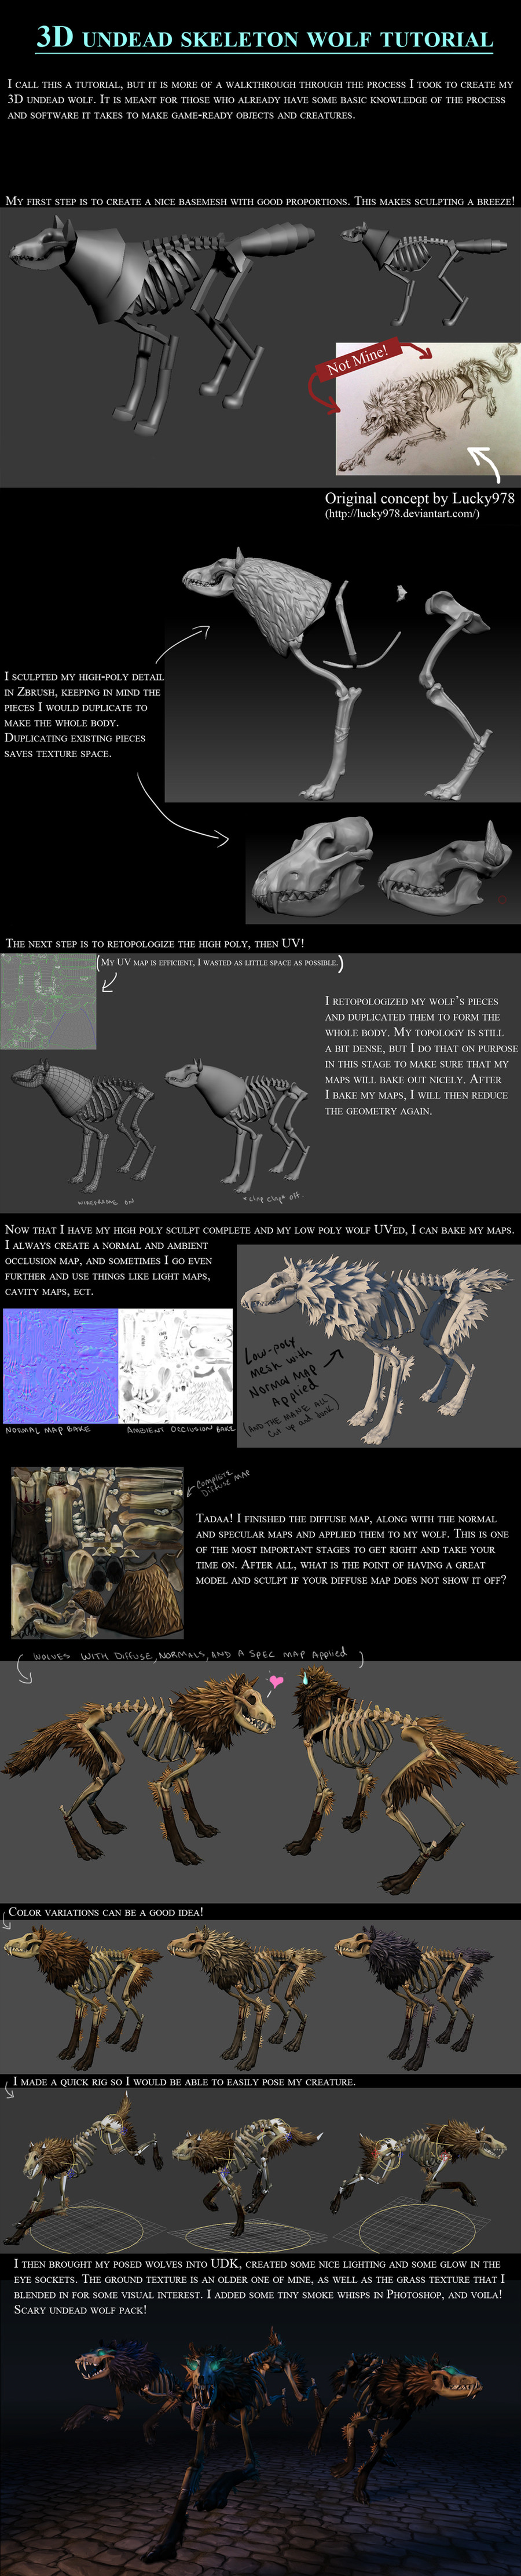
I decided to make a little walk-through of how I created my skeleton canines. I always like it when other people show their processes, so I figures some people out there would find this interesting, even helpful!It is meant for people with a basic understanding of the process used to make 3D characters. If there are any questions, just comment!
Related content


Comments: 92


100chihuahuas
Can I have your wolfskull?
I need it
'cause I edit a wolfskull too and
I think your work great.
Please,
Can you give me this skull to edit a skeleton of the wolf?
👍: 0 ⏩: 1

Glad you like it, but I don't give my assets away. I put way too much work into them!
👍: 0 ⏩: 1

astonishing work, very well done !
There's something I don't understand though :
Did you do the retopology in Zbrush?
And why did you unwrap your model while it didn't have its final topology?
Thanks for the info, I'm currently modeling a wolf for a game and need some workflow advice !
👍: 0 ⏩: 1
I did the retopology in Topogun, but it doesn't really matter what program you use.
My personal workflow preference is to bake all of my maps when my low poly mesh conforms very nicely to the high poly mesh. This will reduce artifacting and make some really nice baked maps. Then, after all the baking is done, I take out more unnecessary geometry, effectively modifying my low poly to be even more efficient.
Hope that helps ; )
👍: 0 ⏩: 1
")

How have you done fur? In zbrush it looks like one plane in uv too so how have you done it to make it ragged and fluffy ? . Is there alpha?
👍: 0 ⏩: 1
The fur is geometry, no alpha. Why? Because I didn't feel like it : )
If you look at the wireframe and the texture, you might be able to see how I did it!
👍: 0 ⏩: 0


this work is totally amazing!!! What 3D software did you use, you mentioned Zbrush, but what did you do the original basic model and rigging in?
👍: 0 ⏩: 1
Thanks  (Smile)")
👍: 0 ⏩: 1
ahh cool, nice to know, thanks ^^
👍: 0 ⏩: 0

")

Pretty cool walkthrough. I love seeing the begind-the-scenes of good artwork!
👍: 0 ⏩: 1

OH WOW THAT'S AMAZING WORK! I love this tutorial!
But... I don't fully understand, how did you made mane? I mean, before baking maps it's a simple cone, did you break the cone into seperate planes with alpha? How did you make it so it matches already baked maps? I'm trying to improve my 3D skills, and it's really interesting how you made it!
👍: 0 ⏩: 1
Whoops, sorry for the late reply. What you are seeing is actual geometry, not an alpha. I decided to geo instead of an alpha map to save valuable texture space and eliminate the need for an alpha texture
👍: 0 ⏩: 0

Thank you so much for posting this tutorial! I am doing similar things in school at the moment, but your work blows me away. I was actually hoping to do something like this for my portfolio, I also looked at the house you did for the ArenaNet intern test, NICE work!! I was wanting to work on that... any advice?
👍: 0 ⏩: 1
Glad you like it! As for advice, I would say to study the GW art style before tackling the intern test. Try to make it look like it could be plopped in the game and belong there! That is what employers want, to find someone who can do their style easily, it is less of a gamble for them : )
👍: 0 ⏩: 1
THank you so much for the advice! It really helps, I know now what I need to work on.
👍: 0 ⏩: 0

reminds me of the undead beasts from Zelda Twilight Princess o0o very nice, be cool if it was a playable model in an MMO!
👍: 0 ⏩: 1
Thanks! Glad you like them ; )
👍: 0 ⏩: 1

Most welcome. Awesome stuff
👍: 0 ⏩: 0

This is incredible..I have to ask, because all I've been hearing is what a pain it is but I don't have a clue..how did you put it into Zbrush, and then back into whichever program it was and were there any problems with the mesh and such? I work with Maya more than anything, I want to get into 3Ds Max because I believe it will be a bit more catered to what I want to do. So I suppose if you could tell me how you import or export from 3ds max and what you needed to do that would be super
")
👍: 0 ⏩: 1
A quick quip: Max and Maya do the same things, all that is really different is the interface. Especially for beginners, any of the autodesk programs will do!
.objs are the file types I use for exporting/importing, they work well. To get high-poly zbrush files back into Maya or Max, I decimate it first to reduce the polygons (google Zbrush decimation). That makes the super high-poly stuff more manageable for baking!
A quick google search on "how to import/export .objs form maya/3Ds Max" will give a lot of info!
👍: 0 ⏩: 1
Awesome. I was so worried about the astronomical poly count you get in zbrush, I like my models verily detailed O_O' I've found the plugin (I'm guessing that's what I needed to find). Seems perfect~ Thanks so much for this!

👍: 0 ⏩: 0

3ds max, zbrush, topogun,Photoshop, Marmoset, UDK, Photoshop
👍: 0 ⏩: 0

This so AWESOME!!! It looks really cool *--* I'm a complete beginner to making videogame content (or anything videogame related for that matter)
I have some questions though....How did you attach it all together? I have a mesh with several pieces appart, and tried parenting them all to the main body, but when I imported into UDK they were gone and just appeared the body (without eyes, tounge and everything else T^T)
👍: 0 ⏩: 1
Thanks! Just be sure you are selecting all of the items of your mesh before you export. Just grabbing a "parent" and exporting that will not also export all of the "children"
👍: 0 ⏩: 0


hey! that looks amazing!
since i love to make low poly models, too, i wanted to ask, which program you used for this awesome normal map. mine always get kind of messed up ;____; or maybe you have some tips for preparing the models for the bake or something :3
thanks in advance
--
Ma Blog
👍: 0 ⏩: 1
Thanks Katz! I use a program called Xnormal, because it is free, simple, and powerful for map-baking of all sorts.
There is quite a science to getting nice NRMS. For one, your low poly should have the same silhouette as your high poly, and have enough geometry to hold up detail. You may notice in the tutorial that my wolf's low poly had too much geo in it when I baked it, that was just so I would have nice silhouette for my pieces. also, try not to have any super sharp 90-degree angles on your low poly, those can bake oddly.
Your high poly's geometry matters too. For example, if you are using a sculpt and you have crashing geometry, geo that is too "pinched" or "inflated", you can get artifacts in the NRM.
If using XNormal, be sure to get the "edge padding" (I think that is what it is called) to be a few pixels. This way you won't get normal map seams on your model caused by mipmaps (zooming out, basically)
One more thing! Sometimes, artifacts just happen. You can use the clone brush in photoshop (or the "spot heal" works GREAT). The smudge tool is good at getting rid of little artifacts.
Wait, another thing! Which is probably the most important thing of all. Make sure you have GOOD UVs. Poorly layed UVs will make everything look bad, make sure there is no stretching or overlap.
Practice practice practice! You will get good at baking in no time.
👍: 0 ⏩: 1
wow, thanks, that is really helpfull!
i'm not totally new to that, though xD but really thanks!
kelly
--
Ma Blog
👍: 0 ⏩: 1
oh, I didn't mean to explain it like you were a noob, I was just pointing out the most common causes of nrm artifacting
👍: 0 ⏩: 1
no no. it's ok~ didn't mean to say that xD
thanks thanks thanks ^3^
--
Ma Blog
👍: 0 ⏩: 0

This is so amazing...
I love your wolf and thanks for the tutorial!


👍: 0 ⏩: 1

Great work. Very generous of you to share your methods. It is very much appreciated.
👍: 0 ⏩: 1

I kind of like this, a lot. Also, I'll be stealing your ideas. Okay? Okay.
👍: 0 ⏩: 1
Haha, that is what it is here for!
👍: 0 ⏩: 1

ahh it's so cool tat ur sharing the process with 3D beginners like me Q_Q i hope u won't mind me asking some questions and confirming a few steps u did up there!
So my understanding is that u've taken ur uv, normal and ambient occ map from the high-res model, and applied it to your retopologized (reduced?) model? Is that correct?
Did you lay out the UV urself? or did u use zbrush's UV master? If not zbrush's uv master, can you tell me which software did u use for the uv unwrapping?
Lastly, i am wondering what is your method of painting the diffuse map? I've seen ppl do back n forth in photoshop and maya, and some in zbrush... how do u do it i wonder
It would be so helpful if u can reply and thank u very very much for ur time >.
👍: 0 ⏩: 1
| Next =>