HOME | DD
 Athey — Portal Gun Assembly WIP 02
Published: 2012-07-30 18:04:38 +0000 UTC; Views: 2887; Favourites: 39; Downloads: 91
Redirect to original
Description
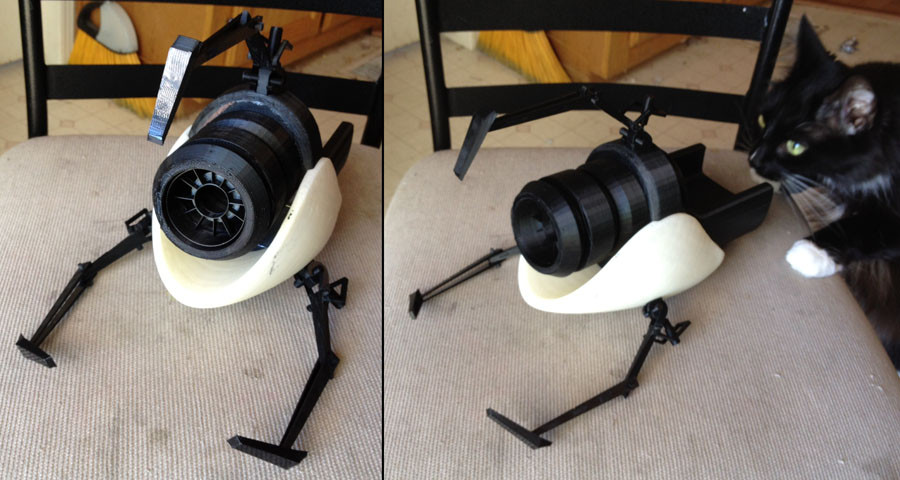
Changing the picture -I don't see a lot of point in flooding my gallery and people's inboxes with a zillion micro-steps of my wip on this thing, so I'm just replacing the previous image with this new one.
I rebuilt the three legs, and actually have them attached now. They're MUCH sturdier now - before they were so fragile that they snapped a few times and I had to glue them back together. This version has NO GLUE! All of the pieces interlock very snugly and tightly, so yay. I'd prefer not to do any permanent gluing at this point, in case I need to replace any pieces.
Anyway - Modeled in Autodesk Maya, with the printing restrictions in mind, which was a real pain to plan out and visualize how things would actually work and how I'd print them.
Everything was done without any raft support, so I had to make sure that each piece could be printed with a flat side somewhere. Most pieces snap together and hold themselves in place without any extra glue needed - that's why I'm waiting on the other two arms - they'd need glue.
Printed with White and Black ABS plastics on my Makerbot Replicator 3d printer. The big pieces were done with default layer height settings of .27mm, but the arms were a mix match - mostly .15mm.
10% infill
feedrate 40
shells 0
Related content


Comments: 19


Part of a portal gun I was working on several years ago when I first got a 3D Printer.
www.google.com/search?q=portal…
👍: 0 ⏩: 1

so, do you manually create the inner shell of the model, or does the software just do an offset from the surface normals of the manifold surface?
👍: 0 ⏩: 1
Not sure I'm totally understanding the question. The plastic is not hallow, if that's what you're asking. But you can set the percent of the 'infill' and the slicing engine uses several different methods for creating the inner fill. The one I use is a honeycomb. This vid is a good reference to see what it does -
[link]
You can, technically, make it a solid object with 100% infill, but that would eat up a lot of plastic and take forever to print.
If you didn't have any infill at all, it would have a lot of trouble printing anything going inwards - it would have any underlaying support for the next layer that needs to come in, any.
👍: 0 ⏩: 1
Oh, that answers my question, When I first started doing this stuff, they didn't have volume offsets, so if you wanted things hollow, you had to build them that way in your 3d application
👍: 0 ⏩: 1
Back when I was making things for Shapeways to print, I had to add in a thickness just because of price. You could leave them solid all the way through, but it would cost a lot more if you did that. heh - so it wasn't a totally foreign idea. But this is a layer extruder 3d printer, which is fairly different than the professional printers like they use a shapeways. It's necessary to have things on the inside with plastics extruder printers, just for the sake of support for each additional layer.
👍: 0 ⏩: 1
It makes more sense now that I've seen the scaffolding for the My little pony model. I've only printed one thing from Shapeways, and it was solid, even though I made an inner mesh for it. What unit scale are you using for your Replicater's source models. Like in maya/max? This was always an issue for me with the Shapeways estimator script for 3dsMax.
👍: 0 ⏩: 1
I'm using Maya because I've got a really nice and reliable STL exporter for it that someone wrote for it. I just set Maya's units to inches, export it, import it into ReplicatorG and it's the proper scale. 1in=1in.
👍: 0 ⏩: 0

"The device is more valuable than the organs and combined incomes
of everyone in (subject hometown here)."
Nice work so far! Do you intend make it look brand new or will you add wear and tear?
👍: 0 ⏩: 1
Don't know yet - at this point, I'm just trying to get the parts built and put together. I'm trying to plan ahead for electronics as well, since we intend to put leds in there and the ability to switch between orange and blue. Not sure if we'll go so far as to work in sound effects.
👍: 0 ⏩: 0

That's fantastic, I really need to get a 3D printer now.
👍: 0 ⏩: 0

When I'm done - if I can make the process efficient enough, I plan to make a few and sell them.
👍: 0 ⏩: 1


 (Smile)")
