HOME | DD
 AuroraLion — Poseable Zoid Model Tutorial
Published: 2013-05-12 00:12:37 +0000 UTC; Views: 5799; Favourites: 100; Downloads: 76
Redirect to original
Description
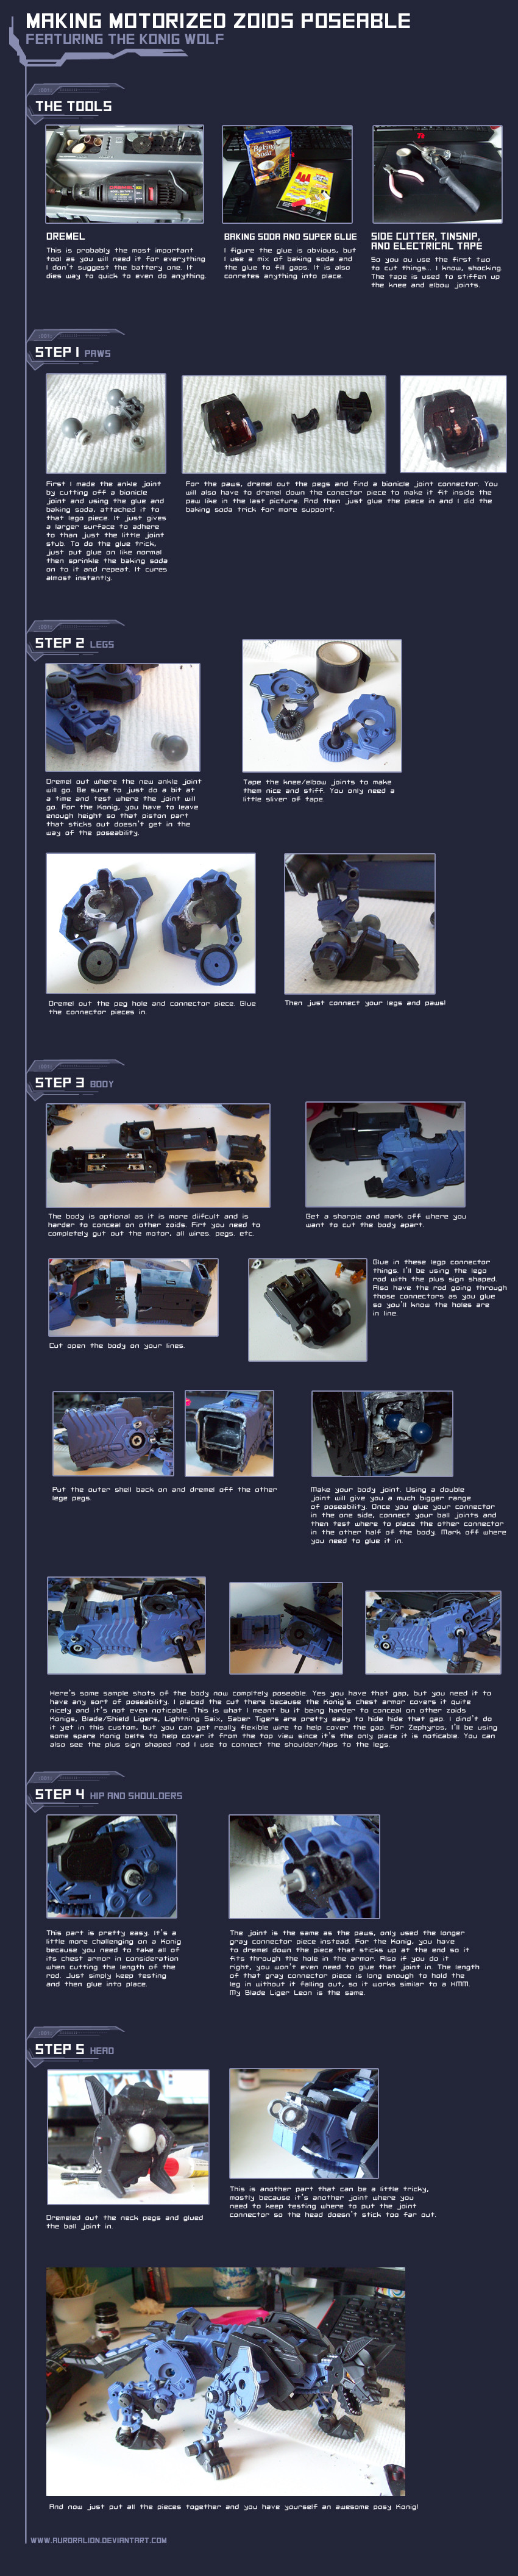
A short guide on how to make the standard Tomy/Hasbro motorized zoids poseable using lego bionicle parts. Pretty much all zoids use the same method so even though this is the Konig, you do the same for others, such as a Liger Zero. It just requires thinking and analyzing!The Konig featured in this is named Zephyros and I've been posting WIP pics on tumblr. I just need to finish painting him. This is where I'm at currently on his process: [link]
Related content


Comments: 32

Wow that seems much easier than I thought! O-O and he looks epic
👍: 0 ⏩: 0

A nice, excellent tutorial! Thanks for putting it up for everyone! <3
👍: 0 ⏩: 0


If i had the money to buy a Konig wolf, pay for all the shipping and to pay you for your time I would love to have a Konig wolf to add to my collection. Only I just spent all my money on a HMM Great Saber Tiger ,Silver Chrome saber custom parts along with paints for a custom I'm preparing.
👍: 0 ⏩: 0

Another thing i like to do for leg joints is use heat-shrink tubing. Its for sealing electrical cables. Cut a bit off to fit the peg, leave a bit off the end as a guide, and apply heat to it (Blow-dryer, heatgun, lighter). Much more uniform and smooth operation of the joint in my experience. Also makes assembly a bit easier.
👍: 0 ⏩: 1

Never thought to use that. I'll probably just stick with the electrical though since I've never had any trouble with and turns out perfectly fine. I know my materials are, um, unprofessional?, not what the real serious modelers use, and out of the norm. I like to think of mine as the hobo special

👍: 0 ⏩: 1
Nah dude! With modeling, its all about what gets the job done the way you want it. Heck, we use Lego's and electrical wires and it still looks great. Rock what you've got.
")
👍: 0 ⏩: 0


Pretty cool little tut! The use of the small Technic piece to increase glue area is a great idea (wish I'd thought of that).
Incidentally, another way to get around the gap in the waist is to build a small box out of sheet styrene (Evergreen, etc.) that only has four sides (no top and bottom). Make it slightly smaller than the width and height of the body and only enough depth to cover half the gap. Glue another piece in the box halfway along its length and cut out a hole to slide over the double joint. Slide it in along the length of the double joint and you have something to help cover the gap that will transition with the joint as it moves. Depending on the size of the gap, you can make another smaller box that can fit one end inside the first, etc. It's a trick usually seen in Gunpla kits in the waist area-- but sometimes customizers make them more extreme if they extend the waist (or torso) for added poseability.
👍: 0 ⏩: 1
Oh yes I've done that already for my redler X3 For a college kid, I have to take any kind of short cut I can to not have to buy anything and I'm saving my only styrene piece for Knock Out lol
👍: 0 ⏩: 1
Hmm, I've got a spare sheet or two around here. PM me your address sometime, and I'll send it over someday-- I'm horrible remembering to mail stuff, so that's why I can't promise a time. lol Creativity shouldn't be crushed because of college costs! Only my forgetfulness to mail stuff...
 (Wink)")
👍: 0 ⏩: 1
Cool thanks I'll let you know whenever I need a sheet. I'll be busy finishing up this Konig and I just spent all my saved money for a model on a FSS Auge resin kit that I'll be working on next. Auge will be my first resin and FSS kit
")
👍: 0 ⏩: 1
Awesome! Which Auge kit? I have the Machine Mess version seen here: [link]
I'll get around to finishing it someday-- hooray for pinning into infinity to keep it together!
Welcome to the wonderful world of resin... where if the toxic dust doesn't kill, it'll at least make a mess of the surrounding area! lol
👍: 0 ⏩: 1
I got this one [link] I liked the elegant stance X3 I'll probably go with gloss white and copper since I absolutely love that color combination. I honestly don't care for using two metallics together like how I usually see the kit painted.
Hah yes~ As I do with painting, I'll be waiting and working on it outside. I wish I could find Testor's and Model Master's non-toxic model paints easier. I love using those and they brush on really nice. That Konig's completely painted with a brush and it looks sprayed.
👍: 0 ⏩: 1
Yeah, that version won't be as much of a hassle to pin as mine since the pose is more neutral. Of course, that's not saying much since any Auge is still obnoxious to pin thanks to the shoulders (especially MM versions). But still, 10-20 less pins nothing to sneeze at! It'll be interesting to see your color scheme-- very Mirage-y so it should look pretty good with the design. Maybe a pearl finish on the white?
I'm now pretty much 100% Gunze solvent-based (Mr. Color) and Gaia now, but yeah, Model Master Acryl is pretty good stuff and a couple of figure builders I know swear by it (including my father).
👍: 0 ⏩: 0


This is fantastic! I know I'll definitely be giving it a try at some point!
Using the bionicle pieces is a stroke of genius.
Excellent work as always AuroraLion!
👍: 0 ⏩: 1
Thanks! I have a ton of bionicles from childhood days so figured I'd just use those instead of buying the "professional" joints. I honestly think they're better anyway because they allow more movement.
👍: 0 ⏩: 1
Indeed! I've also got heaps from when I was little, I've got plenty in storage I could happily recycle for parts as well. This certainly opens up a wealth of possibilities for future projects for me!
👍: 0 ⏩: 0

Do you just buy the whole bionicles to get their parts or can you buy just the joints to use? I've been thinking about doing this with some of my zoids models, but don't want to have to disassemble a bionicle for their parts if I can just buy the joints. lol Anyways, nice tutorial. Definitely will be using it when I do this. n_n
👍: 0 ⏩: 1
I'm not sure if they sell the separately. I have a ton of bionicles from childhood days so figured I'd just use those instead of buying the "professional" joints. You can get the regular ball joints pretty easy though like on this site [link]
👍: 0 ⏩: 1
Gotcha. Thanks for the link to that. I'll probably give it a shot sometime in the future when I have some leftover money.
👍: 0 ⏩: 0

*downloads*
...I would still be freaking terrified to do this on a saix...but one day...one day dangit lol not sure how far I could get with the head due to aesthetics vs. poseability issues previously discussed but posey legs at least would be cool.
perhaps one day there will be a posey Sheba XD
👍: 0 ⏩: 1
Yes! Don't attempt until you're comfortable in doing so, but yes the legs are very easy to do and would be worth it to make some nice running poses! I did find an old Saix of mine so I'll look at making him poseable next X3
👍: 0 ⏩: 1
that would be great, pics would be great if you do, specifically of the head/neck modifications.
 (Smile)")
👍: 0 ⏩: 0


This is a really awesome guide! Articulating some of my Zoids is something I've really been wondering about, but always been a little too scared to try. Though I guess as they say, nothin' to it but to do it. It helps a ton to have an in depth walk through of the process, though!
👍: 0 ⏩: 1
Thank you and no probs! I've been wanting to do a tutorial for a long time now on this. It really is very easy to do, just takes some time. As I said in the comments section, just think and test before you do anything permanent and you'll do fine
👍: 0 ⏩: 0

Very cool tutorial here, must be very frustrating work doing these projects? But in the end it's all worth it.
👍: 0 ⏩: 0