HOME | DD
 Bllacksheep — Adding Straps to Worbla Armor Tutorial

Published: 2013-09-07 19:50:23 +0000 UTC; Views: 30456; Favourites: 451; Downloads: 91
Redirect to original
Description
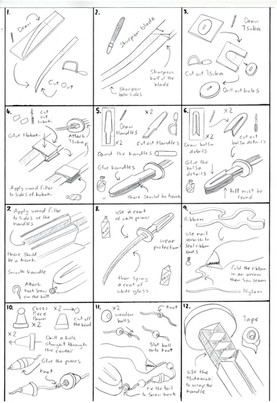
This Tutorial:Here is a tutorial on how I created and attached the straps to the Worbla armor on my Dante's Inferno Cosplay.
Tell me if you have any questions!
Shoutouts:
If you use this tutorial to make your own work, or if the techniques shown here inspired your work - then I'd love to see what you've made! If you comment or message me a link to your photos, then I'll post your link right here in the description:
Costume Full View:
More of this Costume:
Companion Tutorial:
Related content
Comments: 21

You're amazing! Thank you so much for posting this. I am tackling Worbla for the first time this week as armor for my horse... My biggest fear/concern was attachment.
👍: 0 ⏩: 1

Armor for your horse... you mean a real horse! I hope so, that's awesome! Well that's great I'm glad it was helpful 
👍: 0 ⏩: 0

thank you very much for the tips/tutorial. just what i needed ^^
👍: 0 ⏩: 1

Np! I'm happy it was helpful!
👍: 0 ⏩: 0

Gah, see, I had the same problem and glued straps to the armor, using Worbla would probably have been better. Also, the Elsastic is a neat trick, I never thought of taht! Thank you so much, it is really difficult to find instructions on how to fix your armor to your body!
👍: 0 ⏩: 1

No problem! I know, the process of making straps and padding is neglected haha. It's one of those things I always said, 'I'll figure it out later'. But after wearing a cosplay to a convention, the straps make all the difference in terms of comfort. I've never tried the elastic method myself, I found the design on the chest strap of my hiking backpack. So I know it will work! I'd like to try it out, I bet it will make a big difference.
👍: 0 ⏩: 0

You know, even the most well known cosplayers' worbla tutorials seemed to have left this part out. I had been Gorilla gluing my straps onto the back but this seems much stabler.
Any experience with this in heat yet? Did the worbla holding the D ring on ever loosen?
Also, just an FYI, you can TOTALLY buy those D/square rings at a trimming store to save on time next time you do this!
👍: 0 ⏩: 1

I looked for the square rings at my local sewing store but they didn't have any. They had d-rings with pink rhinestones on it though, that would've given my armor a nice touch! It would've been nice if I let people know in the tutorial that you don't have to make your own rings, though...
It was really hot when I went to Otakon, and I stood outside in the heat for an hour or more wearing my armor and I didn't have problems with any of my Worbla reactivating. And I didn't have any problems with the rings loosening, or the Worbla attaching them loosening either - it all held up really well. I wore my armor for 3 days at Anime Boston and 2 days at Otakon and I had no issues with the straps. When I was experimenting with it, I found that the key to those little Worbla strips being sturdy is that step in the tutorial where you take a knife, and sink it into the Worbla strip and down through into your armor. This is what really creates the bond, and fuses the two pieces. Without doing that step, my guess is the Worbla would fall off eventually.
Well I'm glad you found this tutorial! Overall, this method worked really well for me, I'd recommend it if you're making Worbla armor any time soon
👍: 0 ⏩: 1

I already did use worbla but it didn't go nearly as smoothly. Your tutorials will definitely come in handy next time. Thank you so much for taking the time to make it!
👍: 0 ⏩: 1

No problem! Thanks for stopping by! I like your work, and if you ever wanted to make a tutorial on how you do your wig coloring/styling, I'd definitely read it 
👍: 0 ⏩: 1

OH LORD I'M NOT GOOD AT WIGGUS
I'M STILL LEARNING >_<
But thank you!
I actually only ever did one Sharpie wig and it was horrible. Never again. x_x
👍: 0 ⏩: 1

Your wigs look good to me! 
👍: 0 ⏩: 0

WONDERFUL! Thank you so much, this is very helpful!!
👍: 0 ⏩: 1

You are very welcome, glad it helped!
👍: 0 ⏩: 0


Your awesome tutorial has been featured in my weekly journal: Tutorial Tuesday #17 .
I'd love if you could take a look, and offer support and encouragement to your fellow tutorial writers through comments on their deviations
👍: 0 ⏩: 1

Thank you for the feature! 
👍: 0 ⏩: 0

