HOME | DD
 Blue-Uncia — Mewtwo tutorial 4

Published: 2008-01-01 12:21:22 +0000 UTC; Views: 1785; Favourites: 37; Downloads: 22
Redirect to original
Description
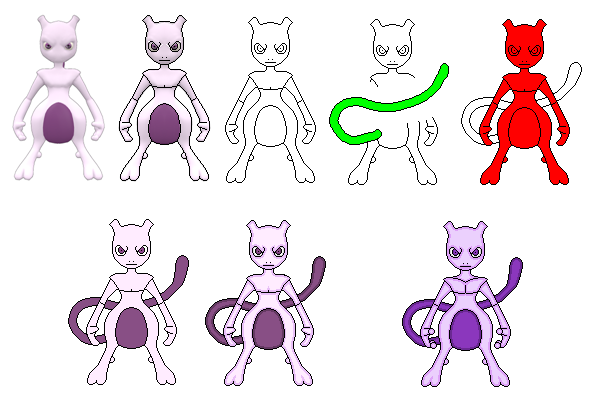
This picture is part of my "Mewtwo's armor tutorial".December 2007: Mewtwo tutorial
Please visit my site to view the full tutorial
Ok, so we'll use this rather ugly looking frontal shot of Mewtwo, as a base to draw Mewtwo's armor. When drawing mechanical things, such as cars, planes, mecha's and Mewtwo's futuristic armor, it's very easy to get lost in the details. So first you need to establish the general shape of the armor, by roughly drawing its basic form (step 1 to 4). Keep in mind that the helmet curves around Mewtwo's ears/horns (see step 6 to 8) and that the chestpiece is in front of the two shoulderpieces. If you draw the shoulders in front of the chest, Mewtwo will look as if he's hunching over, and that doesn't make a very powerful impression. Also don't forget that the armor has a tailring, quite close to the base of the tail.
After you've drawn the general shape of the armor, you can go nuts on the details (step 5 to 8). Mewtwo's armor has oval decorations and it also has what look like ducts on the arms, shoulders and chest. I guess the armor is prone to overheating every now and then. In the movie, the chestpiece is closer to the waistpiece and the helmet's chin reaches all the way down to the chest. The shoulders are also closer together, which means that the armor looks more compact, doesn't show Mewtwo's neck (makes sense, I guess) and reveals only very little of his belly. It's a more menacing look, than what I managed to draw here. That's because I'm not perfect...
 (Smile)")