HOME | DD
 cermaith — Basic Artdoll Making: Part 3
Published: 2006-03-05 10:57:06 +0000 UTC; Views: 3558; Favourites: 32; Downloads: 44
Redirect to original
Description
So I'm making another one and thought I'd take pictures of the process, what I do. I don't know why, just.. thought I'd share. I'm constantly refining it so this is slightly different than Fear Darrig, and rather different than Otto and so on, at least of those works I have taken photos of and made available. This particular method I like very much though. Deirdre's played with it quite a bit and it's no worse for wear, so this is not a fragile doll or dollmaking method. The head armature is there for proportion, it twists off to be sculpted over and baked separately.---------------------------------------------------------------
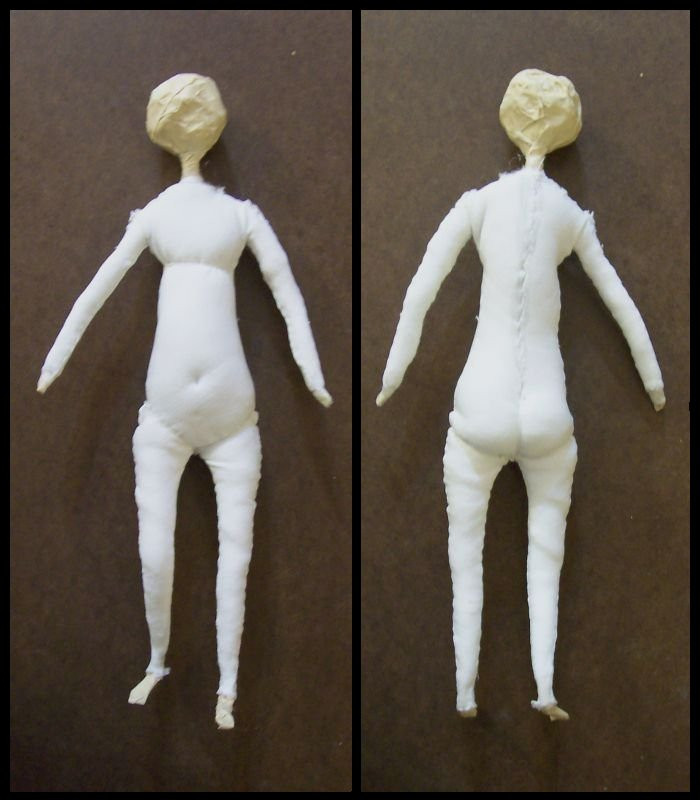
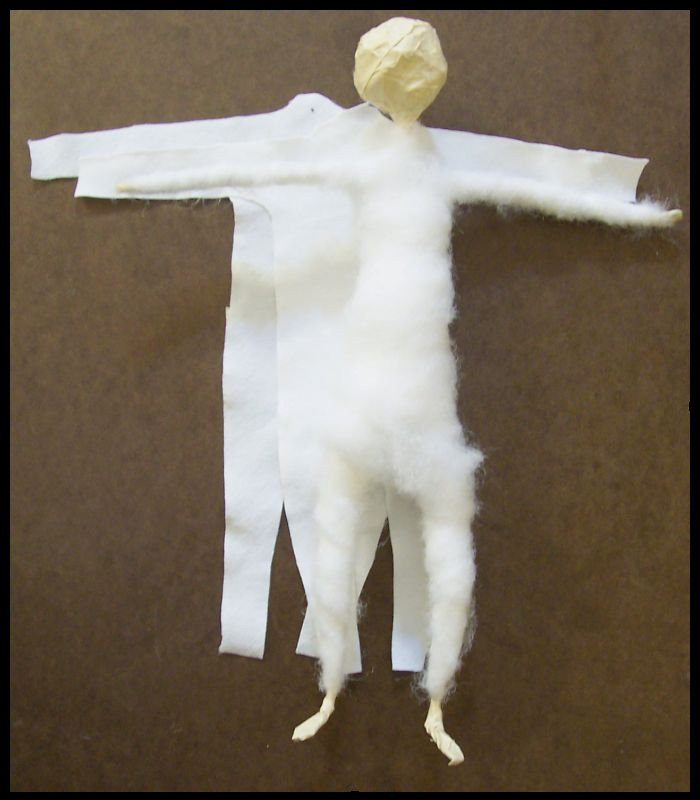
Here we have the doll, stocking on, stuffed and "done" except for the sculpted portions. After sewing the two pieces of body-stocking together (leaving a hole at the top/neck from roughly armpit-to-armpit so that it can be slipped on the doll), I turned it rightside out (with the help of small needle-nosed pliers to get in there and pull the legs and arms out). At the ankles and wrists I applied some fabri-tac and smoothed it around and over both the batting and taped wire to keep the batting from going anywhere before I began slipping on the stocking. If I did not do this, the batting would pull up when the stocking went on and just make a lumpy mess. When that's dry, I pull on the body stocking, legs first. It takes some funky bending getting the arms to go through, but they do go, and this is why the big hole at the neck. As it goes on, I add small amounts of additional stuffing in the places I want to be thicker (in this case, the abdomen, buttocks and shoulders got some) and tighten the stocking over those sections to keep it in place as I pull it on. For this type of stuffing, I use fiberfill, a silky, slippery, fluffy type of stuffing (not batting like the quilter's) which is much easier to poke down into the right places. Once the stocking is on, I proceed to sew it up around the neck using a ladder stitch, gathering any excess fabric and tucking it under. Sometimes I get a tuft of thread from the fabric coming through, but it's not a big deal as long as the stitch is good and tight. It can be trimmed off or glued down later. For the body shaping, I use some simple stitches and tricks to create the curvature of the spine, the buttocks, leg creases and pectoral muscles. That's all I did for this guy as I wanted him to have this look, but you can do more for more defined shaping if desired like abdominal muscles, strong shoulders, etc. When everything is all sewn up I smear a bit of fabri-tac glue on any knots, complex seams that might make a run in the fabric if abused and on the ankles and wrists again, to keep the fabric down in those areas and keep it from tearing or snagging until I get the hands and feet on.
Related content


Comments: 15


Wow, so far this has been extremely helpful... now I'm thinking about making little fairies to play with my big dolls...
Thank you so much for doing this - I (as well as many others) really appreciate it!
👍: 0 ⏩: 1

Hehe. No problem.. I just figured I'd take pics as I made one and see what happened. Next comes the sculpting part. I'm not sure how to break that down.
👍: 0 ⏩: 1
Yeah, that's kind of more of a case of learning and practice, but any tips would be helpful ^__^;
👍: 0 ⏩: 1
I just ended up sculpting it. I rework my sculpt soooo many times cataloguing wouldn't be helpful.
👍: 0 ⏩: 0


Very cool~ I love to see how others make their dolls~
👍: 0 ⏩: 1
 (Smile)")

I think what your doing here is really cool, its great to see someone teaching 3d techniques on DA
👍: 0 ⏩: 1

woow! more more more!
.....,/)/)
....( . . )
c((")
👍: 0 ⏩: 1