HOME | DD
 CGCookie — Exercise 44 Results: Slime Time Step by Step

#goo #digitalpainting #drawing #drips #goop #ooze #otis #reference #rendering #skull #slime #stepbystep #translucent #tutorial #drawingsteps #slimemonster #cgcookie #conceptcookie
Published: 2016-03-07 17:01:23 +0000 UTC; Views: 95940; Favourites: 1808; Downloads: 1019
Redirect to original
Description
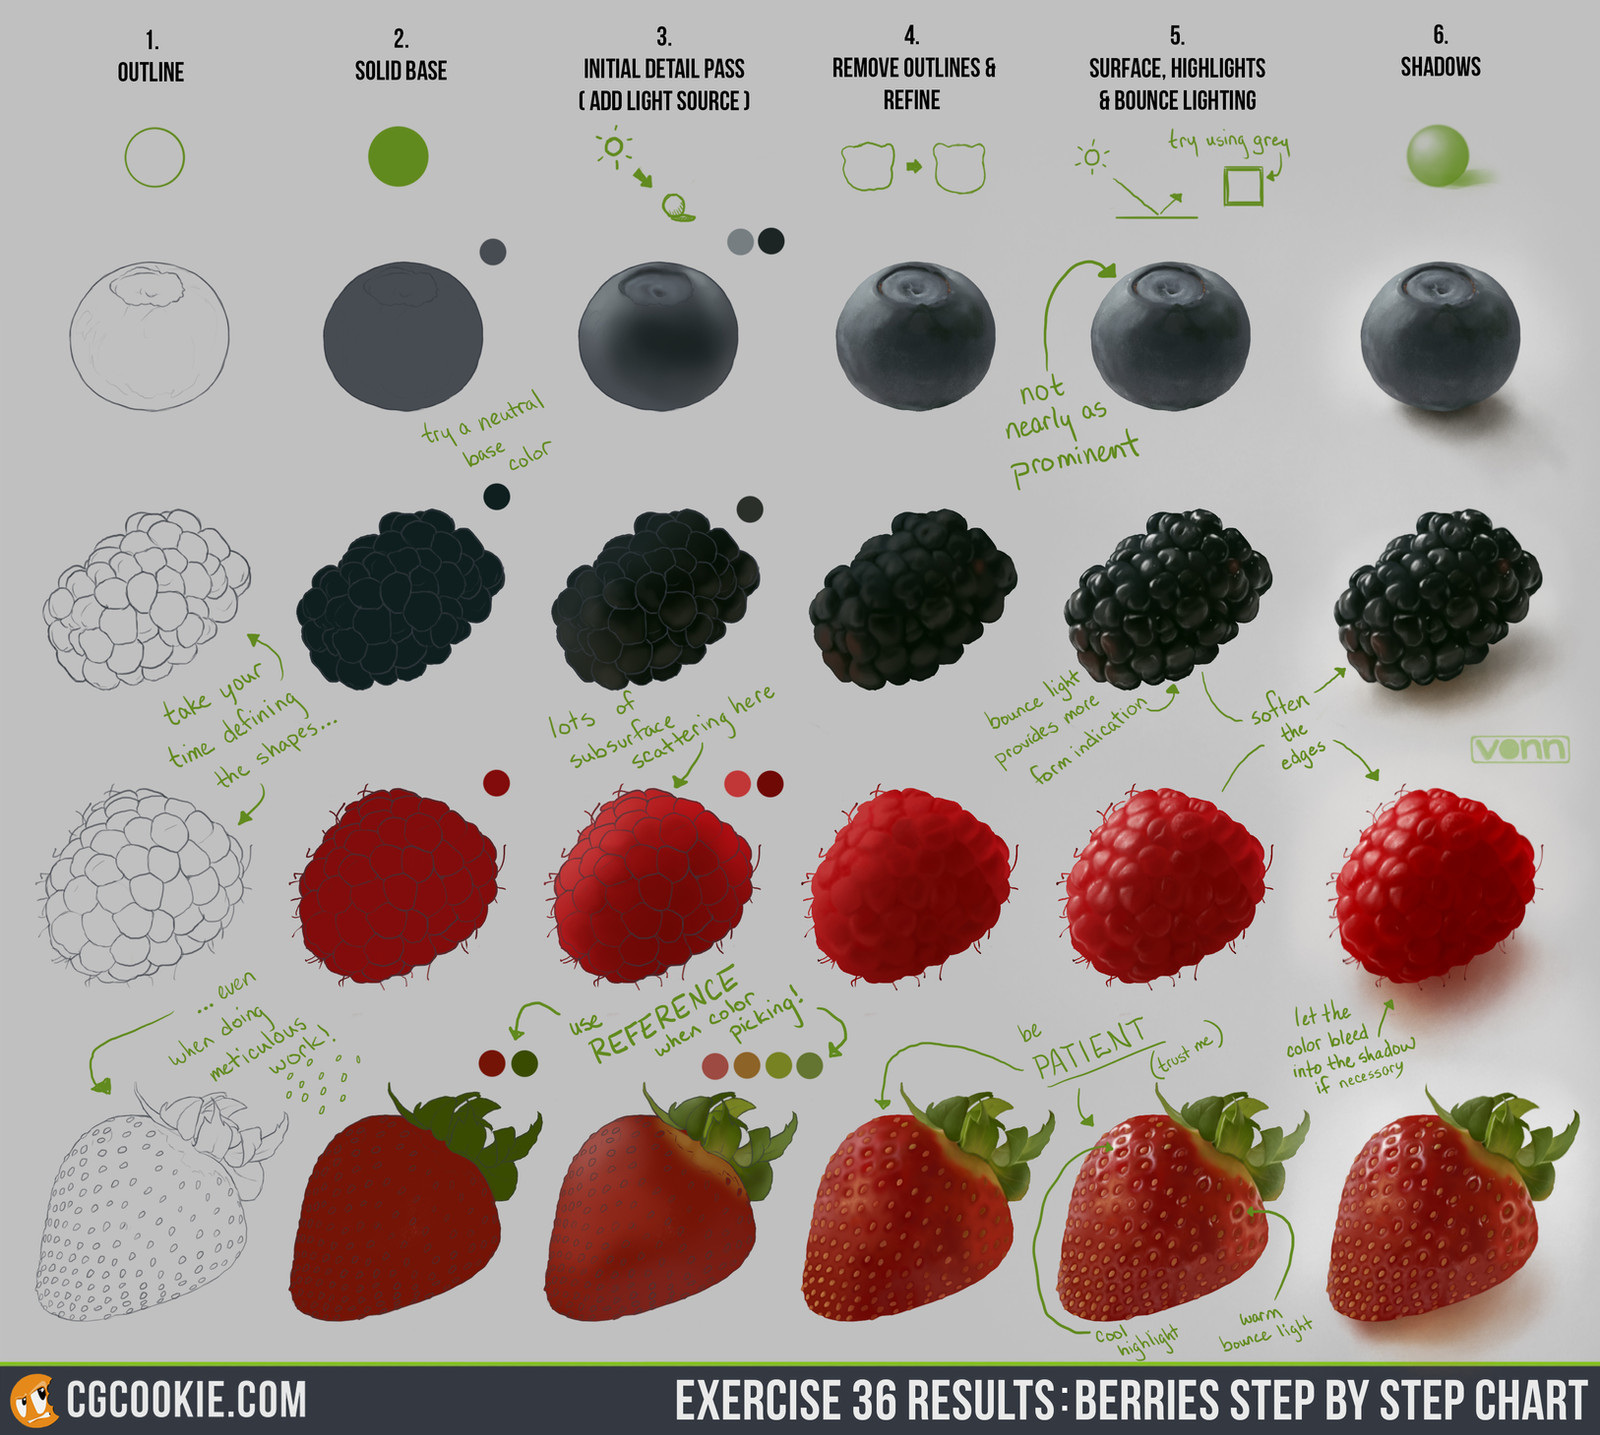
Check out the Exercise and Download the Step by Step Guide HERE .And here is the practice worksheet for this exercise HERE .
Artist: Joe Chico
This exercise was extremely useful for understanding light through translucent objects, along with how some materials may wrap or hang around an object. The difficulties I ran into were understanding that it's often times not just one bright white highlight on an object to make it look like goo. Instead it's the accent lights and the soft highlights that help sell a good goop, that and bubbles... lots and lots of bubbles. Eventually I started thinking about how these forms aren't just two dimensional paintings, but instead in reality they have mass to them, and you can clearly see it by what's laying inside of them. When working with goo or slime, it's always important to remember that the center of the mass is more dense and thicker in opacity along with darker. When gravity takes effect of drips of goo that hangs, it's shows that thinning of slime can cause it to pick up the color of the object it sits in-front or lays on-top of. Color/Density of ooze will also factor into how clear you can see under-neath the object such as the dark green, compared to the light blue.
Now while I used my self-made reference pictures for understanding the slime, I came to our friend Otis the ooze, who is the third object on our worksheet. I didn't want him to read exactly like a realistic goo monster, but instead be a bit fantastical along with being extremely adorable. Another thing I would like to point out is the other objects that arent' really the focus of this study, such has the fingers and hands. While I could spend more time rendering them, their usage wasn't so much about rendering them out to be perfect, but instead to understand what's going on under the surface of the slime.
Below is a step by step guide on how I went about this process as well as studying, while most goo isn't represented on these extremes say in animation, it was important for me to try and get as real as possible all while not making an exact copy of the reference. I hope that this guide can help show you guys how to render and think about goo, whether it be hyper-realistic or for something cel-shaded.
This exercise took a lot of time and patience for myself but I sure did learn a lot. Slime can be one of the more difficult materials to render and understand, but don't give up, take it slow and be patient because in the end it will pay off!
Related content


Comments: 10


I really love when you do these. Even though I only do photomanips when it comes to digital art, I've always been fascinated with digital painting.. doesn't feel as limited as photomanips where I have to spend sometimes hours finding the right model and such, whereas with painting you can just paint what you need. I have seen countless of tutorials and videos on this topic and am waiting to get a digital tablet as it's really hard painting with a mouse. These little step by step guides you do truly make me feel like digital painting is possible and easier than what it seems like in my head. Thank you for doing these
 (Smile)")
👍: 0 ⏩: 0

this would be a perfect tutorial for zac in league
👍: 0 ⏩: 1

Totally ")
👍: 0 ⏩: 0


")

Well, I am slimed(sorry for my slimy slum pun) but this is very helpful.
👍: 0 ⏩: 0


What a great tutorial! viscus material can sometimes be difficult to draw but you've got a great walk through!
👍: 0 ⏩: 0