HOME | DD
 CGCookie —
Exercise 45 Results: Fur Step by Step Guide
CGCookie —
Exercise 45 Results: Fur Step by Step Guide

#animal #conceptart #digitalart #fur #hair #animalfur #vonnart #cgcookie #conceptcookie #timvonrueden #art #stepbystep #furtutorial
Published: 2016-04-21 19:43:13 +0000 UTC; Views: 171536; Favourites: 9287; Downloads: 2796
Redirect to original
Description
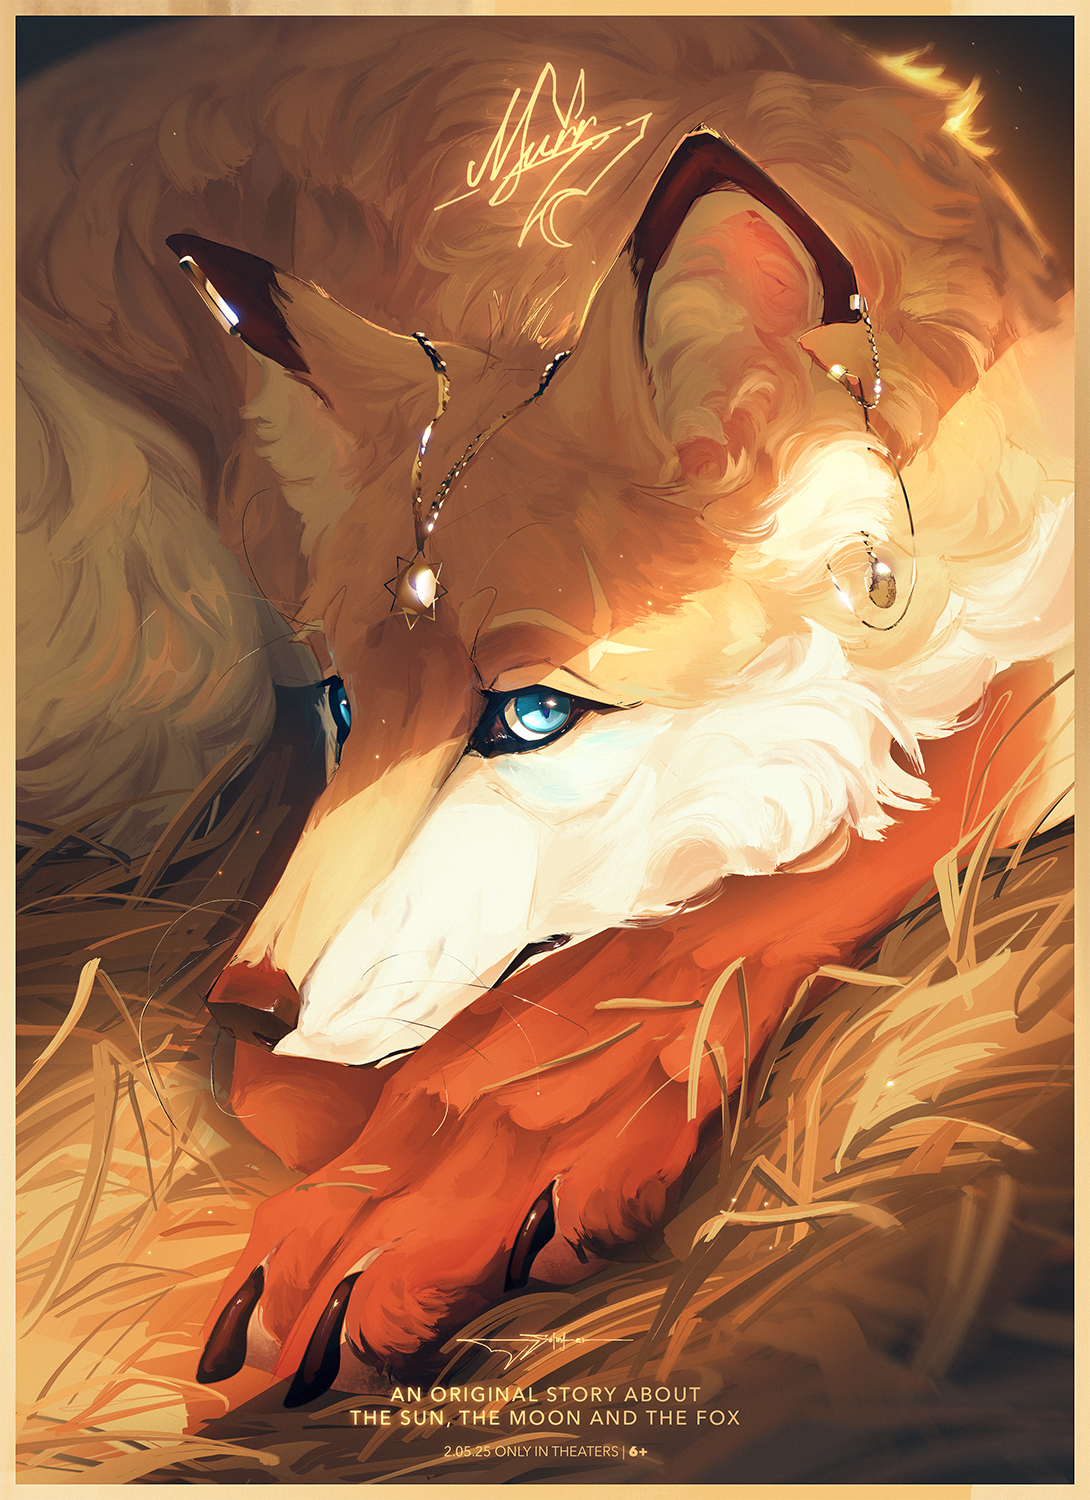
Check out our Fur Exercise and Download the Step by Step Guide HERE .Artist: Tim Von Rueden (vonn)
Fur can be tough, so be patient and don’t rush the details. If you really analyze the movement and shaping of fur, you can see how intricate and fluid it can be. So instead of creating individual brushstrokes to represent fur or drawing triangles, instead work with layering the shapes and keeping the flow moving in a general direction.
I generally start with a solid foundation value, and a slightly darker one. This allows an easy buildup of lighter values to create the illusion of fur. From there, I lay down the initial sketch and general direction of the fur which is important because it creates an outline guide to follow along. And remember that you should the fur to feel messy in areas while still following a general direction. Fur that looks too perfect may not look like fur at all but rather something more synthetic. When putting down the lighter values, avoid going straight for white but instead build it up slowly to create a more natural progression of values. I personally avoid pushing highlights at all because this can be a distraction and often strong highlights aren’t necessary. And have your brushstrokes follow the flow of the hair.
From there, it’s all about cleaning up the details and pushing edges that feel blurry or muddy. Once I think we have a solid outcome, I will then pump up the contrasts if necessary, usually with the “Levels” adjustment slider bar which can be found under the “Image” tab on the tab menu, then “Adjustments”. And typically you want an area of interest for your viewer to look at and a soft lighter “gradient” starting where the light source is coming from will do the trick!
If you’re looking to add Color, then A “Color” Layer Blend mode is a great choice for going from greyscale to color. This can be found by creating a new layer on top and changing the mode under the “Layers” menu, which is normally set to “Normal” to “Color” instead. Then you choose your color and paint over the grey to add color!
This is only one way of many to create the illusion of fur, but hopefully it can help you out if you’re looking to creating some fur in your own work!
Related content


Comments: 127

👍: 0 ⏩: 0

👍: 0 ⏩: 0

👍: 0 ⏩: 0

👍: 0 ⏩: 0

👍: 0 ⏩: 0

👍: 0 ⏩: 0

👍: 0 ⏩: 0

Ooo yes I’m saving this shit. I can never get fur/hair right!
👍: 0 ⏩: 0


Thanks so much I’ve been working on neko those cat eared people great help
👍: 0 ⏩: 0


I might try this exercise sometime for later drawings, thanks for the step guide. <3
👍: 0 ⏩: 0

Yesssss I needed this :'D
By the way, which brush types should we use and which art program would be suited for these steps? I'm used to using MS Paint so I'm a complete newbie to anything else... ;u;
👍: 0 ⏩: 1

I use krita and it works just fine. Download it here krita.org/en/download/krita-de… and learn the basics here www.youtube.com/watch?v=dQw4w9…
👍: 0 ⏩: 1
btw use regular_brush_soft
👍: 0 ⏩: 0

Thank you so much!!! This tutorial is very helpfull!
")
👍: 0 ⏩: 0

I still don't know what kind of brush-setting i need to use.
👍: 0 ⏩: 0


At first, it looked like "how to paint a fluffy phone case"
But still, that's a nice tutorial :3
👍: 0 ⏩: 1


oooo, wow thanks :3
👍: 0 ⏩: 1


There are different types or fur ya know, individual brushstrokes are nice if you can use them. And most of the ime the texture of fur looks like strokes, these curly hair are common for dogs and cats maybe(the breeded ones).
👍: 0 ⏩: 0


do you paint/shaded on the same layer? (im sorry if this is a stupid/already answered question)
👍: 0 ⏩: 0

Even though I'm helpless in the art division, I must say this is impressive. Great steps (make me feel like I could actually do it) and not a simple, sloppy tutorial. This will help many
 (Smile)")
👍: 0 ⏩: 0

Wow, thank You very much. I was looking for a tutorial like this.
👍: 0 ⏩: 0

Thank you so much this is most helpful for my art project!
👍: 0 ⏩: 0


i really like this tutorial. i dont use photoshop for art, i use Paint Tool SAI. but the final step was actually my downfall. am i supposed to do this al in the grey and then add the colour somehow at the end? because doing it this way left me only able to overlay one colour, and if i were to say do this for a tiger which has white fur and orange, and stripes, im unable to give it those colours because they dont layer well on SAI. it usually hides all the fur effect, or the colours dont show up properly at all cause of the greyscale in the first place..
is there any tips or suggestions? thanks
👍: 0 ⏩: 1

You can use the shade layer on low opacity to add stripes, or lumi and shade layer on lowish opacity for all colors. <3
👍: 0 ⏩: 0


| Next =>