HOME | DD
 chiihun — Tutorial: Le Fab Ironman - SAI color how to
Published: 2012-07-07 02:39:09 +0000 UTC; Views: 6623; Favourites: 128; Downloads: 2
Redirect to original
Description
hmm per fallenpapers ([link] ) request, here is a tutorial on how I color on SAI.This actually a commission for Hiddencamela ([link] ) that i'm currently working on...I'm right up to the pre-rendering stage...so the 2nd part of the tutorial should be up by the end of the weekend haha...if yakuza4 doesnt suck more of my soul awayyyy~~~ ITS AN AWESOME GAME EVERYONE dd8Dbb i get to experience the life of a yakuza from the comforts of my home XDDDDXDXDDXDDD
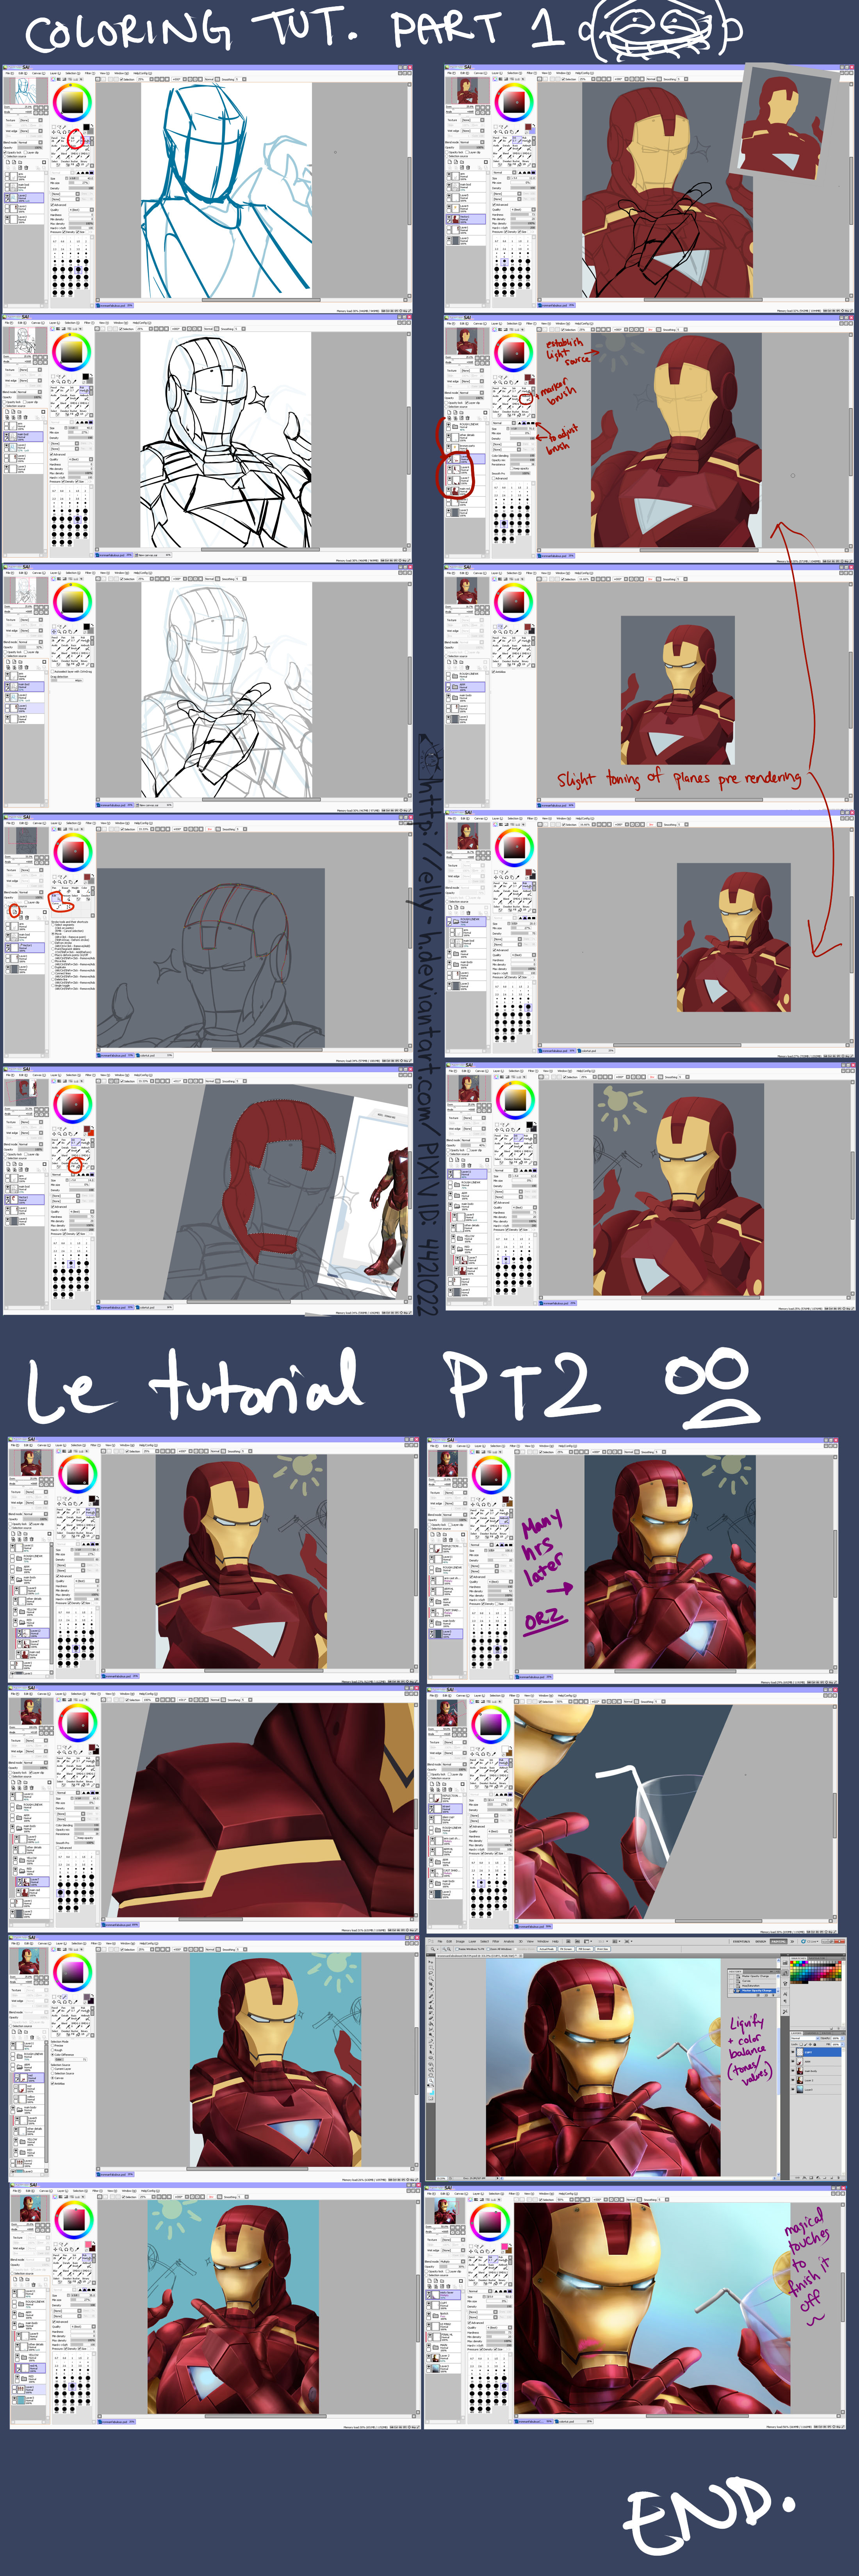
err this piece is slightly different than what i normally like to do as it has no line art....but if it were my regluar lineart half render....i'd clean up my sketch with either the vector tool or manually with either the pen/crayon/pencil brush, then fill in the color and shade. anyways, here's some quick notes on what i did here so far, i've circled the brushes/tools being used in red...thought it might be faster than me typing a name out XD
1. sketch and establish composition/pose & perspective of the character
2. rough in line art
3. vector tool to start blocking in color flats
4. establish a light source & put the new layers on a clip mask to fill in more flats, but these flats are for the plane changes to create the 3D-ness
5. i've started to lightly tone some areas to shape it out but just roughly. then i did editing as some proportions and angles were off
6. roughed in the cup in the hand, but ignoring it till the very end
And its ready to be rendered....ahhh...this above took about 6hrs?mayybbee up to 8....i was really confused at the neck and shoulder construction of the suit )8
**PART2
so after getting it all blocked out
1. i layered a set of shadows to mark off the shape of each part of the subject. i did this using the marker/airbrush/pen brush on different opacities. i made sure these brush strokes contoured the shape of each part & kept the light source in mind. the type of metal i went for was a stainless steel type so i gave some grain on the surface and did not completely blend out the brush strokes
2. after a couple of layers of color and establishing the shapes, i went in with the 1st layer of highlights and reflective lighting. Since i'm doing a high shine metal...i went in with a bright color (closer to the white and more vibrant). then went over the spots where light would hit and blended it with the shadow layer done in step1
3. after repeated layers (this took me about 8hrs) the subject was rendered enough to put a 2nd set of highlights and shadows. hmmmm for this 2nd set of highlights i used a more complimentary shade so it stands out a bit more creating more contrast...as for the shadows they're the global cast shadows and i just eyedropped the darkest color used so far and painted it on with the marker brush
4. added in the remaining details after this and then took it into photoshop to adjust color balancing to make sure there was enough value. then went over it again with more vibrant colors that was lost during the color tweaking. used liquify to correct whatever was out of place
5. lastly....did all the final final effects + details flipping btw photoshop and sai....i didnt do much of a bg on this...the bg is just a pulled gradient with some blotches of color here and there
and thats all orz. i actually did not use the vetor tool entirely when blocking out the parts....i mostly freehanded the fills...i found that faster......i only used the vector for curves and circles lol
completed on here: [link]


 (Cool)")


