HOME | DD
 chioky — Swordmaking Guide: Part 5
Published: 2007-10-16 21:51:25 +0000 UTC; Views: 25982; Favourites: 100; Downloads: 262
Redirect to original
Description
Swordmaking Guide: Part 5 (Advanced Skills)This is a abit long overdue but I have created the Advanced Skills Guide XD. My first 4 swordmaking guides are outdated and i can say that my skills have grown quite alot since that time. The guides were made at the time i finished shinso. Now we all know that when I made kyoko suigetsu my skills jumped alot. However I never explained how I did it I mean it wasnt in the guides. So thats why I am introducing my fifth swordmaking guides which highlights the area of swordmaking which will make your swords FANTASTIC. You will have to use my first 4 swordmaking guides in conjunction with this to make a full book XD.
As usual dont hesistate to ask questions when unsure ^^
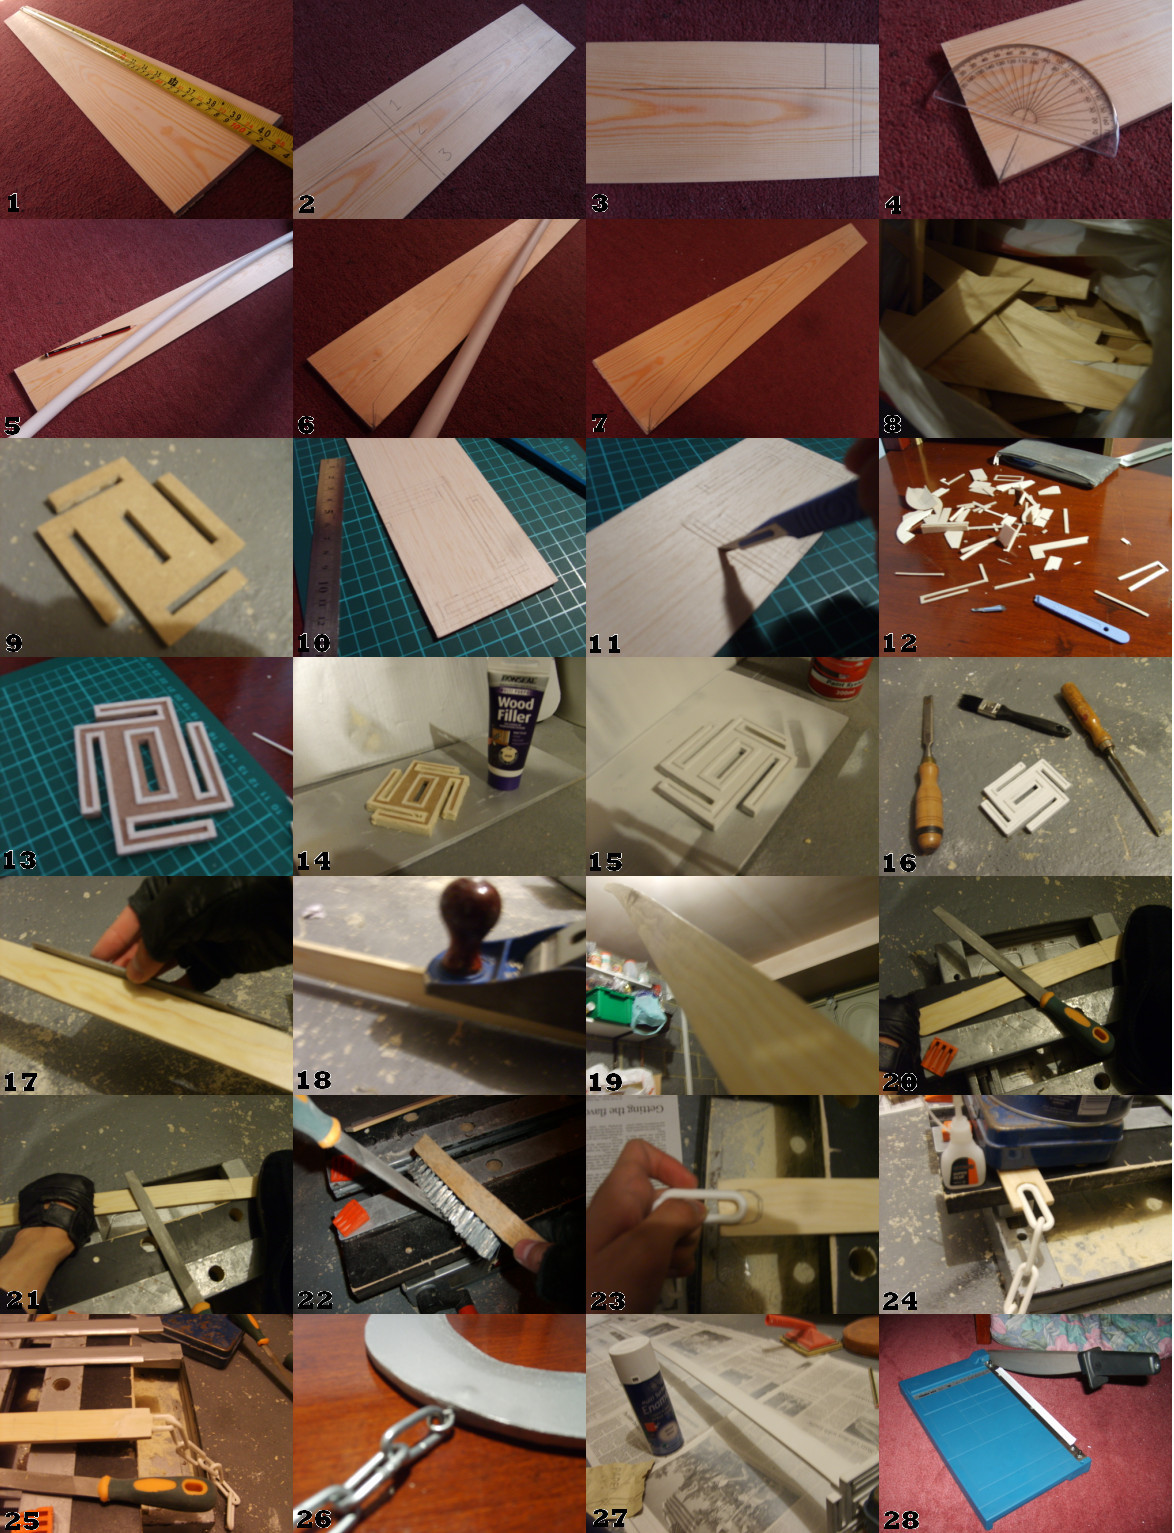
1: Okey to make a basic katana grab a piece of strip pine wood 9 cm in witdh, 1 cm thickness and 40 inches long. Check for any knots or cracks and make sure the surface is smooth.
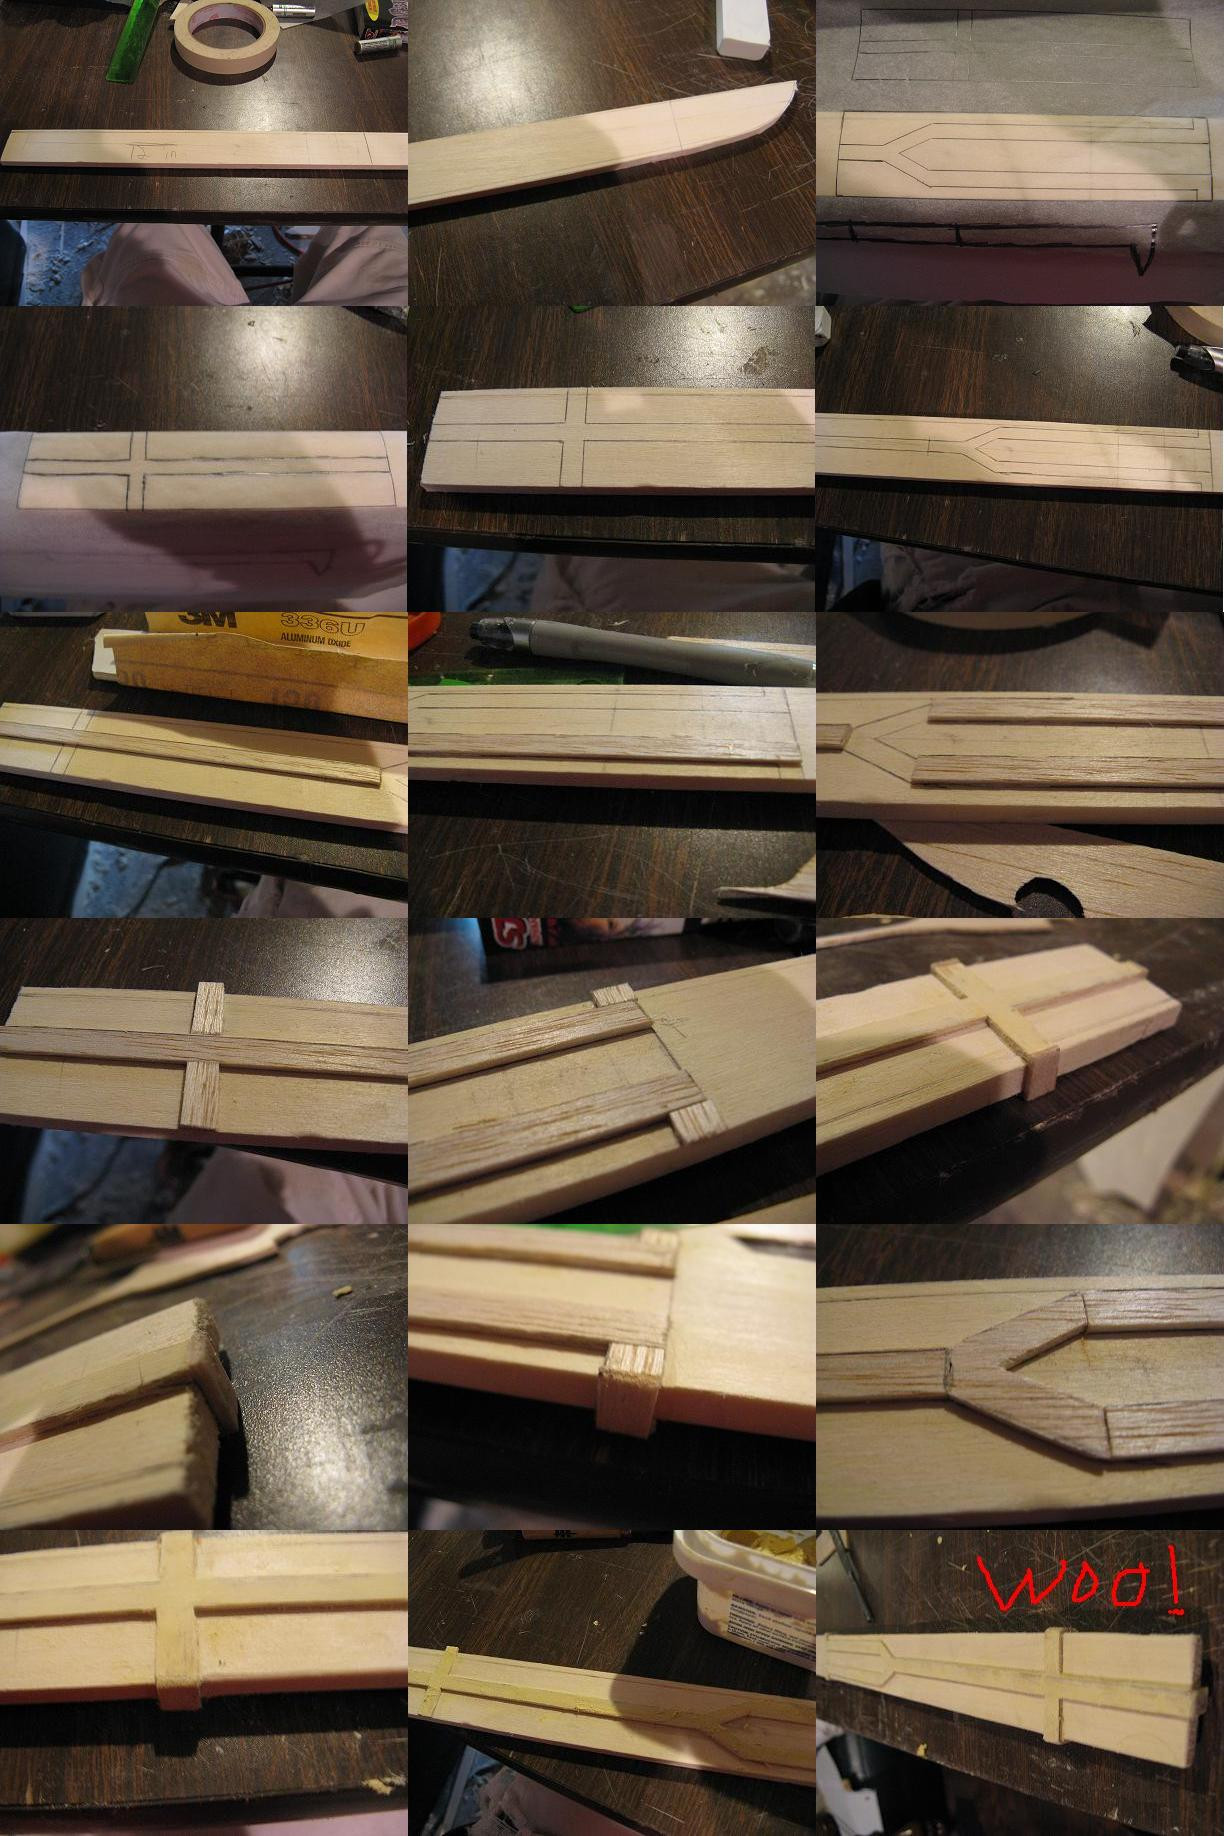
2: Now draw 3 lines, 3cm apart from the bottom, 10 inches long. Now the number "1" on the picture is where the core of the handle is attached to the blade. Numbers "2" and "3" are the handles.
3: Now above the 3 lines you drew which are 10 inches make a 0.5 cm column along the width of the wood. This is where the guard goes. Now from that line go up 2cm then make a line, this is what will connect the guard to the sword. Finnaly from the line which is 0.5 cm draw a 6 inch line. This is where the curve of the blade will go.
4: Now on the other side of the wood the tip of the blade is going to be in the bottom left hand corner IF the handle of the sword is in the top right. With a compass get a 45 degree angle and draw a line 3cm long. This is the tip of the blade.
5: Now get some PVC pipe tubing, this will draw your perfect curve. From the tip of the 3cm line which is the tip of the blade your gonna draw a line to the tip of the 6 inch line from the handle. Bend the PVC pipe accordingly and keep a weight on both ends and draw the line.
6: This might take several tries to get a good clean line but it is drawn perfectly becuase the PVC pipe acts as a guide. Do the exact same for the other side of the blade.
7: After you have fully drawn the blade you have got the perfect design drawing of a 40 katana on your piece of wood. 10 inches is the handle and the 30 inches is the blade + 0.5 cm for the guard. Now just cut it very slowly.
8: Top tip ALWAYS keep pieces of wood that you cut off that are bigger then 5cm by 2cm they will ALWAYS have some use. Most of the wood in that bag can be used to make handles and to test paints.
9: Now how to make a more detailed guard. Most guards will have embossed details. You can chisel these features but not recommended for first timers so you can use balsa wood instead. First cut out the main shape of the guard.
10: Now on the balsa wood draw out the embossed details that are going to go on the guard. Of course make them for both sides of the guard. Draw with a pencil as no not mark the balsa wood.
11: With a craft knife slowly and carefully start cutting out all the details for the guard. I use a scalpel becuase its nice and sharp. You can cut it out all in one piece and glue it on the guard or cut it in indivual pieces.
12: ARGH >.> If the guard is very complicated like tensa zangetsu's your better off cutting every piece of detail indiviually then cutting out all in one go. I broke the scalpel it nearly cut me ;___;.
13: With wood glue you apply it onto your FINGERS then with glue on your fingers wipe it onto the balsa wood guard details. Then Stick the pieces onto the guard firmly. When the glue dries the balsa wood will stay rooted.
14: Now with woodfiller apply it outside of the guards sides and also inside, it depends on the guard. This is so it covers up the line between MDF and balsa wood. Also apply wood filler to and spaces inbetween the balsa wood you dont want.
15: Sand away all the excess woodfiller with sandpaper or a smooth file and make the guard clean from dust. Then apply the white primer give it about 5 coats on each side. Then after you can add the actual paint or gloss.
16: If you have overpainted it like I did the paint will have covered up the embossed details. So with a chisel, scrap away all the excess paint and resand then repaint. Use a brush to sweep away all the dust.
17: Now how to make a flawless curve on a blade. First if the surface of the blade edge is heavily uneven buff it out with a smooth file. Hold the file like I am in the picture and bring it back and forth. Do this process fast to buff out all the bumps.
18: The grab a plane the tool in the picture and guide it over the blade edge's surface. This acts like a razer and will catch any bumps on the curve. Control this carefully as to not deform the blade. After the plane guides smoothly the curve is flawless.
19: Top tip pint the sword blade's tip towards a light. Then holw your head along side the blade and stare down the edge of the blade. The shadow will highlight any bumps on the curve you might have missed. Always, always do this to check your doing it right.
20: Now how to sand twice as fast. Get into the position I am in in the picture. You can use weights but, add one weight to the side of the wood, while holding firmly onto the other end with your hand.
21: Now bring the file scraping backwards while moving the wood upwards with your hand. Since both the wood and file is moving there is more friction, which in turn sharpens the blade alot quicker. However you cannot control it well so when the blade is almost pointed switch over and use a smooth file with your hands.
22: Top tip ALWAYS clean the dust off your files. Dust on files = less sanding on the blade. So use a steel brush or a bristle brush and brush away all the wood dust. A clean file is a more effective file.
23: How to attach a chain to a sword. On the part you want the chain draw around half of the chain link with a pencil. Now with a coping saw cut out that little space. Now slot in the chain link and make it a tight fit.
24: Now with the half the chain link tightly secured apply the super glue!. The super glue will bond the chain to the wood and it will give it alot of strengh to keep it in place.
25: Now add layers and layers of woodfiller over the space inbetween half of the chain link and the wood. It wont stick at first but keep applying. Then when fully covered sand it down flat and now the chain is fully secured to the wood.
26: Another way and much simplier but less cool looking is to use a hook screw. Put the hook screw through the chain link and close it with pliers. Then with the screw end, screw it into the wood for it to fit.
27: When painting you can add gloss to the paint to make the sword gleam. However applying gloss cleanly is very difficult so dont make many mistakes. So you use white primer then the paint then the gloss. If you make a mistake sand the area then do the above 3 processes.
28: Finnaly for my technique of handle wrapping to cut the tape in half i suggest using a gillotine if you have one. Using scissors is not very accurate and using a solid piece of tape has too large a width so cut it down to size.
Related content


Comments: 38

I love swords and I'm so glad that I've stumbled onto this! I hate two swords myself and I want to make my own.
👍: 0 ⏩: 1

so you hate two swords then as seen from your comment 8D
👍: 0 ⏩: 1
I have two swords that I bought. I want to make my own and I love your guide. It's simple enough for anyone to use.
👍: 0 ⏩: 1
Oh trust me swordmaking is easy when you follow steps ^^
👍: 0 ⏩: 1
I see. I'll need to get the supplies together then as well.
👍: 0 ⏩: 0

thank you so much. this is very helpful and extremely detailed. I can't wait to make a sword of my own. i am so glad i found your lessons.
👍: 0 ⏩: 1
You know I have wrote new updated tutorials right XD
👍: 0 ⏩: 1
O_o ...u did? *runs to go read them*
👍: 0 ⏩: 0

For all the ones making swords you must be god or an angel XD
👍: 0 ⏩: 1
yes indeed that is true to some and I always say there are people better then me XD
👍: 0 ⏩: 1
I really want to know them, they seem to be like elves.
Maybe they are in this world, but no one is sure.
👍: 0 ⏩: 0

YOU R SHO AWESOME MAN!!!!!!!!!!!
the first time i saw your swords, i tot im gona make one alsooo,, haha..
i already made a project with my fren, to make tensa zangetsu black one,,
so much help from you, thank you!!!
👍: 0 ⏩: 2
then I hope my how to make a tensa zangetsu guide will prove beneficial to you XD
👍: 0 ⏩: 0
'--' ._.//
errmm.. can you give us the measurement of number 9 and 10......
👍: 0 ⏩: 0

O__O
This isn't funny, your methods are EXACTLY the same as my methods! We even use the same superglue, file, and spray paint (Wilkinsons brand ;D)
👍: 0 ⏩: 1
O.O
And your asian as well. It seems to be in our blood... And we both admire swords...
Must be an asian pride thing
")
👍: 0 ⏩: 1
Yes... maybe... you're not my long lost brother are you?! xD
👍: 0 ⏩: 1
You know you might be even though theres like 2 billion of us XD
👍: 0 ⏩: 1
*music*
*runs towards you in slo-motion*
It's my loooooong loooooost broooootheeeeeerrrr!!
👍: 0 ⏩: 1

You need a sunset background for that
👍: 0 ⏩: 1
That was over 9000!
:icon>9000:
👍: 0 ⏩: 1

Neato!! A year is so long for me to wait to get started T^T
👍: 0 ⏩: 1
A year without swordmaking... *thinks, is shocked, dies*
👍: 0 ⏩: 1


Very detailed guide
thanks for sharing this to everyone
 (Wink)")
👍: 0 ⏩: 1
Its my duty as a swordmaker to share the knowledge of swordmaking ^^
👍: 0 ⏩: 1
But there also exist people who don't want to do that
btw what was the most difficult sword you created?
👍: 0 ⏩: 1
Then of course this is for the people who have an intrests in swords and wish to create some ^^
My most difficult sword to make... I would say Benihime, It would be suzumushi however that was more frustrating then difficult
👍: 0 ⏩: 1
but you finished it and it looks really great
 (Smile)")
👍: 0 ⏩: 1
Thats becuase when you make a mistake it can always be fixed I just happened to make loads of mistakes XD
👍: 0 ⏩: 1
I hope you didn't hurt yourself during work
👍: 0 ⏩: 1
When you have been making sword for a long time you know how to avoid injuries ^^
👍: 0 ⏩: 1
")

yes now go make more swords XD
👍: 0 ⏩: 1