HOME | DD
 Cid-Vicious — Sketch to Color - Tutorial
by-nc-nd
Cid-Vicious — Sketch to Color - Tutorial
by-nc-nd
Published: 2010-10-01 03:24:24 +0000 UTC; Views: 4022; Favourites: 36; Downloads: 0
Redirect to original
Description
This is my first attempt at making a tutorial. I tried to be as explanatory as possible.Oh, I use Photoshop 7.0 and Microsoft Picture Manager.
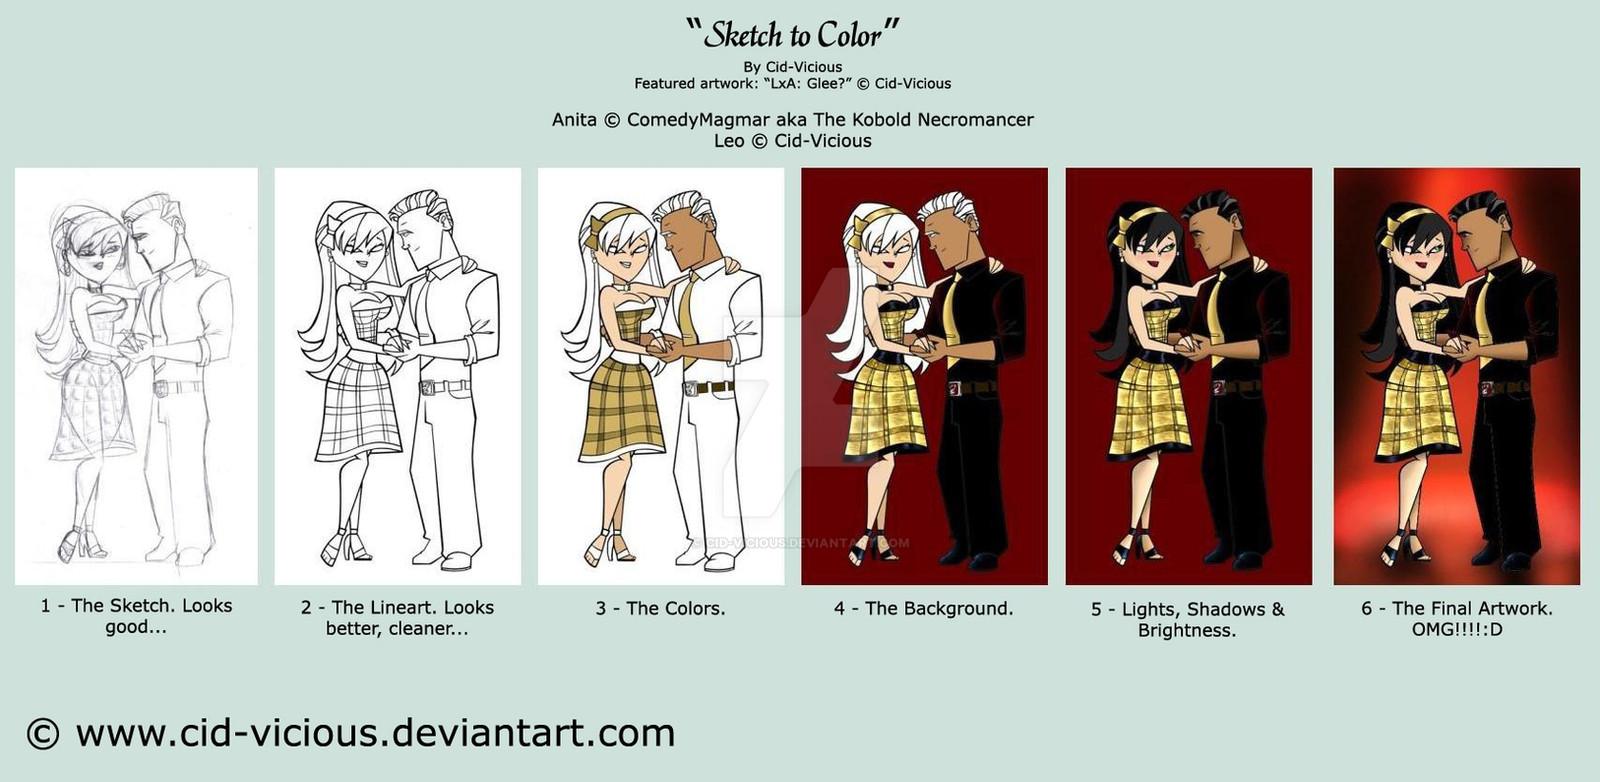
1 – In some drawings, it’s good to have an idea of how you want the effects of light and shadow just in the sketch. Besides, there are some details of things that I decided to not use, as the hoop earrings that I replace for pearls.
2 – Lineart. I make them with a black ballpoint pen. After cleaning the grey spots in Photoshop, I increase the contrast in the Microsoft Picture Manager, making the white whiter and the dark darker.
3 – Colors: I choose the colors based on the original costumes. How very dark colors blend with the lineart, color the lighter areas first. In darker areas, the tool "Magic Wand" is useful to prevent similar color tones to mix when you color some area.
4 – The background. If this isn’t black, you can fill it if you want to get an idea of the contrast with the main image. If you intend to use a darker background or play with the tones, I suggest you use "Magic Wand" when coloring and already in this stage to make the effects of light and shadows, therefore, when the background blends with the lineart, everything is lost, and you have to start all over again. Oh, exactly, I suggest you make a copy of your work at every stage, so at least you can resume where you left off, if possible.
5 – Now, let’s go with the effects of light and shadow. I use the tool "Magic Wand” to select the area, and then the “Brush” to make the contrasts, using different diameter and opacity. For brightness, I use the tool "Dodge", using "Highlights", "Midtones" or "Shadows", depending on the effect you want to create. To create the bluish glow around the edges of Anita’s dress, so does the shoes, I filled in the black area, used the brush to make lines in blue-gray, then I sharpened the blue with black lines using a smaller brush, and used "Highlights" to accentuate the center brightness. The same with the red glow on Leo’s shirt and the bluish glow in his shoes. In dress, you can use the "Dodge" and adjust the style and size in "Brush". This helps to create effects of leaf spots or anything else, giving a more characteristic glow.
6 – The final artwork: now that you've arrived here using what you learned to do the effects of light and shadow to color the eyes, mouth and other remaining parts, let's to the effects in the background. I usually leave it for the last part. I select the background with "Magic Wand", and basically accentuate the clarity in certain red areas with "Highlights". To make the picture looks paler, saturate, sepia, etc, I use the Microsoft Picture Manager when necessary...
Hope this helped.
Related content


Comments: 18

")

I love when people show their work and describe! Great job and art!
👍: 0 ⏩: 1
 (Smile)")


Cool! I love the way you kinda drawed them like they were from total drama island.
👍: 0 ⏩: 1

Anita - *looks at the drawing, then her hair* "I wonder how I would look with platinum hair like that. Good?"
Leo - "You'd look like Mandy."
Anita - "Hmmm, maybe."
 (Wink)")
👍: 0 ⏩: 1

Leo - *begins to imagine Anita in a Mandy-like outfit: leather corset, boots, platinum hair and torn fishnets...* "Looks good... Very good..."
👍: 0 ⏩: 1
Anita - "Oh, do you also want me to worship the Old Gods?" *She playfully strokes Leo's chin.* "Or do some other kind of worshipping?"
👍: 0 ⏩: 0

it looks nice i like how se looks in white hair to
👍: 0 ⏩: 1

wow nice nice..well maybe this will heealp me with my art jeje nwn
👍: 0 ⏩: 1