HOME | DD
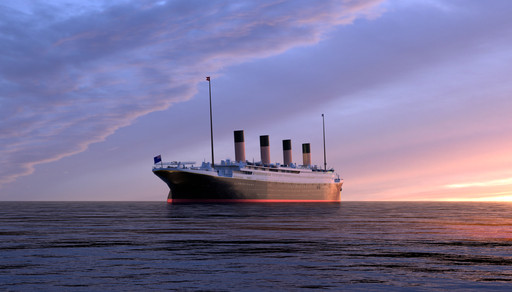
 Cleptrophese — Titanic Bow (Cycles Render 2)

Published: 2019-01-08 14:27:53 +0000 UTC; Views: 1333; Favourites: 3; Downloads: 3
Redirect to original
Description
Long story short, I got bored. Anyway, I've added some extra details, including the lights on the central section of the forecastle deck, and a couple of capstans next to the mast. I also added the auxiliary anchor in the well at the very prow, and one other anchor resting on the forecastle. Oh, and the...thingy between Cargo Hatch One and the Bunker Hatch, though it's a little bit wide, so I'll be fixing that in the next render. In terms of things I need to add, the crane at the bow, just aft of the auxiliary anchor well, a number of capstans and other details, and of course the anchor chains. Oh, and obviously rigging, but I'll add that when I'm done with the exterior of the ship. I also need several diagonal supports at the sides of the well deck. Oh, yeah, and the electric cranes aft of the Bunker Hatch. I did notice in the last image that the text on the sign on the wavebreaker is unreadable, so if anyone's wondering, it says 'NOTICE Passengers Are Not Allowed Beyond This Point.' Oh, and yes, I used the wrong material for the top of the capstans, I'll change that, too, it's an easy fix. Other than that, I guess portholes and then the actual superstructure. And the poop deck. I haven't added water yet, it would have taken too long to render.The RMS Titanic was a luxury liner built in 1911 by the Harland and Wolff shipyards for the White Star Line. When she was launched on 31 March 1911, there was a significant turn out, though noticeably less than had shown up for her older sister, Olympic's launch. She set sail on 10 April 1912 with little fanfare. Four days into her voyage, she had a fatal collision with an iceberg, taking an estimated 1,500 lives. Because of this disaster, her story is known worldwide, and we remember her even today. This model is an attempt to faithfully recreate her using the Blender software and eventually Unity.
Related content
Comments: 3

This needs to be under proper lighting. I know under a proper HDR with a good placed sun lamp, this will be absolutely stunning. I'd also find a few better metal textures. Especially for the capstans, or rather the black material you're using. It looks like it's just a principled shader? Take a look through here, they're not free but they're all really high quality and what not. I love this site actually 
Also, the water shouldn't take that much longer to render. It's pretty simple as far as Blender is concerned. Same with HDRs they usually render as fast as the plain background will. What kind of GPU are you using? I feel like I've asked this before lol. Regardless if you get the chance, an upgrade isn't too expensive right now as the prices have really tanked. Because of the low GPU prices right now, especially the used ones. I went ahead and put a second GPU in my rendering rig for animations. My original XFX RX-480 GTR 8gb in PCIE slot 1 and an XFX 4gb RX 460 in PCIE slot #2. I'm telling you, duel GPUs is the way to go! I'm making some clips for one of Issac Arthur's upcoming videos right now and after getting the second card installed, it went from 5 minutes per frame on the current clip, to 1.5 minutes. In EEVEE it'd be like nanosecond renders lol.
👍: 0 ⏩: 1

Yeah, I agree that it needs proper lighting. I always shy away from using a sun lamp for fear of it looking unrealistic, but I suppose I should give it a shot. I'll go ahead and download all of the sky HDRs from Poliigon, too, and find some good ones to use for the model. I already have a good metal texture, actually 
As for the water, yeah, I'll add that back in on the next render. It slows my computer down when I'm modelling, though.
👍: 0 ⏩: 1

Sun lamps are essential for a realistic look. Turn the lamp up to about 10 and then go into the "scene" tab (the one with the sphere, cylinder and little lamp as the icon, right next to the "world" tab"). Go down to "color management" and set "view" to "Filmic" and "look" to Medium contrast. "color space" and "desplay device" should both be sRGB. This will both prevent textures from overexposure (white out) and will simply make everything in the scene look better. That's one of many tricks to make a scene look better. You'll have to play with the exposure and gamma settings till you get a result you like. I tend to just leave them in the default.
As for the textures, yeah. Too each his own. I like to finish the entire model, or at least the vast majority of it before I start textures, but that's just me. There's no right or wrong way. It's however you like it. Also try "Textures.com" for sky HDRs, they have a much larger selection. Also not free, but it's the same high quality stuff for the most part.
Water also shouldn't effect your ability to model. It should literally be just a plane mesh with one simple texture. Shouldn't be enough to lag you out, not even close actually... Interesting.
👍: 0 ⏩: 0


