HOME | DD
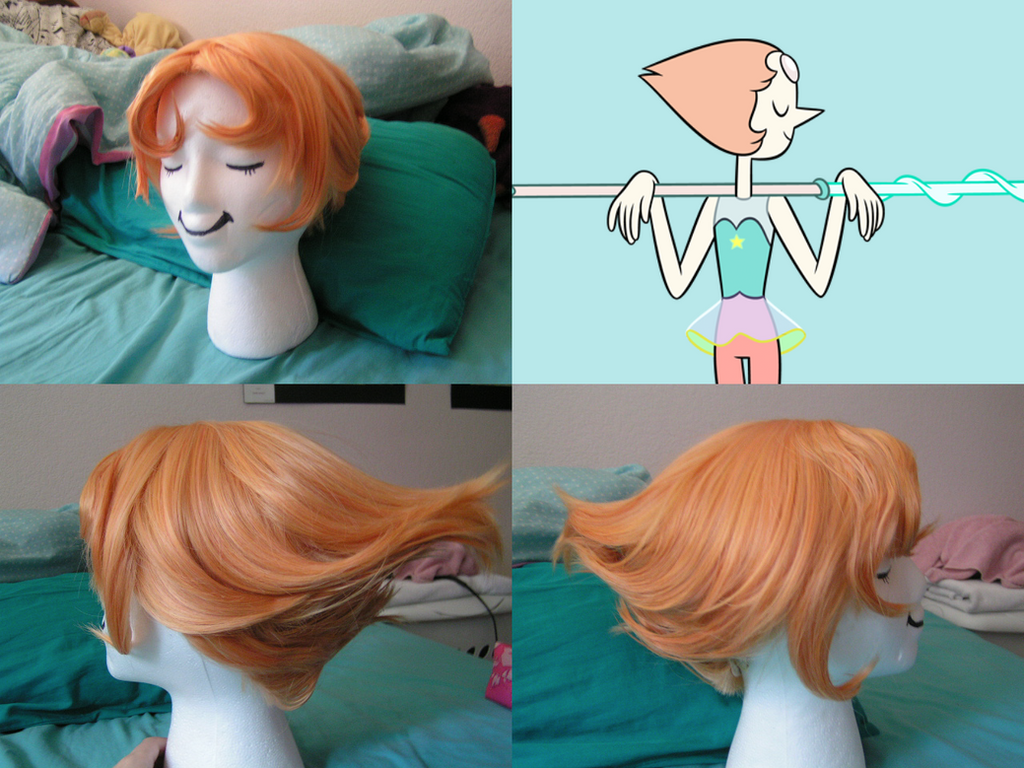
 Conej0s — pearl wig (wip)
#cosplay #pearl #steven #styling #universe #wig #stevenuniverse
Published: 2015-07-16 03:48:44 +0000 UTC; Views: 7448; Favourites: 138; Downloads: 34
Redirect to original
Description
doing a pearl cosplay for non desu kan this fall. this was the wig before i sewed the weft into the back. i'll post an edit of what the wig currently looks like soon. it looks a lot better in person, however, so i would urge any nan desu kan attendees who are fans of steven universe to say hello. i'll be posting the completed look in the fall.materials:
arda "lulu" wig in peach
arda short weft in peach
got 2b freeze spray
got 2b styling glue
vidal sassoon curler
bobby pins
barettes
if you want any advice for styling a pearl wig, please ask. when i was doing research for mine, i found very little information from other pearl cosplayers.
Related content


Comments: 16


This is really beautifully done! I love that you manage to make it look really soft without coating it in hairspray. I just want to ask how sturdy is the pointed end of the hair? I'm cosplaying space suit pearl and I would be moving around a lot so do you think it's practical for a con? I could always just do a shorter point but I love the style you did yours in!!
👍: 0 ⏩: 1

it held alright. i wore it for a day 9 (about 10 or 12 hours) a couple weeks ago, and had to fix it once or twice. the trick is to use more spray on the underside of the point and on the inner layers, which aren't as visible.
this looks nice and soft, but yeah, it was fairly fragile because i didn't use a ton of spray. you'll probably need more spray if you're going to be doing a lot of moving around. i was mostly just walking around (i did some dancing for videos, too). i guess it depends on how much jumping/dancing you plan on doing.
side note: i think it looks awful when a wig has so much product on it that it's all crusty and hard. it feels gross when you're wearing it too. it's one thing having a lot of spray in areas where its needed (like i suggested above) but literally drenching the wig in hairspray not only looks bad, it's a waste of spray imo.
👍: 0 ⏩: 0

I'm going to be cosplaying a 50's style version of Pearl and am having the hardest time right now finding any good tutorials. I'd love some more info on how you did yours because it's beautiful.
👍: 0 ⏩: 1
well idk about a fifties au but i'll tell you all i know about styling for regular pearl.
let my preface this by saying the process i used looks really nice, but it does take a lot of patience. it took me several hours to complete this. an excellent alternative to this if you're new or on a time crunch is to mix this method with the ponytail method .
i should mention, however, that the tutorial i linked is heavily flawed. the person in that tutorial bought an 80cm wig only to cut most of the hair off, which was stupid. if you use that method, don't do that >.>; you can get the same results by using a shoulder-length wig. also they use hot glue on the wig, which you should never, ever do! you'd be surprised what you can accomplish with hairspray, barrettes, and bobby pins. you can use a strategically placed wire if you need it, but using hot glue on a wig is a great way to burn yourself and render it impossible to thoroughly wash/reuse the wig.
anyway, here's my method:
first, i would recommend that you find a longer wig (shoulder length) for this style. i made the mistake of getting a short wig, and it ended up being long enough on top but too short on the bottom. i was able to solve this problem by sewing a weft in, but i really wouldn't recommend that approach, especially if you're relatively new to styling.
obviously i combed it with a wide-toothed comb first, just to make sure everything was in order before i began. i pinned the wig to the foam head at the nape of the neck and at the partline, then (and this is going to sound bizarre), i flipped the wig head upside down, so that the partline was against the table and the hair was flowing against the direction it was sewn in.
at what would be the top layer of hair in the back if the wig were rightside up, i pinned the hair into a triangular point as a base. after spraying it, i styled the next layer, pinning it against the previous one and spraying it so that it would go against the original direction. i basically continued smoothing the hair towards the base point on top and away from the nape of the neck until all of it was going towards the "point" of her hair.
the front part of was comparatively simple. i set the wig head rightside up again, parted the bangs in the middle, and shortened them to eyebrow-length. (don't do this next step the way i did if your wig isn't heat resistant), i used a curling iron to heat the bangs, and while they were still hot, i put them in pin curls. the iron didn't curl the hair on its own because the fibers needed to cool in a curled position in order to hold. take one or two chunks of hair on each side of the face and repeat this process.
the sides of the wig that aren't curled need to be pinned and sprayed into the triangle shape with the rest of the hair.
do one last all over spray, let the wig dry, and pull out all of the pins.
sorry if i overwhelmed you! i'm very detail-oriented.
👍: 0 ⏩: 2

Hi, I'm doing a Pearl cosplay soon and I've never styled a wig prior to this! I absolutely adore how yours turned out (especially considering how terrifying the concept of using a foam base and hot glue is lmao), and thank you for the detailed description of your process!
That being said, I'm not completely sure how to go about pinning the top layer of hair into a triangular base? If you had pictures that'd be fantastic, but if you could at least elaborate a bit more on how you did that, I'd be so grateful ;u;
Thanks so much in advance, you should be super proud of your cosplay! It's one of my favorites <3
👍: 0 ⏩: 1
i knew i should've done progress shots of this. to create the point, you pin the wig to the foam head, flip it upside-down, and gather the top layer (which will be on the bottom when you flip it) into a point, then style accordingly. i drew a diagram for you if it helps: orig15.deviantart.net/7fb1/f/2…
this is quite the undertaking for a first-time styler, but i think you can accomplish it if you invest enough time. good luck!
if you need any more clarifications, let me know.
👍: 0 ⏩: 1
That's alright, that diagram you made is super helpful! Thanks so much for taking the time to make it!
And ha, I know, I'm prolly in a bit over my head! But I'm gonna give it my all, I appreciate your pointers (heh, point)
👍: 0 ⏩: 1
np. shoot me a note if you need any more help.
👍: 0 ⏩: 1
Thank you so much for your reply! Honestly, that's kind of how I was going to go about it. I've never seen or heard of the pony tail method before...
I'll give it a shot and see what happens.
👍: 0 ⏩: 1
yw man
if you have any questions, feel free to ask
👍: 0 ⏩: 0
