HOME | DD
 DanielAraya — Logan Step-by-Step
Published: 2009-08-24 00:30:59 +0000 UTC; Views: 21252; Favourites: 356; Downloads: 724
Redirect to original
Description
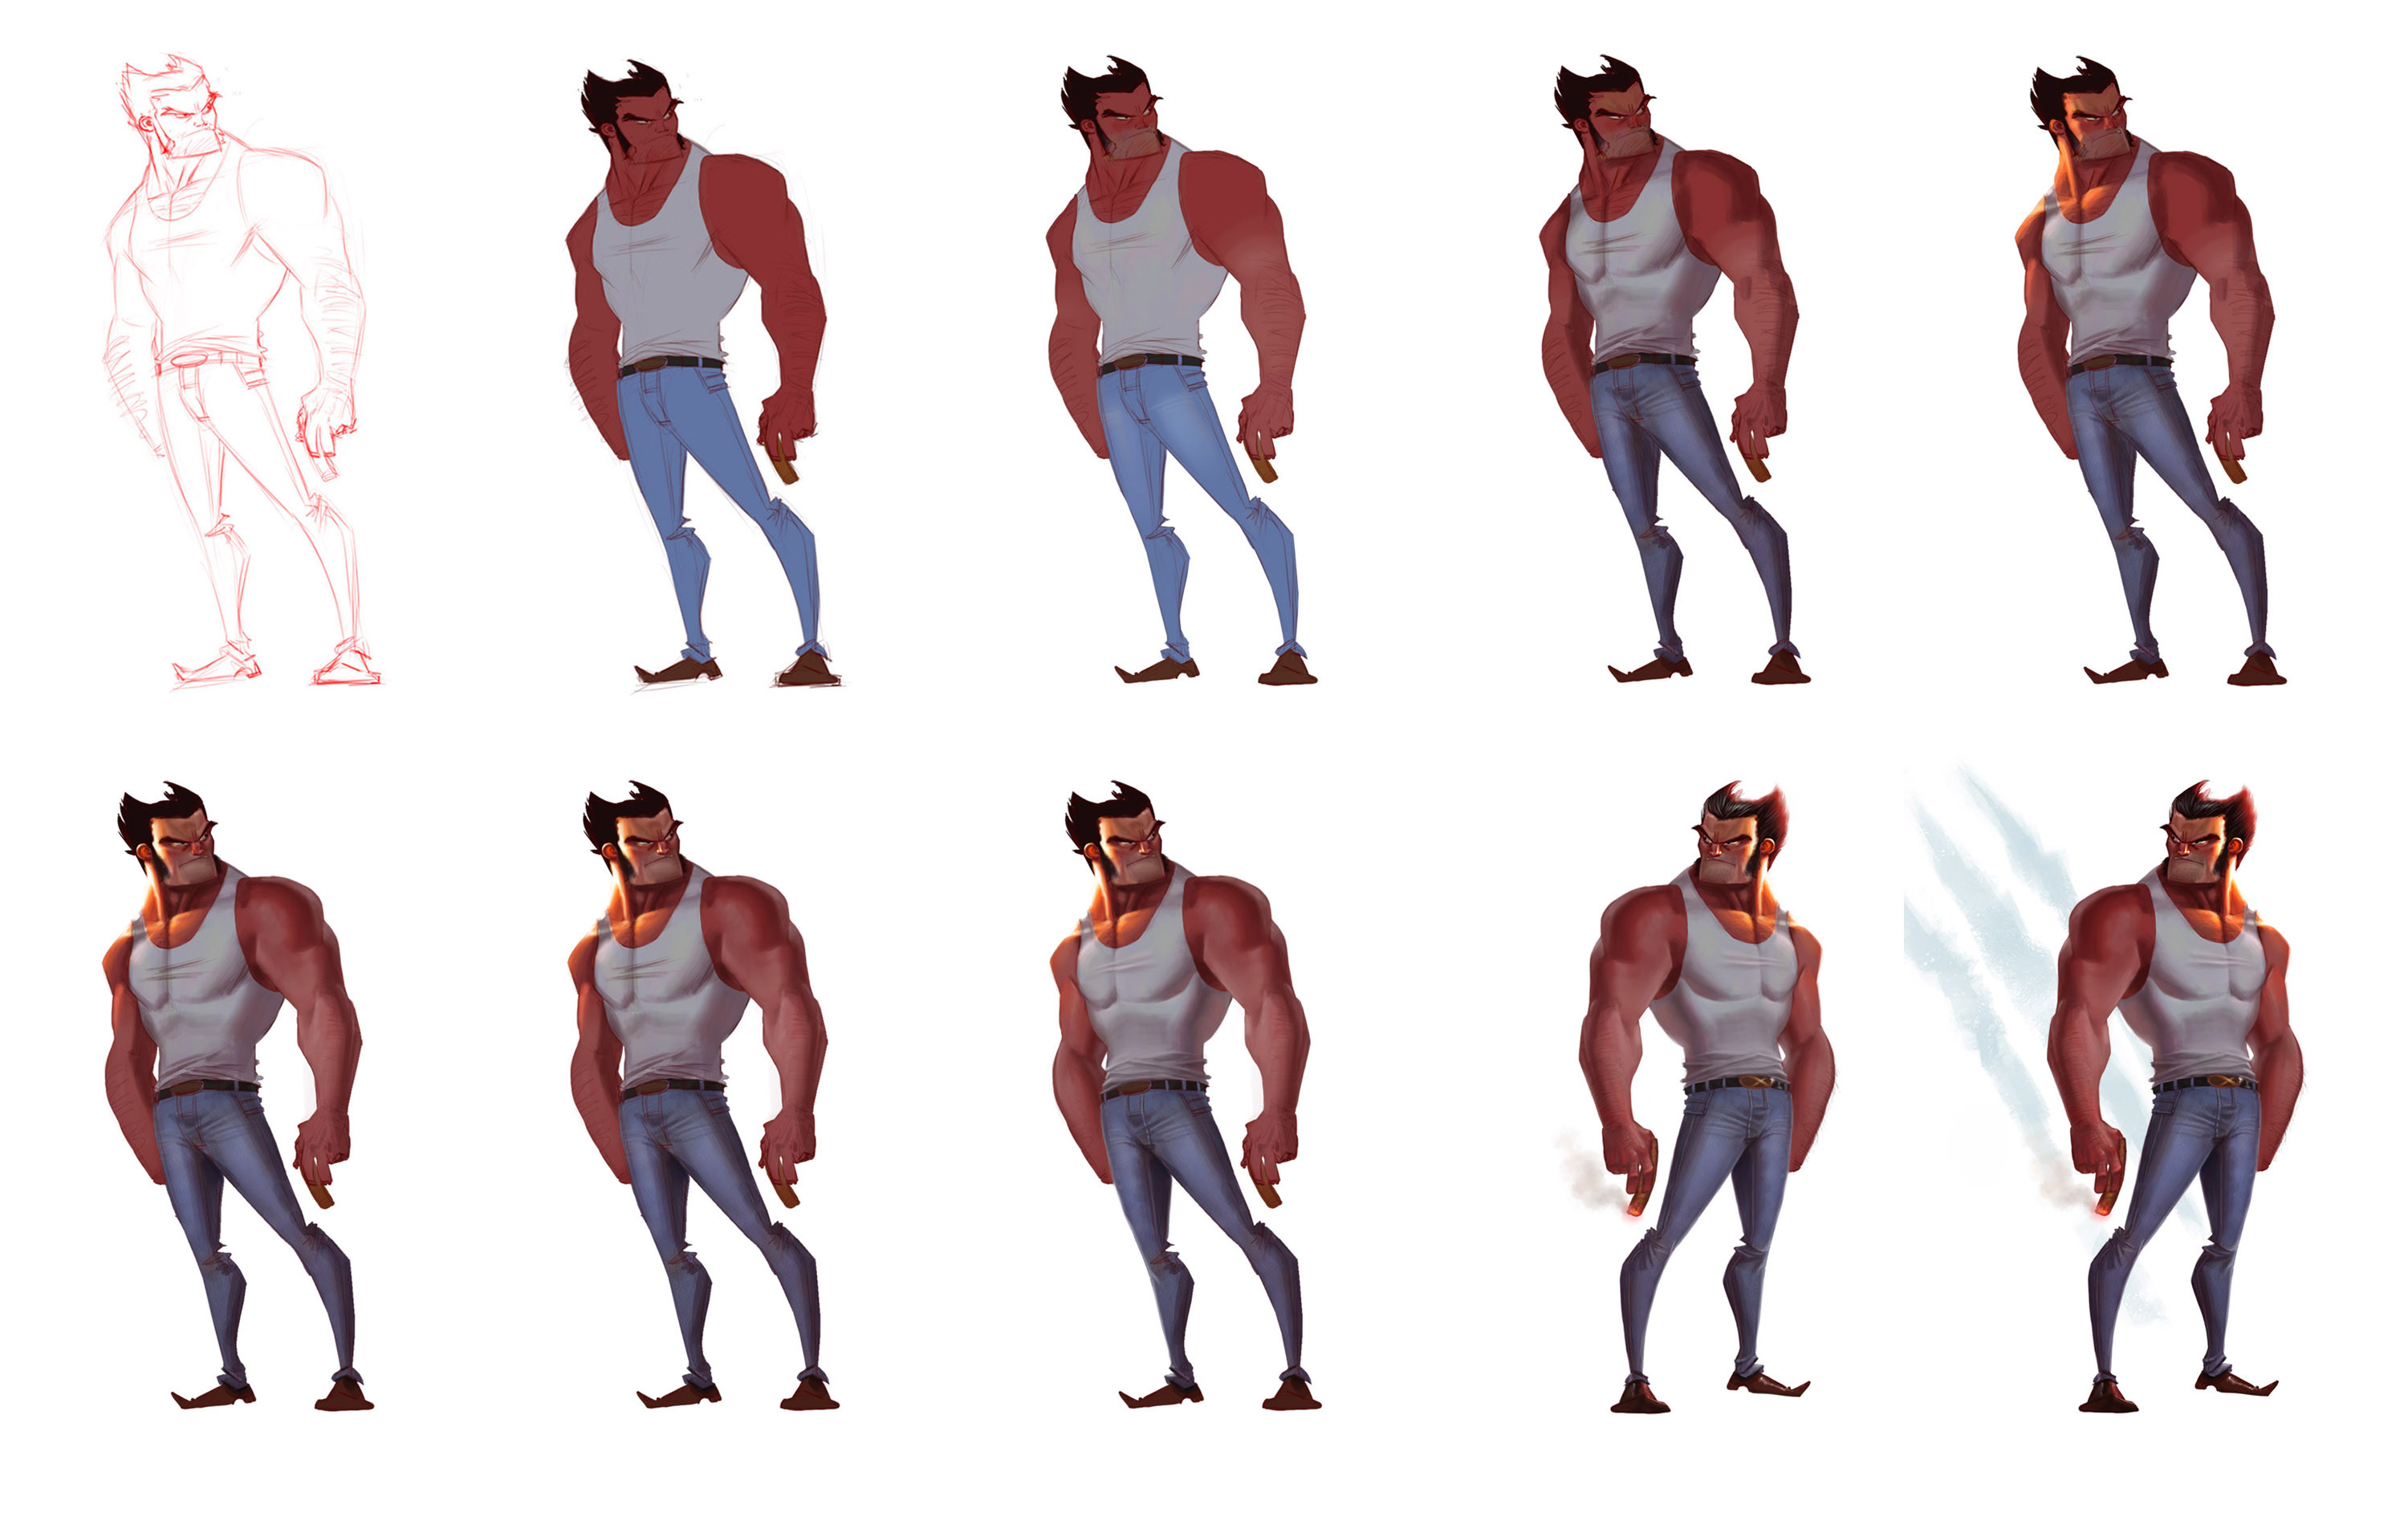
Step by step for this baybeh: [link]Click Download for the ginormous-er version of this.
I'll do my best to explain what I did in each step, but I kinda just saved at random times so it doesn't make for the most in depth look into my process. Honestly, I barely even have a process, I just slap my tablet with the stylus until something comes out.
Uno) Rough sketch done in Autodesk Sketchbook pro on my tablet PC. I had no idea what I was going to doodle, so I defaulted to my standard "dude standing around" and gradually morphed him into Wolverine.
Ni) Flats. Pretty self explanatory. I tend to pick super ridiculously saturated reds for my base flesh tone, because I usually calm it down as I progress. Or not. I don't even know to be honest. i REALLY like the piece at this stage, in some ways more so than how it finally turned out.
Tres) Using a standard airbrush on a new layer, I glaze in some hue shifts. Some are arbitrary, some are super exaggerated (the face). I like to keep adding shifts in hue to keep things varied, as opposed to having big blocks of the same color.
4) On a multiply layer I paint in the basic shadow patterns.
Go) I paint some orange junk to indicate a strong natural light source.
Six) I strengthen the hell out of that light source, and I paint in a bit of sub surface scattering. I crank the SSS all the way up for his ears, because I always do that. I think I also paint a bit of ambient occlusion under his chin and in some of the other more recessed parts of his figure. I also start painting a subtle light source on his arm to flesh it out a bit
7) I don't even think there's a difference. What a stupid step.
Hachi) Smoothed his shirt and started defining his jeans.
9) Paint his hand and hair, continue refining things here and there. It's a little hard to narrow down what I did because after step 4, I'm spastic as hell with my approach.
Sixteen) I add minor touch-ups that nobody will notice, and add the claw scratch thingies cuz they're KOOOOOL. Annnnnnd at this point I call it done. An hour later I come back and change 4 or 5 relatively unimportant things, and then I post it up on deviantart.
Related content


Comments: 34

panels 2 and 3 look like something straight outta disney!
👍: 0 ⏩: 1
 (Smile)")

In my opinion, even the picture is perfect since the third one!
👍: 0 ⏩: 0


That would be pretty awesome
👍: 0 ⏩: 0

This was actually a lot more helpful than I figured it was going to be.
Also studying design has taught me that design lecturers hate it when you do something because it is KOOOOOL, as such I have established it is the best reason to add anything to a piece of artwork.
👍: 0 ⏩: 0


The 4th one looks like it can make it's own animated series! great job
👍: 0 ⏩: 1

I have a doubt with the red lines, at the time, say six step
to mark the fleshy parts or mouths, just left the same lines of the lineart?
pardon my English
thank you very much for the tutorial, keep trying xD
👍: 0 ⏩: 1
If you're asking what I think you're asking, yeah the lines were still in there by that step. Most of the lines are gone by the end of the painting though.
👍: 0 ⏩: 1
it was not exactly what I was saying, but you solved my question, thank you very much
I need to learn to ask questions xD
👍: 0 ⏩: 1
I know it's been a really long time, but I think I know what you're asking and the answer is yes, the line for his mouth is the same as the lineart, with a little bit of touching up around it!
👍: 0 ⏩: 0

 (Wink)")

Hey, I just wanted to thank you for an awesome tutorial. I followed it exactly(best I could anyway) and uploaded my result. Maybe, one day, I'll be awesome just like you. :3
👍: 0 ⏩: 1
I saw man, great job! You flatter me too much
👍: 0 ⏩: 0

Awesome workflow.Especially the SSS!
Do you have any tips on how to achieve the effect you do?I've tried.Mostly unsuccessfully.
👍: 0 ⏩: 1
Study reference! I mean really study it. Find a pic with some good SSS and do studies from it. Stare at it and try to figure it out as much as possible. Ask yourself where you see SSS ocurring the most and why it's being affected the way it is.
But BEFORE you do that, do yourself a favor and read through this [link]
Reading through that (THOROUGHLY) will give you a stronger understanding of the lighting phenomena that you're witnessing. Once you've read that and understood it, you'll take a more well-informed approach to studying your reference, and you will know what to look for. Hope that helps!
👍: 0 ⏩: 0

awesome stuff...do you use custom brushes in PS, or the 'built-ins?'
watching!
👍: 0 ⏩: 1
I use both. I use the hard round brush most of the time, but I also have a brush that simulates more painterly brush strokes that i sometimes render with. Any other custom brushes I use are on a case by case basis for different textures.
👍: 0 ⏩: 0

wooaa!! you did a fantastic color job! if you want to do a collab with me it will be very cool!
")
👍: 0 ⏩: 1
I'd love to! It would just be a matter of me finding some free time to do it.
👍: 0 ⏩: 1
let me know when your free
👍: 0 ⏩: 0

