HOME | DD
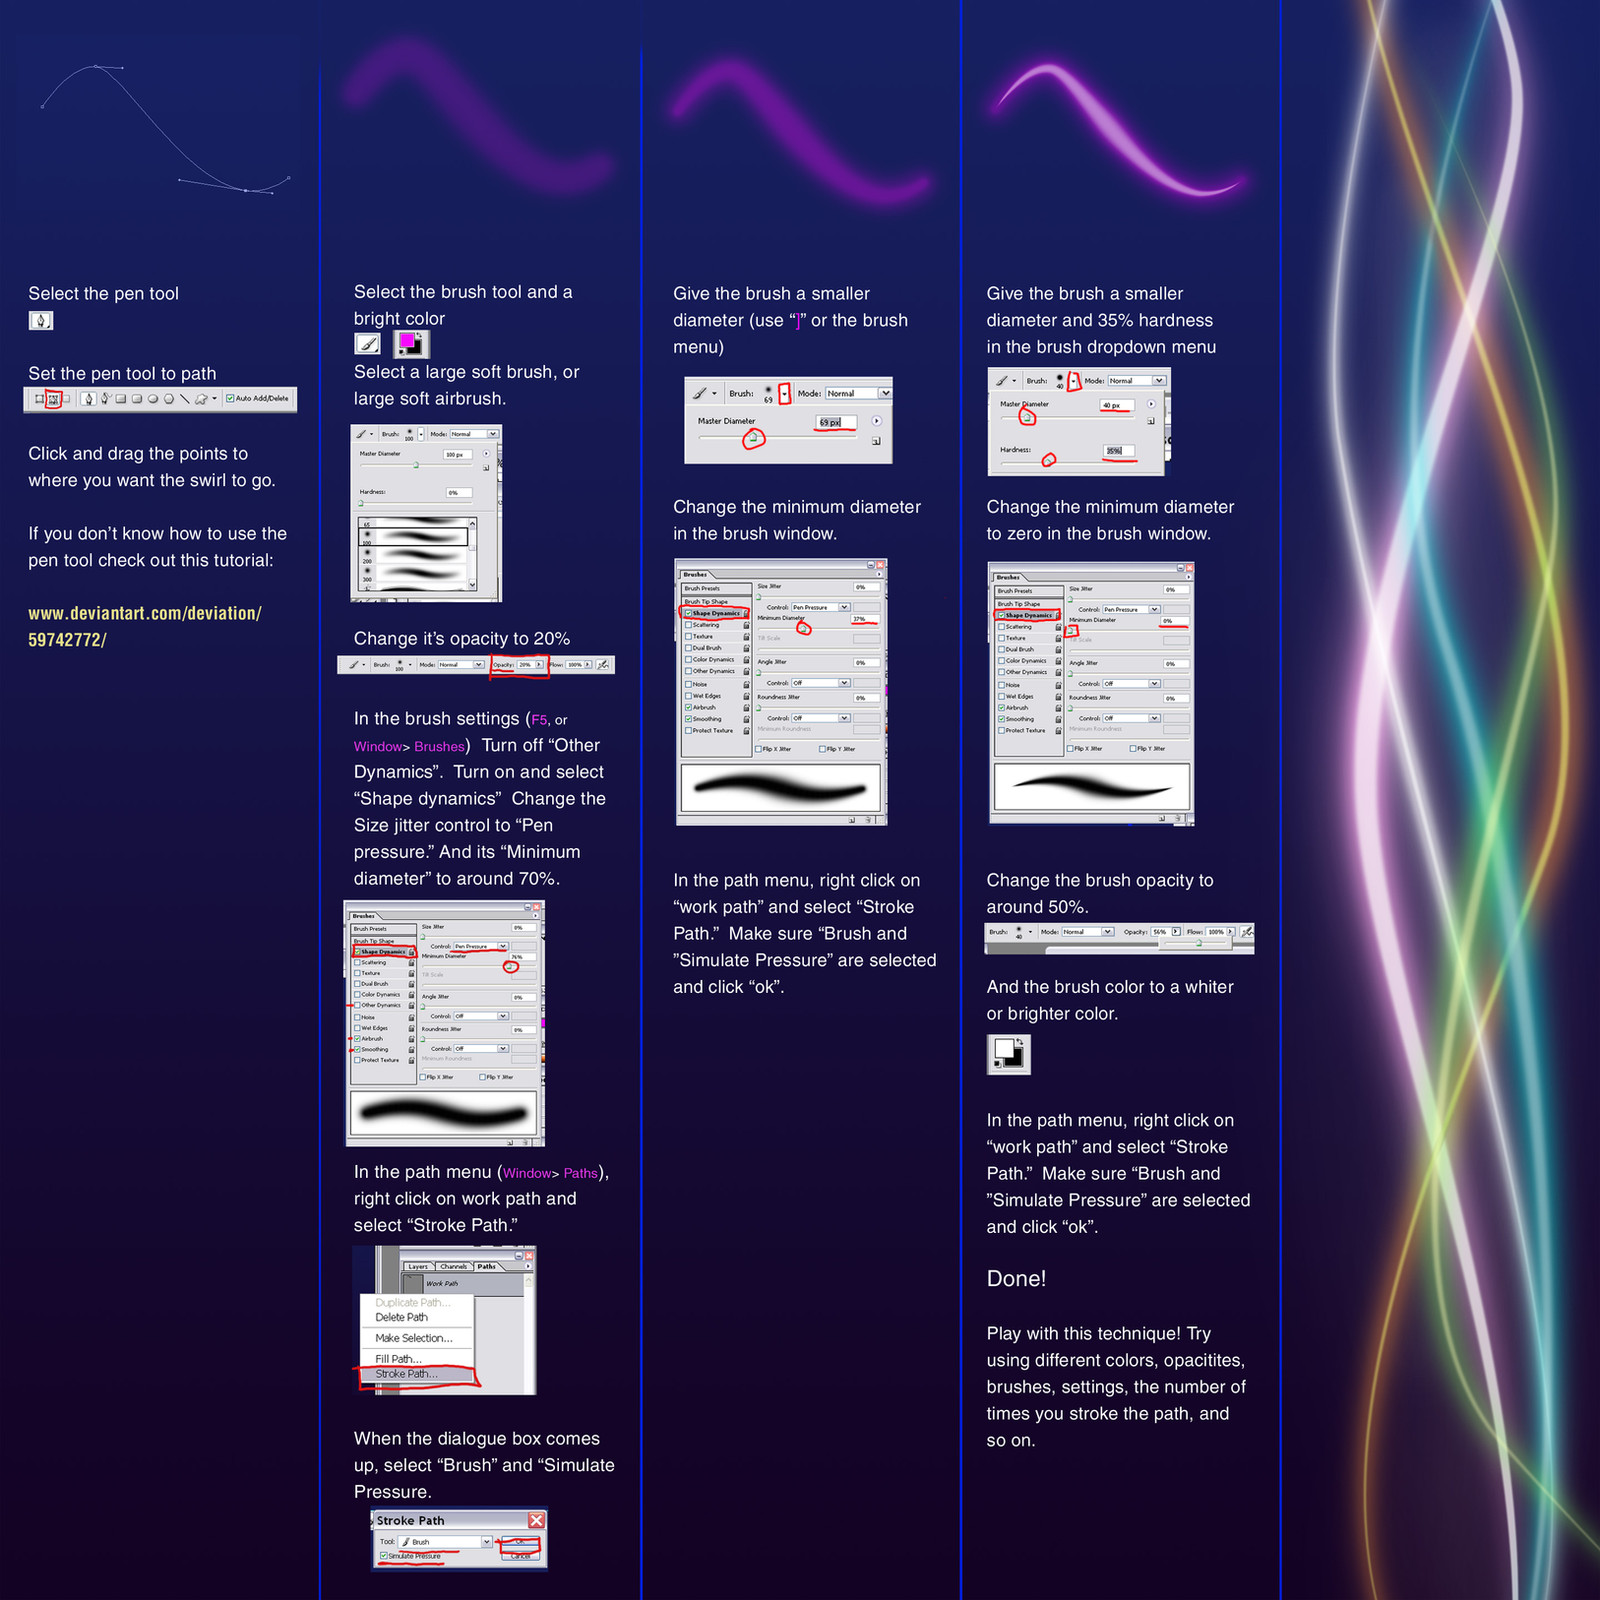
 danzr4ever — Magic Swirl tutorial
Published: 2007-08-08 21:00:18 +0000 UTC; Views: 52899; Favourites: 1258; Downloads: 4572
Redirect to original
Description
 Check out my other tutorials: [link]
 Download for full view.
Want to do magic swirls? This is how. This goes off the same concepts introduced in "Simple Glow Tutorial " and introduces the use of paths.
I used this technique in this picture: [link]
I also forgot to mention for the multiple swirls i have on the right as an example, I changed the layer blending mode to "Hard Light." These modes are available on the in the layer window ( windows > layers) in a dropdown menu, the default is "Normal."
If you don't know how to use the pen tool, check out this tutorial: [link] by :
Related content


Comments: 166


Thx for this tutorial
it was very helpfull! -> [link]

👍: 0 ⏩: 1

Awesome job. Glad you found it helpful!
👍: 0 ⏩: 0

Awesome tutorial it was just what I needed ")
thank you very much for putting this tutorial on DA it was exactly what I needed

👍: 0 ⏩: 1
Glad you found a use for it. Very nice photomanip. Keep up the good work.

👍: 0 ⏩: 0


cool tutorial  (Smile)")
👍: 0 ⏩: 1
The tutorail was created with CS. I haven't tested in previous versions. But it's not using any new tools, so I'm sure it will work in some of the prior versions.
👍: 0 ⏩: 0


Thanks!! i need io.O
soty pesima para ingles jaja xD
gracias lo necesitaba mucho
👍: 0 ⏩: 0

Nice, Simple and gives a cool effect, thanks
👍: 0 ⏩: 1

It says "Soft Brush" OR "Air Brush" and I know you can have an air brush setting on them but is there a difference between the two? If so, where can I find an Air Brush?
When I do this tutorial I notice the picture of your brush changes, the lines at the end disapear. Mine doesn't do that, is that because I can't find the "Air Brush"?
👍: 0 ⏩: 1
Doesn't really matter, it's just a starting point because bother brushes have a hardness of 0. You want to be following the brush settings (window > brushes) indicated in the print screens. Since they show what settings should be on and off.
The brush changes because in my instructions I specify brush setting changes. Each step I tell you to make the minimum diameter smaller. And the last step I increase the hardness of the brush.
You are creating custom brushes in this tutorial, that can't be found in the drop down menu. When you go to select a default brush, that drop down menu on the right has a small arrow. If you click that and select small list, the brushes will be listed with a thumbnail and a name for the brush. Also you can add brush libraries photoshop has that might not be open as a default.
👍: 0 ⏩: 1
Ohh, I see. Thanks a lot. I thought the way my brush was shaped compared to yours made a big difference, but I suppose not. Do you know why yours was shaped differently, though?
Yeah, I've noticed that you can append other brush sets into your current brushes, I just never really played with it too much, unless I randomly downloaded a cool brush set, but thank you!
👍: 0 ⏩: 1
I'm not really sure what you mean by different because I don't know what your brush looked like.

👍: 0 ⏩: 1
Sorry I'm slow. And it looked almost like yours but it the ends didn't get smaller. was just solid the whole way through.
👍: 0 ⏩: 1
Did you make sure your brush was set to pen pressure, and that when you stroked the path that "stimulate pen pressure" was checked?
👍: 0 ⏩: 1
Yeah, everything looked exactly like yours except the picture of the brush itself, I did everything as you explained. I'm not sure if it really makes much of a difference or not, but my brush strokes were just a bit different at the ends than yours.
👍: 0 ⏩: 1
Yeah well the brushes and numbers I listed were more of a starting point, so it's not a big deal if it's not exactly the same.
👍: 0 ⏩: 0

I have problem with step 2 and 3... How do I make it look like it's fading out?
👍: 0 ⏩: 1
You can either change the brush settings under other, to control the opacity with pen pressure. Or in post you can go in with a low opacity eraser and manually fase the glow out a bit towards the ends.
👍: 0 ⏩: 1
Hmm Okey, Have too see if it works. The funny thing is that I have tried this tutorial before and then I succeded. But now, when I just want to fix the brush I cant...
I was thinking on the pen-thing too. How do you make so yo just have from A-B and don't need like a circel or close figure to make it?
👍: 0 ⏩: 1

After completing the line you wish to make with the pen tool, try clicking on the pen tool button on the left hand side once. This should let you begin a new line without connecting the two. Hope this helps!
👍: 0 ⏩: 1
Hmm, I tried what you said. But I'm not sure I understood you right
👍: 0 ⏩: 0


Awesome!
glad to see this toturial !! ^^

👍: 0 ⏩: 0

would this be photoshop, or illustrator?
👍: 0 ⏩: 1

THANK YOU SO MUCH I REALLY NEEDED THIS!
👍: 0 ⏩: 1
Welcome, glad you found it useful.
👍: 0 ⏩: 0

Wow! It's simple, but looks great! Thanks for this really helpful tutorial!
👍: 0 ⏩: 1

tried it out! ^^
very useful. thanks for posting it.
[link]
👍: 0 ⏩: 1

Glad you found it useful. Thanks.
👍: 0 ⏩: 0

Thanks, I made part of [link] with this.
👍: 0 ⏩: 1
Very cool. Thanks for showing me what you made.
👍: 0 ⏩: 1

thank you ive never done it before thats why i asked.
👍: 0 ⏩: 1

Thanks for making this
👍: 0 ⏩: 1

Ah, this is very useful! Thank you for sharing it with us ~
👍: 0 ⏩: 1
| Next =>