HOME | DD
 davidfoxfire — May Background Offer
Published: 2006-05-05 03:49:58 +0000 UTC; Views: 1010; Favourites: 7; Downloads: 358
Redirect to original
Description
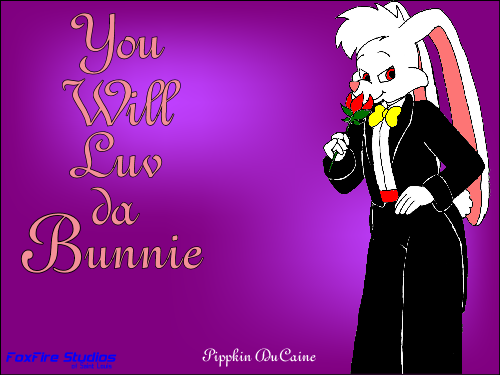
Because many people Luv da Bunnie, it's the background offer for May.Any donation to the web site will be rewarded in this background E-Mailed to you in any needed dimension.
Related content


Comments: 8

Bunny is spelled 'bunny.' 'Bunnies' is plural. The hand should be lower (unless you plan on having him have girly hips), the nose shouldn't be as prominent and sticking out of his face. Bunnies do not have the same snouts as dogs-- think of a more cat-like nose, Y-shaped. The eyes should be father up, more detailed, and rounder (but not so round as to make him look overly cutesy-wootsey, unless thats what you're going for). Also, I suggest shading, and more background than purple-with-bleach-stains (if you want people buying this). On another note, try to get his arm farther away from his face. As of now, the bunny looks as if he wants to ingest the flowers. Try to get the flowers farther away from his mouth, like he's still smelling them, but not eating them.
👍: 0 ⏩: 1

I'll keep all your suggestions in mind. Appreciate the tips and all. I'll work them into future pics as I make them, if that's all right. It'll take me time to get every suggestion up to speed.
👍: 0 ⏩: 0

It's nice, but you really need to get those white bits off of the rabbit's border...
👍: 0 ⏩: 2
I worked on it some with Gimp. What I usually do is select all the white space around the drawing with the magic wand, inverse the selection, and then copy-and-paste it into an transparent file. I raised the tolerance level for the Magic Wand function and improved the image, somewhat.
I'll keep looking for improvements.
👍: 0 ⏩: 1

Doing all that magic wand business is time-consuming and error-prone. Try this:
1. Image -> Mode -> Grayscale, or Alt-g
2. Image -> Colors -> Invert (so it's white on black)
3. Image -> Duplicate, or Control-d
4. On the duplicate: Image -> Colors -> Levels; set Output low and high levels both to 0, hit OK (totally black image)
5. Image -> Mode -> Compose; select RGBA; set Red, Green, and Blue all to the black image; set Alpha to the inverted image; hit OK (voila, black lines on transparent back)
👍: 0 ⏩: 1
 (Smile)")