HOME | DD
 duck-tape99 — Dave Strider God Tier Hood Tutorial

Published: 2011-12-29 18:48:25 +0000 UTC; Views: 63057; Favourites: 804; Downloads: 690
Redirect to original
Description
Hope this helps!! Please let me know if there is anything unclear and I will do my best to change it!If you do use this I would love to know how it turns out!
In case you are having trouble reading the text, here is everything typed out here:
You will need:
4 yards of fabric
Sewing machine
Fabric scissors and paper scissors
Measuring tape
Either newsprint/newspaper/pattern paper
Thread
Yardstick/Straightedge
Iron
1:
trace from the hood of a hoodie onto a piece of newsprint.
After you do that, cut it out with paper scisors and measure at a few points 2 inches around the hood.
Play connect the dots to make the final pattern and cut that out!
Now that that is done…
Measure from where the hoodie hood typically hits your forehead (just above the hairline) and measure to where your eyebrows start (mine is 4 inches).
Use this measurement for the half oval.
You will eyeball the length on the bottom.
Lastly:
To measure for your cape, you will need a bit of help. Hold the tape measurer to your shoulder and have someone read off the number at the back of your knee. Add anywhere between 2-5 inches to this length depending on how long you want this to be! (I added 2 inches)
For the cape…
Experiment with the lengths on the front and go with whatever looks good. Leave a hole for your neck and if all else fails, use these measurements (see image)
Use a ruler as a guideline for cutting these out! You don’t want a crooked knight collar!
2:
Fold your fabric in half, matching the selvages and pin on the hood (2 times; one for the outside and one for the lining), the half-oval, and the front of the cape.
After this is cut, you should have 2 half ovals, 2 front capes, and 4 hood sides.
The back cape is a bit more complicated
First open the rest of the fabric and fold it the opposite way than it was for the first cut.
Then place the front cape pattern at the top and from the shoulders measure your desired length. Connect the two points and make a straight line across the bottom. Use a yardstick or straight-edge to make a straight line from the corner of the top to the corner of the bottom and then cut.
3:
*Be sure that when you are sewing, have the right sides of the fabric touching
*Use whatever length of seam allowance you are comfortable with; I used a quarter of an inch
On all of the hood pieces, sew along the back edge.
Then mark the center of the half circles and line it up with the center seam of the hoods. Pin there and sew along the curve. At this point you should have two hoods with a front on them.
Here is the tricky part:
Flip them both so the right sides are out (no seams are showing)
Put the right sides together and sew along the front seams (NOT messing with the bottom! Only sew at the front of the hood!)
Once you get the hoods sewn together, flip it out using the bottom hole and press the seams. Now place the hood to the side, or on your head. You will not need it again until later.
CAPE:
Sew the cape front to cape back with right sides of the fabric together. (you will do this step twice) Only sew at the 3 inch marks on the shoulder so you do not sew your neck shut.
Once these are sewn together, lay the two finished pieces on top of each other with right sides touching each other. Pin all the edges.
TIPS FOR SEWING THIS PART:
-Sew all of the long directions first (including the spaces on the front). This will save your cape from doing an awkward tuck thing at the corners.
-Leave the seams open from your previous stitch if possible; not a huge deal though
((See Image: Sew the green lines first, and then go through and finish the blue lines. Finish by clipping corners))
When that is all done, flip it outwards using the neck hone, and press the seams.
Finishing Steps:
Mark the center of the back of the cape and line it up with both of the hood back seams. Pin the hood on and sew around.
When you get that all sewn on, stitch the remaining edge that isn’t in contact with the hood (if there is any)
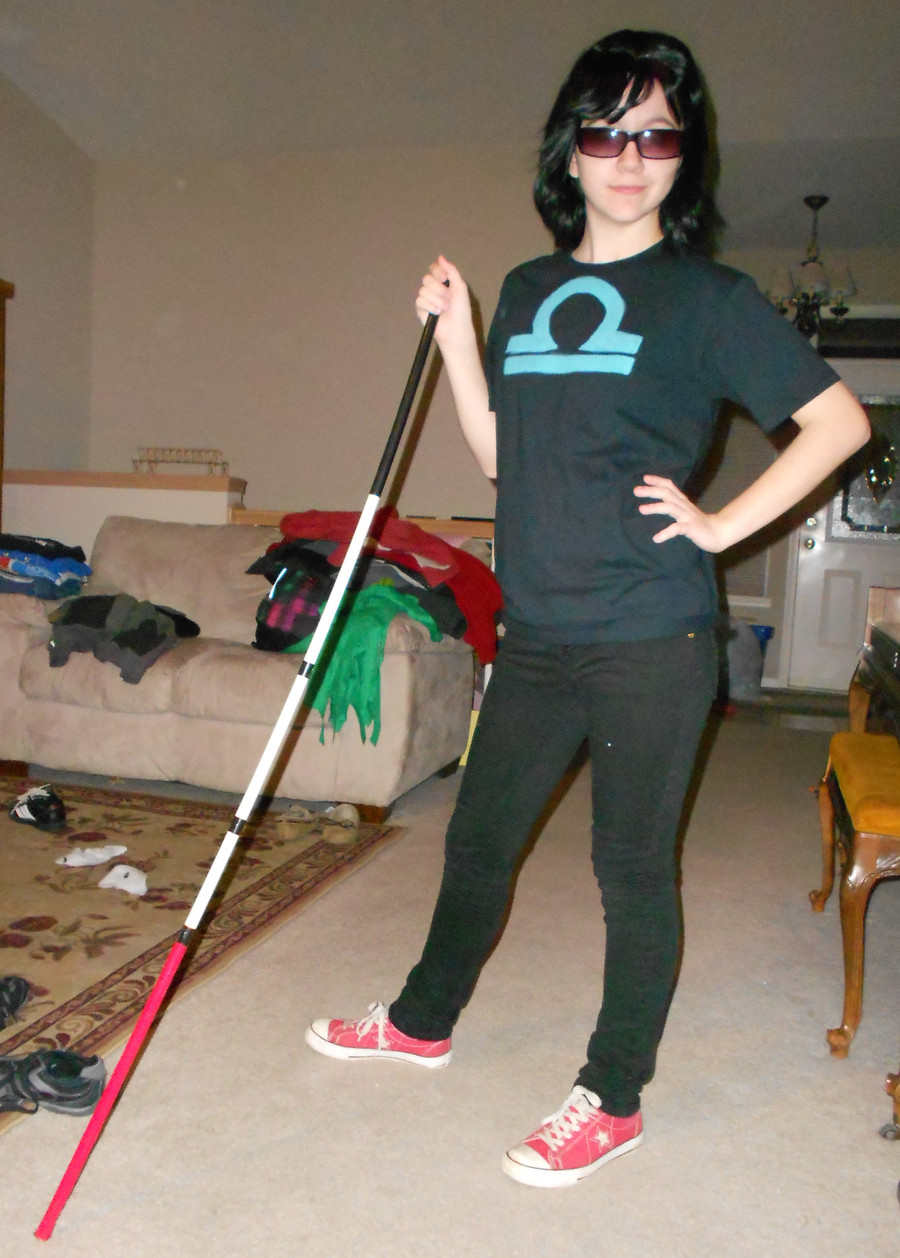
When that is done, be a boss in your little hood!
Related content


Comments: 153

Okay, so pretty much you are making two hoods and then sewing them together at the end before attaching them to the hood. What exactly are you having trouble with in this step?
👍: 0 ⏩: 1

I'm just confused about how and where to sew these 4 pieces together.
so basically i sew two pieces to make one hood
and do the same for the other two pieces.
what exactly do i do with the two hoods?
👍: 0 ⏩: 1
okay, so with each of the two hoods you sew on the half-circles.
after that you flip one of them inside out.
match the two sides so that the pieces you want on the outside are facing eachother.
sew along the front edges (straight piece of the sides and the bottom of the half-circles.
👍: 0 ⏩: 1
oh okay thanks! i got it
👍: 0 ⏩: 1
Awesome! If you have any more questions just send them over!
👍: 0 ⏩: 0
okay so i have 4 hood pieces, and i'm really lost at step 3?
👍: 0 ⏩: 1

Alright...I'm sort of lost on Step 3. When you sew the hood together, you then turn it inside out so the seams don't show. But when you attach the half oval, do you just push the hood inwards so there's only a seam from the half oval facing your head when you're wearing it?
Sorry, I am in no way a sewing person and I'm not sure if anything I just said made sense. :\
👍: 0 ⏩: 1
okay, i see what you mean.
no you are actually making 2 hoods technically. you sew the two hoods together at the front along the edges to hide that front seam
I hope this is what you are talking about. If this didnt answer your question im really sorry! Feel free to message again with further questions!
👍: 0 ⏩: 3
Another question I have: How exactly do you sew the hood to the cape?
👍: 0 ⏩: 1
I just pinned the right sides (the parts you want to show when you are finished) together so they are touching, making sure to get ALL LAYERS of fabric. then line it up an even distance from center front and stitch.
I really hope this makes sense!
👍: 0 ⏩: 0

I'm still confused, sorry I just really dont want to mess this up. So I've sewn the hoods together along the back, how exactly do I sew the half circles on?
👍: 0 ⏩: 1
okay, on the half circles you take the curved edge, pin to the right side of the hood (the one that is going to be shown) and stitch
(sorry it took me a bit to reply - midterms are a butt)
👍: 0 ⏩: 0
Figured it out.
Thanks for the reply, though!
 (Smile)")
👍: 0 ⏩: 0

I used a polyester blend, but you can use any type of cotton/polyester/anything that doesn't stretch too much.
👍: 0 ⏩: 0

How tall are you? Cuz' I bought a smaller amount of yards and am wondering if it will work??
👍: 0 ⏩: 1
I am 5 foot 3. but it should still work. I actually had a LOT of excess fabric after making the length of the cape
👍: 0 ⏩: 1

Woah dang I'm like 5 foot 8 O.O
👍: 0 ⏩: 0

I used a cotton/polyester blend (aka the cheapest fabric at your typical fabric store)
👍: 0 ⏩: 0


Thanks for the tutorial! I used it for my cosplay [link]
I do have to say that the numbers were very hard to read though, so I used the ones I could read as guides and guessed on the rest. Still thanks though! I was able to make it the night right before my friend came over with her newly made John cosplay, and we were able to make a video that night.
👍: 0 ⏩: 1
Ah cool!! Sorry the numbers were hard to read, most of it depends on the person though, and thanks for the pic! From what i can tell the cape looks great!!
Thanks for the feedback and enjoy your cape.
👍: 0 ⏩: 1
I most definitely will! and I would have given you a better view of the full cape, but my cosplay group and I have decided to keep our group photoshoots on our tumblr, but yet again, thank you!
👍: 0 ⏩: 1
Ah thats awesome all the same! I'll keep my eye out for them there! (I am an avid tumblr user myself and many a homestuck cosplay shows up on my dash!)
👍: 0 ⏩: 0

Hey! Thank you so much for posting up a Tutorial! My hood turned out awesome! Thank you sososoo much!
")
👍: 0 ⏩: 0

Hey, I wanted to say thanks for the tutorial. This was the only one I could find but I was able to get my Knight hood created following it
👍: 0 ⏩: 0


awesome!
hopefully when I get my latula god tier cosplay started, I'll use this uvu!
👍: 0 ⏩: 0

Oh man, this'll be so handy for my God tier dave cosplay! 

👍: 0 ⏩: 1
It does not matter what type of fabric you use, as long as the cape part isn't a stretchy fabric - that makes it a little harder to work with
You're very welcome and enjoy making your cosplay!
👍: 0 ⏩: 1
it can be really used with anything. I would say to not use stretchy fabrics. So a nice cotton or broadcloth would be a-okay!
👍: 0 ⏩: 0

ah ok never mind! i was being dumb and didnt go through the comments before i posted this. sorry hehehe...
👍: 0 ⏩: 0

It's a very good tutorial owo I'm excited to start piecing together a Dave god tier because I have til April for my con XD
👍: 0 ⏩: 0

It looks like a really good tutorial.... But i cant see what the text says ^__^' would be good if you upload it in a bigger and better version so u can see it. But it looks like a great tutorial!
👍: 0 ⏩: 0

Attempting this in white tonight for a prototype for someone else's cosplay. This should make it really easy, thanks! =3
👍: 0 ⏩: 0

Can you like message me the direction i cant see the writing
👍: 0 ⏩: 0

This is the first time ive attempted to sew something and this is a little difficult for me.....but im sure ill get it .x.
👍: 0 ⏩: 1
oh gosh, well if you need any help at any time, just let me know! I'll do my best to help if you need it!
👍: 0 ⏩: 0

Thanks, this is helpful! My friend and I are going to a con together, it will be my first. I've never sewed/cosplayed in my life. I'm going as God-Tier Dave. SO thanks for the help with this!
👍: 0 ⏩: 1
ah you're very welcome! Have fun at that convention!! Just let me know if you need clarification or any sort of help.
👍: 0 ⏩: 1
Okay, will do. Thanks.^^
👍: 0 ⏩: 0

I have a question about step 2? Okay, I've never done stuff like this before, so pardon my slight ignorance on this uvu but it seems like you're cutting enough fabric to make 2 capes? like why do you need 2 cape fronts? If there's only one cape, it only has one front so dont you only need 1 cape front thingy? I'm sure there's a reason for it, I was just wondering if you could explain it more to me? I don't want to waste fabric by doing it wrong :U
👍: 0 ⏩: 1
yes, you cut enough to make two capes so that you don't have obvious edges and so it is a little more sturdy.
You will be making two of each and then sew each sides together.
👍: 0 ⏩: 1

This is a suggestion, but you could probably get the same effect by using a thicker fabric and hemming the edges, and that way you would save on fabric. (a double knit poly would be my choice)
👍: 0 ⏩: 1
You absolutely could! I just didn't want seam lines to show so i went with the double method
👍: 0 ⏩: 0

| Next =>