HOME | DD
 eelstork — Blender Tip: Array + Shrink-wrap
Published: 2013-01-10 04:58:08 +0000 UTC; Views: 5762; Favourites: 19; Downloads: 32
Redirect to original
Description
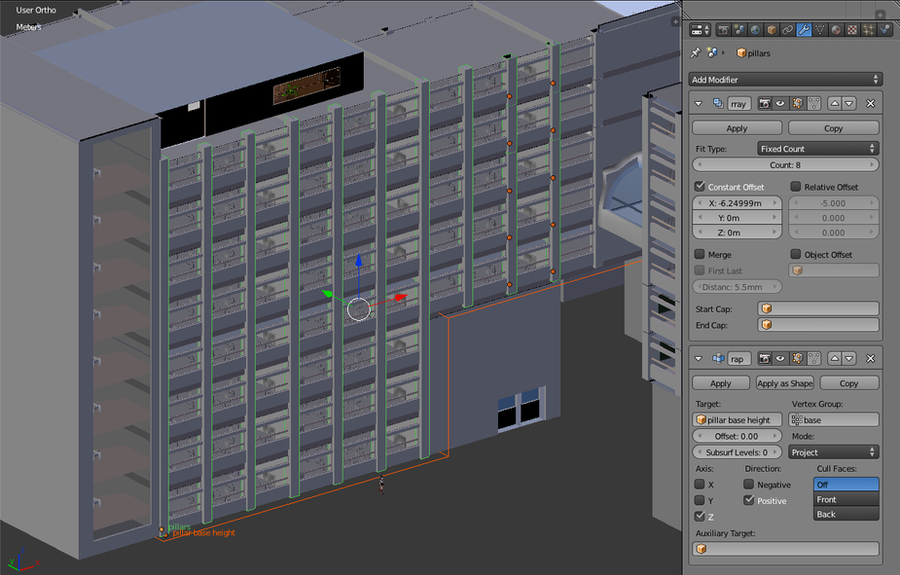
I'm simplifying and polishing the skin of one of the SCHS buildings. I wanted to replace several columns (multiple orange dots on right of image) by a single, arrayed column.Before moving further with this explanation please note that separating the columns per floor is not a mistake. It can be a good idea for interior scenes as it facilitates creating a breakdown (so, we can load only the current floor in the game runtime).
But for exterior scenes this approach will be wasteful as we may wish to skip interiors and display the skin of the building with optimized poly count.
Running arrayed columns from bottom to top is the obvious solution but, as you can see on the right, column heights are not uniform.
I could use a separate column. A more powerful approach, however, consists in using another object as 'limiter'.
We could do a CSG but CSGs are not often clean, instead I used the shrink-wrap modifier.
So you can see how the object named "pillar base height" limits the... base height of the arrayed object named 'pillars'.
It was done this way:
1- Create the pillar/column object (just a box...)
2- Create a vertex group named 'base'; add base vertices from 'pillar' to the group.
3- Add shrink-wrap modifier to 'pillar'. Set mode to 'project' ; set axis to Z (vertical) and direction to 'positive'.
4- assign 'pillar base height' object as 'target' and use 'base' as vertex group (we are projecting the base vertices so that they touch the base height; we do not wish to project ALL vertices otherwise the column will collapse)
As I did you can display the 'limiter' as wireframe and exclude it from renders (or put it on a different layer).
Check the modifier stack for clarification.
(Above tip is relevant to Blender 2.6x)
Related content


Comments: 18


Can't you "key" the array count value? After all on B26 you can key next to all values so why not key the array count with a driver which in turn uses a curve to select different count values depending on an input value (let's say X coordinate in your case).
👍: 0 ⏩: 1

Can you? I understand 'keying' but here it seems to me that 'array' is a one-off operation, so trying to vary the count according to X... Well - intuitively - I don't see that working here.
Besides I thought keying was mostly time based? What am I missing?
👍: 0 ⏩: 1
A driver is sort of a dynamic keying hence the keyed value changes depending on some input value. I made a quick mockup to chekc for myself: [link] . The driver is just a generator modified with (0,1) as properties (hence a 1:1 mapping of the scripted expression). For a real setup using a python method there instead of an inline-if-then would be a better idea. Theoretically you could use a F-Curve too I think but that I didn't get working yet. But using a python method you should be able to do something like columnHeightByX(x,thresholdX,countIfTrue,countIfFalse). That would be then an expression like "columnHeightByX(var,8,6,2)". I think the expression is evaluated whenever the object location changes. At last in my test I could move the object around in the edit view and the array count changed according to it's position. Just an idea. Not sure how practical such a setup would be.
👍: 0 ⏩: 1
I kind of get it.
So it's documented here I guess?
[link]
It looks like an animation feature but as I understand it can be used to affect output in real-time, while editing?
If you got a sample file... I'd be curious.
How's your engine / game project doing : )
👍: 0 ⏩: 1
Drivers have been implemented in the first place as an animation feature. A typical use had been back then to animate shape keys using bones in an armature or an object or to animate objects according to the state of another. Since B25 though allows now to animate most RNAs and drivers can use python scripts drivers can be used now to do interesting stuff in places one would not expect it from to begin with. I've also seen once somebody loading an audio file and linking the apmplitude for different equalizer bands to the array count of objects through a driver to get like a 3D equalizer.
I've made only a little test file I took the image from. But you need nothing more than the image since that is all the configuration you need: add a driver to the array count RNA, click on the driver to edit properties, select the appropriate transform channel and insert the code snippet. Once done you can already drag the object around along the X direction. Just think of a driver as a python code snippet run whenever a certain value changes. I think they keep track of linked RNAs in drivers using a list in the linked objects so this should be not slow but I'm not sure about that detail. Best is to go experimenting with the feature to see how much use it is in the end.
Concerning the engine/game I'm quite slowed down at the moment. Since the beginning of this year I'm down with a lot of real-life problems and got little time. Besides I'm fighting against speed problems especially with the new "feature" I'm working on. Hopefully I can soon show something. It certainly makes a difference
")
👍: 0 ⏩: 1
Oh I'll have to try it out and figure some... useful use : )
nvm, In the above tutorial, the count does not vary, however; what we're looking at is a 1D array (columns are running across floors), so what varies is the position of the column base (hence use of vertex groups).
Doing it this way means a lot less vertices for a slight increase in fill.
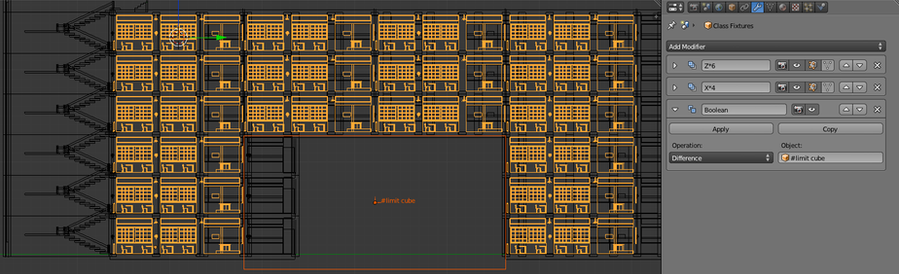
Similar approach used here [link] but in this case it actually reduces fill since it prevents the base of wall elements from piercing thru the ground.
Well, speed is a factor worth mentioning. Some of the above geometry really got slow to process (kind of solved with groups, I explain that somewhere else but I say 'kind of' because I dare not think what my py exporter will find when I tackle said groups)
👍: 0 ⏩: 1
If this is a problem I take it then Blender does not use a depth pre-pass as it is common in deferred rendering engines like mine. That would reduce the fill. Concerning the use though it is not required to be dynamic. The driver is just to select the proper array count depending on where the object is located. You can do this by hand though too. Not sure how well Blender handles instancing though. I think it has it one way or the other.
👍: 0 ⏩: 2
Okay what I understand is depth pre-pass gives a benefit similar to front-to-back rendering, i.e. discard fragments early ~~
👍: 0 ⏩: 1
It's more than that. You lay down depth first using a cheap depth only shader (depth only on modern GPU potentially uses double-write speed). Then you render the expensive geometry shaders. Due to the depth pass you only apply the expensive geometry shader to exactly one pixel, the one pixel where the depth value is equal. Hence the idea is not to do a front-to-back rendering but to render only the front most pixel and thus running complex shaders on as little pixels as possible (namely each screen pixel exactly once).
👍: 0 ⏩: 1
That is actually what I understood. Sorry for my approximate comment and thanks for taking the time to clarify.
👍: 0 ⏩: 1
You're welcome. GPU stuff is after all quite complex... if you want it to be fast.
👍: 0 ⏩: 0
In Blender performance issues crop up as modifier stacks get heavier so it's not related to rendering. A few version increments back the array modifier notably, started suffering from horrible perf. issues. Having said that I very much doubt they use deferred rendering here.
I mentioned fill and vertex count as these directly impact rendering with my custom renderer on iPhone, iPad ( no deferred rendering here either).
Being very much not a rendering specialist, I'm not getting the whole depth pre-pass thing. On PowerVR (GPU type very common on tablets and smartphones) rendering sorted front to back with depth buffer enabled is faster (because fragments drop quickly when hitting the depth test).
Fill remains an everyday concern, unless working with trivial geometry ofc.
👍: 0 ⏩: 1
Actually front-to-back sorting is the default modus-operandi of GPUs no matter if high-end or low-end (as on mobiles). The difference in performance you see there is mainly due to the difference in shader cores. Fill-rate as such is term not used anymore since a long time because with the unified shader core technique the true fill-rate (ROPs) have a much smaller impact than actually number and power of shader cores. Laying down depth first helps especially shader core weak GPUs as they can quickly reject pixels to render using HW-Z-Optimizations. So no matter if defered or forward rendering a pre-depth pass is a win in most situations.
👍: 0 ⏩: 0
It causes an object to wrap itself around another object; practically this work by moving vertices from object A, to the surface of object B.
So, a typical use (works with default settings only needs offset) is fitting a clothe tightly around a model; this works well because you can set the so called offset away from skin so surfaces don't overlap. I think it is why they call it shrink-wrap
But it has 'project' option which allows projecting in a specified direction like up or down, until the vertices touch the surface, so in the above example I project 'up'.
Finally, instead of moving all vertices, you can limit the action to a specific vertex group which I also used here.
I hope this is clearer I also added more comments...
👍: 0 ⏩: 1

I wish i was that good at making things in blender. I acutely have to start rendering a sword all over again in cycles because my laptops battery popped out...
👍: 0 ⏩: 1
Mmh. Actually I was checking out this stuff then after one hour I just hit Ctrl+N or such and didn't save. So yea.
I mainly do collaborations these days so most of what you might see in my gallery was edited by two, sometimes 3 of us...
👍: 0 ⏩: 0