HOME | DD
 Elestial — .photoshop.tutorial.tools.
Published: 2007-12-09 23:52:14 +0000 UTC; Views: 1362; Favourites: 5; Downloads: 55
Redirect to original
Description
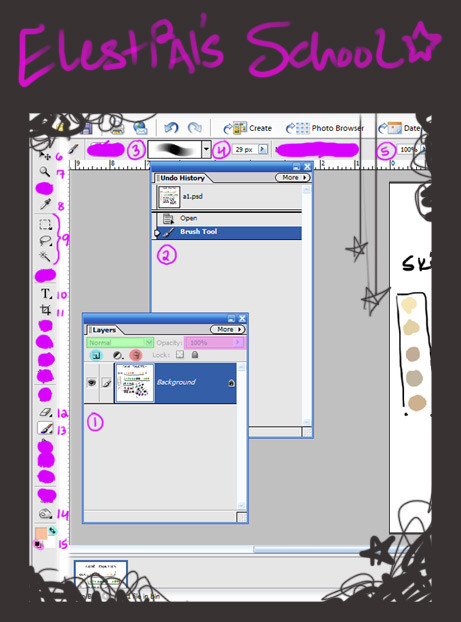
So, I know a lot of people do tutorials of how they color in pictures, but I realized that they never really told you about the tools and their capabilities. So, I took the liberty to do so. ^^Sorry that I had to put the tutorial on the description, there wasn't any other way...That I know of. ><;; Here we go:
[1] The Layers Palette:: The layers Palette is really your best friend. It's what determines where everything goes and in what order. You can really use it to your advantage. To make a new layer, you click on the blue highlighted icon. This will make a new layer on top of the one that you are currently working on.
To delete a layer, simply click on my red highlighted icon. This will then pop up a screen asking you if you truly want to delete the layer. If you don't want this hassle, all you have to do is click-hold and drag the layer to the trashcan.
The pink highlighted area is opacity, this will be discussed later in the tutorial.
The green highlighted area is your layer options. It's really difficult to explain this feature, but basically, it affects your layer portion in different ways, just mess around with it and you'll see what I mean.
Now, the layers palette is very cool because of one very important reason; Each layer is separate, which means that you can erase, delete, or color in one layer without affecting the rest of them. This can come in handy a lot because it can keep your colors separated when it comes to coloring in a drawing, so when you're filling in a character's skin for example, you can do whatever you want with it without affecting all your other parts of the character.
Another feature with layers that can come in handy is the layering itself. One example is skin and clothing. If I put skin on a layer BELOW my clothing layer, then when I color in my clothing, it will cover up the skin layer.
If the layers palette is not up on your photoshop screen, go to windows-->layers.
[2] History Palette:: Another one of your best friends. The history palette basically is like an undo button. It will keep a 'history' of everything that you've done on your drawing, so instead of having to go edit-->undo twelve times for something you did a while ago, all you have to do is scroll back on the history palette and click on the little slide that came before everything that you want to take back. However, I must warn you. The History Palette can only hold so much information, so be careful about how much you do, especially if you're uncertain of it. One of the best ways to deal with this issue, I find, is to just make a new layer. If you like what you did, keep it. If you don't, all you have to do is delete the layer and your mess is gone.
If the History Palette is not up on your photoshop, go to windows-->history.
[3] Brush Palette:: This is a marvelous little thing. It holds all sorts of brushes for your art. Try to experiment with a couple and get a feel for how they work. Pick one that tickles your fancy. That sounded very dirty, I know. I usually color with the third brush type on the drop down window.
And by the way, the brush palette on the top can only be seen as an option if you are on the brush tool. Another thing we will discuss later in the tutorial.
[4] Brush size options:: This is a very straightforward option. Click on the drop down screen and move the slider back or forth to change your desired brush size. Or, you can just type it right in.
[5] Opacity:: This tool is pretty cool. The opacity tool basically sets the opacity of your tools, ie. The transparency of them. The closer to 100% the less transparent, and vice versa.
[6] Move Tool:: This is pretty straightforward as well. Once selected, you have the power to move things around. Oh the Power!
[7] Zoom Tool:: Once again, straightforward tool. You use this to zoom in or out of a drawing. I like to click and drag around an area that I want to work on if I find the need to work on it closely. Also, once selected, the top area of your photoshop window (Where currently I have the brush tool options) will have a couple options;
Actual Pixels- this shows you the actual size of the picture compared to how you're looking at it currently.
Fit on Screen- this will fit the drawing on the screen. I basically use this as my zoom out tool, instead of having to switch back and forth between the plus and minus magnifying glass.
Print Size- Useless. Never click on this.
[8] Eye Dropper Tool:: Another of your best friends. I think we all know what this little baby does, thanks to MS Paint. A good shortcut for this tool is pretty easy, I use it all the time. All you have to do is be on the paint brush tool, from there, just hold down the 'Alt' button on your keyboard, and it will switch it to the eyedropper. Once you've clicked on the desired color, it will immediately switch back to your paint brush.
[9] Your Selection Tools:: Now, I don't use these too often, but there are times where these can be totally handy. From top to bottom they are:
Marquee Tool- This is a basic square selection. I use it a lot to copy and pasty images onto other documents that I'm working on.
Lasso tool- A great tool to work with. The main basis of this tool is to 'draw' a selection around your desired area. You basically trace what you want to surround, and then you trace your ass back to where you began, and a little circle will appear next to your lasso tool icon. This is basically telling you that if you 'click here' it will close your selection. To deselect whatever you have selected, all you have to do is either click out of your selection with the lasso tool or click select-->deselect. You have three different types of lasso tools. Just click and hold on the lasso tool and a little screen will appear beside it:
[Basic Lasso Tool]: It's like a freehand selection tool. I like using it a whole lot.
[Magnetic Lasso Tool]: This is a very cool selection tool. It will attract to the lines and colors that are around it. Basically, it'll do the selecting for you, it's pretty sweet.
[Polygon Lasso Tool]: Another recommended tool. It's basically a straight selection so you have to click every time you want to continue making your selection. It's real easy to use though, so I like it a lot.
Magic Wand- The magic wand is an OK tool I think. Essentially, you use it to click on an area, and it will select that area. However, think of it as the paint-bucket tool on MS Paint. It's a pretty cool thing and it's easy to use, but if your lines aren't connected 100% it will fill it out. That's exactly what the magic wand does, which pissess me off. If your lines aren't perfectly closed (Which they usually aren't on a scanned-in lineart) it will go crazy and select all sorts of random shit. So I wouldn't recommend it. It can be really useful at times though, you just have to know when and where it's appropriate.
A good tip for the selection tool is also how to add to your selection without deselecting or subtracting from a selection. To add, simply click the shift button and continue with your selecting needs. To subtract from a selection, click the Alt button and just pretend like you're going to select a portion. Whatever you select with your tool, is going to disappear from your selection....If that makes any sense at all.
[10] Type Tool:: OK, as cool as putting type on a drawing is....This tool sucks major ass. I mean, it's handy for a couple lines here and there, but when you're trying to type out a HUGE thing, it is not your friend. Which is why I am posting this entire thing as my description of the drawing on Deviantart. I don't think I need to go into much detail on this one...It's pretty basic.
[11] Crop Tool:: Once again, really basic. Click and drag around what you want to select, click enter and then whatever it is that you wanted to erase or exclude will no longer be in the picture. This can also be used to get rid of extra space on a lineart etc.
Note: ALWAYS click enter after you've done a selection crop with it, even if you want to take it back. Just click enter and then undo the crop tool, there is no other way to get out of it after you've used the crop tool selection.
[12] Eraser Tool:: Another very handy tool, it well, erases. This works great with layering if you do it right. For example, let's say that I want to color in the eyes of my character white but I've colored over them with tan from my skin color. All I have to do is use my eraser tool on my skin layer and erase the skin color from the eyes.
The eraser tool also has an opacity, so if you wanna erase something just a little bit to make it lighter, you just lower the opacity and it will be as if you were just lightly erasing on a drawing in real life.
[13] Brush Tool:: No explanation for this, it's REALLY basic.
[14] The Burn, Sponge, and Dodge tools:: OK, to get each different tool, just click and hold on the icon and like the lasso tool, a little slide will pop up next to it. Just select your tool.
Burn Tool- It will darken whatever it is that you want to 'burn'. It's not one of my favorite tools, but you can certainly learn to love it. Opacity is useful here too, it will help you control how much you will initially 'burn'.
Sponge Tool- This is one of my favorites at times. Once selected, the top portion of your photoshop screen (Where I currently have my brush tool options selected on my screen-shot) you will have a little drop down screen that gives you a selection to 'saturate' or 'desaturate'. Saturate will make whatever it is that you rub the tool over brighten up and basically saturate with color. The desaturate option will do the oposite, except it will 'gray down' your color. Basically, it will strip whatever you rub it over of it's color and make it grayer and grayer each time you go over it.
Dodge Tool- It basically makes things lighter. Or in other words, adds white to your selection, it's essentially the opposite of your burn tool.
[15] Color Selections:: The most used tool in photoshop, right next to the brush. This will determine the color of whatever it is that you're doing. The top square is the foreground color, and the one on the bottom is the background color square. To select a color, simply double click on either square and a screen will pop up with a HUGE array of colors to choose from. (The square you double click will be the one that changes color)
A neat little thing is that small curvy arrow that I have highlighted in blue. This can basically switch your colors back and forth, so it's good if you're using two colors at once. Oh, the square on the top is the one that will determine the color of whatever tool you're using.
Also, the area that I have highlighted in pink under the squares is a default tool. The default photoshop 'square' colors are black and white. This will change whatever colors you have back to default.
I hope this helped those of you who are clueless about photoshop. I'll try to post a tutorial on how I normally color my lineart and whatnot, but as of right now, I think this should be good. ^^
Related content


Comments: 9


i have a question.
for example like all tutorials have different images....
as in a step by step picture of whats happening next.
how do you add an image that you already have onto the canvas?
im haveing a lot of trouble.
so if you could help that would be great ^.^
thanks!!
👍: 0 ⏩: 1

Add an image?
What do you mean?
What you do is you work on your picture and when you get to certain points, you take a screenshot of the image. Save it. Repeat. When you have a finished drawing, you open all your screenshot images and paste them on a new document. Add text, arrows, etc.
Did this help? (owo)
👍: 0 ⏩: 1
Yes slightly ^.^
thank you
ill try googling it too
and see what i get >W<
Thanks again!

👍: 0 ⏩: 0

god damn.....*gets blinded by the enormous amount fo typing*
is this what you were doing last night
")
👍: 0 ⏩: 0
-bows- Thank you. I'm glad somebody likes it. ^^ Took forever to type up!
👍: 0 ⏩: 1

I'll bet, but it'll help a lot of people!
👍: 0 ⏩: 0