HOME | DD
 EmiMG — Tutorial: COLOUR

Published: 2013-06-03 19:00:04 +0000 UTC; Views: 28472; Favourites: 1831; Downloads: 297
Redirect to original
Description
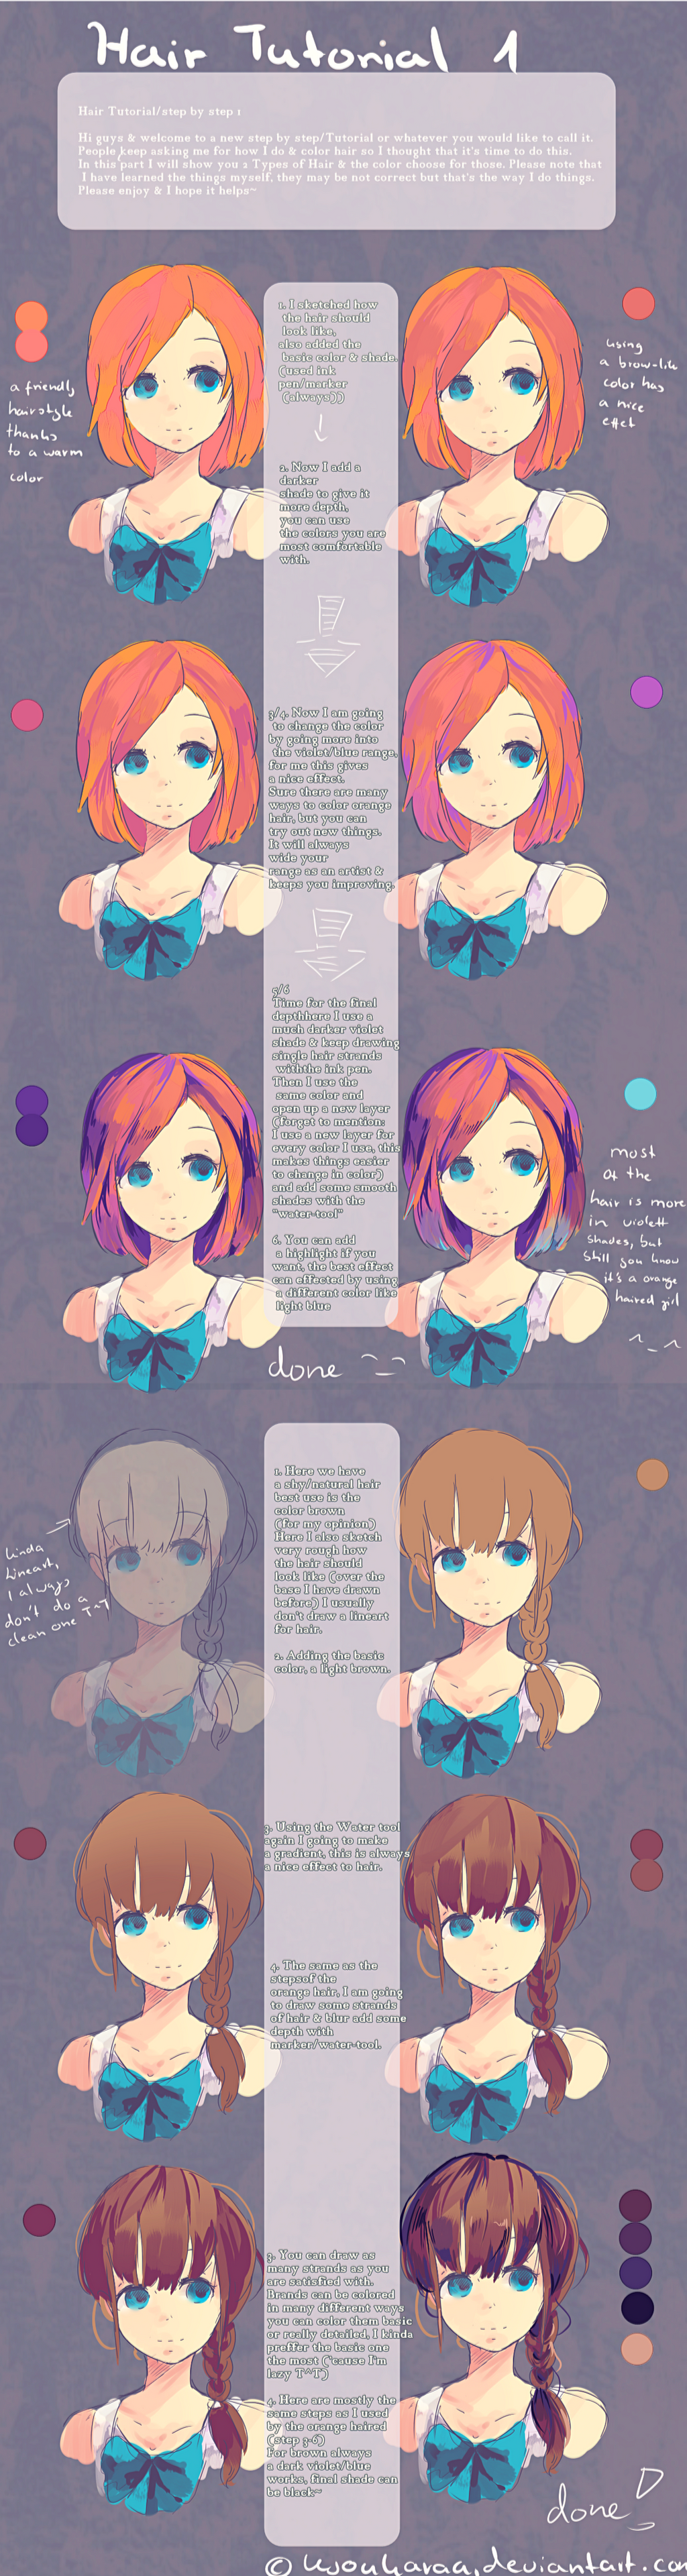
Hello! And welcome to the second part of my tutorial.Im glad im finally being productive OTL
Everything was made in Paint tool SAI, Character drawn is named Alexan and she belongs to me!
Question! do you personally enjoy coloured or bold outllines?
lineart tutorial:
Related content


Comments: 81


Thanks so much! ")
👍: 0 ⏩: 1

its a layer option, anything you do on that layer effects the one below it. but ONLY the one below it. So that means if you make a clipping group layer above your outline, you can scribble colours all over and it will only effect the outline.
No need to clean up :3
👍: 0 ⏩: 1
Oh, so we're supposed to colour over the outline on another layer above the outline? Thanks a bunch, you've really helped me!
👍: 0 ⏩: 1
Yep! if you want it coloured its very simple to do it that way, if you look back at the skin part and see the layer screen cap, it shows you what it should look like
👍: 0 ⏩: 0

I just stumbled across this and this is amazingly helpful. Thank you so much for sharing your pointers!
👍: 0 ⏩: 1
You're welcome! There's so much to cover in colouring though n_n; There's just so many ways you can do it
👍: 0 ⏩: 0

This is really awesome. ouo
Personally, I do bold outlines when I'm drawing normally, but I use colored outlines when I do pixel dolls and stuff like that.
👍: 0 ⏩: 1
Ohh it works on pixels very much so.
I can never decide between multi colour or single colour.
👍: 0 ⏩: 1
Yeah. I usually do multi, which then depends on what colors I used in the particular area.
Kind of a pain, but I think it looks nice.
 (Smile)")
👍: 0 ⏩: 1
I keep meaning to try that. But I end up getting carried away with the colour
👍: 0 ⏩: 1
Ahhhhhh I know that feeling. D:
Though it's more of a "I keep meaning to do x, but I end up getting caught up doing y, which is completely different from x or anything vaguely related to x" sort of thing. lol
Either way, I hate when that happens. XP
👍: 0 ⏩: 0

This tutorial helped me a lot!!! Thanks for sharing!
👍: 0 ⏩: 1
<33333 your colouring is already the bomb
👍: 0 ⏩: 1
dohohoh thank you so much ; 3 ; <3
👍: 0 ⏩: 0


Awesome tutorial, But you could use a lot less layers if you use the preserve opacity option instead of a clipping group, it acts the same way but you don't need to use another layer
👍: 0 ⏩: 1
Oh! Nice :D Thanks for the tip!
👍: 0 ⏩: 1

This is wonderful! One thing though. Could you explain how you color the part of the hair over the eye? I can't seem to think of how you get it semi transparent and over the line art too also with the rest of the hair not being transparent too. o.o
👍: 0 ⏩: 1
ah! I did miss that out.
I actually use the clipping group. To apply a faded look. It also helps to gently erase ( on the lightest setting )
Over the eye, it makes it transparent. Those are two ways of doing it.
It's easiest just to lightly erase
👍: 0 ⏩: 1