HOME | DD
 enc86 — Dry Brushing Tutorial

Published: 2013-02-03 02:16:01 +0000 UTC; Views: 1632; Favourites: 28; Downloads: 11
Redirect to original
Description
*DISCLAIMER: I am not a pro/master at any of these techniques. what works for me, might not for you. there is always more than one way to do things. be sure to do additional research and practice on a test piece before trying on your projects.*so what is this "dry brushing" you may ask, well its a techniques used in painting 3d object to create dept and used for weathering.the idea is to use a brush with very very little paint on it ("dry") to bring out raised edge details. this basic techniques is easy to learn but takes time to master
different paint types and colors can be used, experimentation is key. for the sake of this tutorial i will be going a bit heavy handed, but it will be easier to see.
in the tutorial i am using model masters "jet exhaust" on model masters "euro gray".
What you will need: a painted part or kit(in this case my virago) a dry brush color( metals colors work great for weathered metal effects) your preferred paint thinner.a sheet of paper towel or napkin and a brush. i like to use an old #2 flat (use smaller brush for smaller areas). never use a brand new or good brush. dry brushing does tends to wreak brushes, so try to use your older beat up ones.
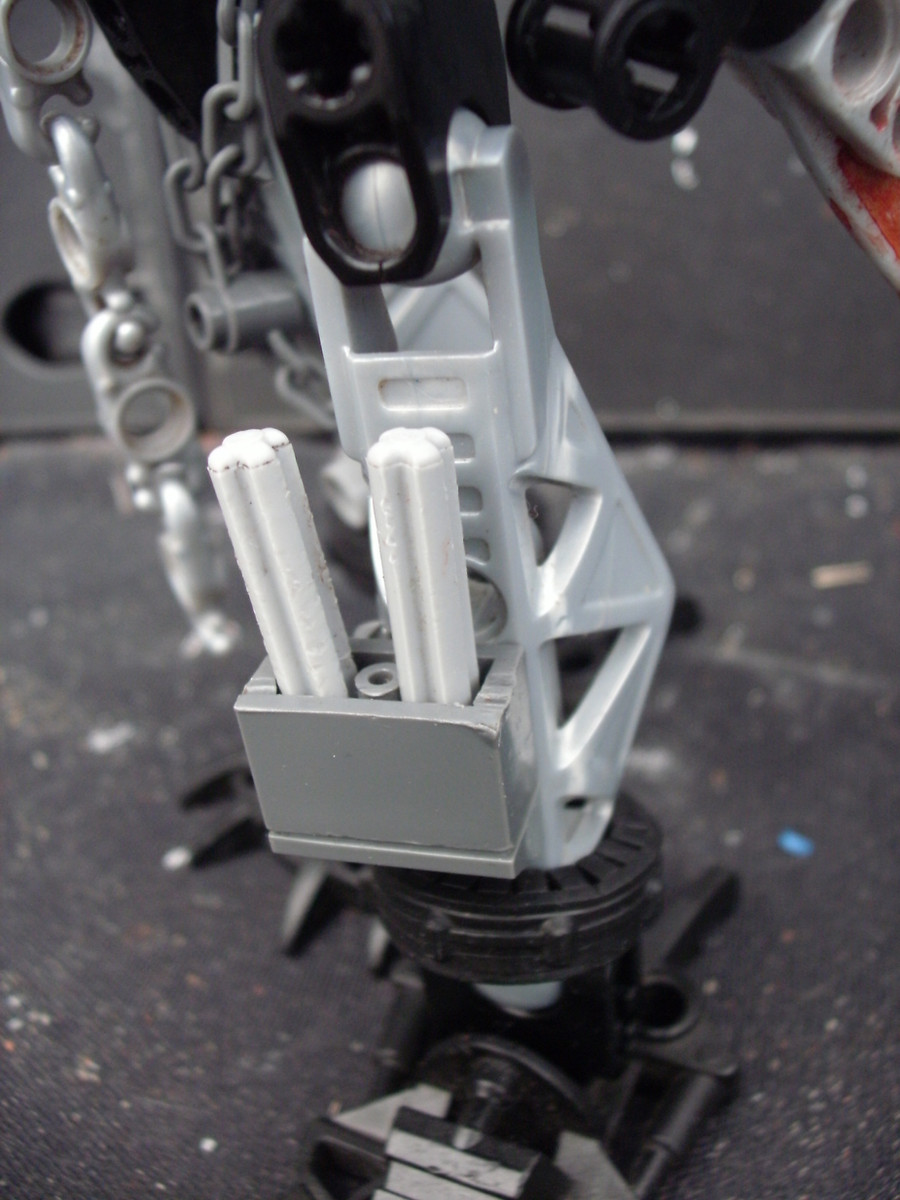
the technique: the idea is to have your brush have very little paint on it and have it leave paint on the raised edges/details on a model. i load the brush up with paint, then swipe it on the paper towel till almost all the paint is removed. next i take my brush and run it perpendicular to the raised edge i want highlighted. the paint will stick on the raised edge and create highlights. remember its best to have it be too light than too dark, you can always go over a detail more than once. if the brush starts to get stiff, just dip in the thinner a bit.
remember to have the brush just barley touch the parts raised edges and use nice gentle strokes. work in small areas or one detail/edge at a time.
in the photos above you can see a few before and after shots. and i have added lines to how i moved the brush to create the effects.
Related content


Comments: 47

pretty cool give a insight on how you painted it good work
👍: 0 ⏩: 1

thanks dude! i am working on more painting tutorials as well.
👍: 0 ⏩: 1
thats good you can always learn by teaching
👍: 0 ⏩: 0

Hmm, I'm going to have to try that for the weathering on my Pz II... Looks like your ship's coming out pretty good ")
👍: 0 ⏩: 1
Cool happy i could give you some ideas.
the ship is prince xizor "virago" from star wars shadows of the empire [link] while i dont think the kit is rare, i really haven't seen it done. i think its a kind cool design.
👍: 0 ⏩: 1
Yeah, it looks pretty interesting! I can't wait to see it completed!
👍: 0 ⏩: 1
thanks buddy! should have it done in the next few days.
👍: 0 ⏩: 0

Nice tutorial. I suck at painting, so this'll help when I decide to paint that Shelby I customized
👍: 0 ⏩: 1
cool! happy i could give you some ideas.
in the next few weeks ill be doing more tutorials on painting and such.
👍: 0 ⏩: 1
Cool
I'm already repainting a P-51. Been working on it off and on
👍: 0 ⏩: 1
cool dude! well in the mean time if you ever have any questions or want some tips, dont be afraid to ask.
👍: 0 ⏩: 1

Looks great lad  (Smile)")
👍: 0 ⏩: 1
cool buddy! its a pretty simple, in the example i went heavy but usually less is more.
👍: 0 ⏩: 1
Less is more....that just sounds awesome ^^
👍: 0 ⏩: 1


brings out a lot of detail and looks awesome!!
just thought about doing it to NR but i guess it would be permanent ish...
idk tho it would look petty cool!
👍: 0 ⏩: 1
it would look pretty cool, but yea would be kinda permanent, unless your will to use paint thinner to strip stuff(NO FUN)
👍: 0 ⏩: 1
Yeah I'd have to unpaint parts and the paint new ones every time I upgraded...
He'd look sssooooo much cooler tho!!!
👍: 0 ⏩: 1
what color would you suggest?
i was thinking a grey but that would probably stick out to much... so i guess a light shade of black or something...
👍: 0 ⏩: 1
hummm maybe a gray would work, eruo gray or RAF ocean gray. the key is to have the color be a bit lighter, that way the highlights really pop but are not distracting.
if you are going for a more metal weathered look, i would say jet exhaust,steel
here is a link to what some of the "model masters" metal colors look like [link]
tho you do not want Alclad II Lacquer, i would get some "model masters" enamel colors [link] can be found in most hobby shops and amazon, and the site i linked.
👍: 0 ⏩: 1
i'll probably be looking in Hobby Lobby, thats were we usually go for this kind of stuff!
thanks for the help! i'l post some practice parts when i start working with it!
👍: 0 ⏩: 1
cool! glad i could be some help.
👍: 0 ⏩: 1

oooh i didn´t knew that!!! will try it when i make some big tank again... =3
👍: 0 ⏩: 1
cool, happy i could give you some ideas! could be done on smaller scale too. i went really heavy on this one(shows better in photos) with less paint on the brush the effect is more subtle.
👍: 0 ⏩: 1
maybe can try in the jadgtiger, when arrives x3
👍: 0 ⏩: 1

Great info - I really like the level of detail that drybrushing brings a kit. I think it really makes a difference in the end result!
👍: 0 ⏩: 1
thanks! i really like dry brushing too, its an essential skill. i went really heavy on this just for the photos, its the underside of my spaceship so it wont show as much.
👍: 0 ⏩: 1
Yes indeed, but the effect looks great in your photos! Really nice of you to share with everyone!
👍: 0 ⏩: 1
thanks again friend. i am gonna try to do more tutorials this month, hopefully they will help out the people new to the craft.
👍: 0 ⏩: 0

For weathering, I always find testor to be really good in my opinion.
👍: 0 ⏩: 1
yea testors work nice and has some great colors.
👍: 0 ⏩: 0

It's always nice to share the secrets to your secrets. You should definitely make more of these with other things you do in your model building.
👍: 0 ⏩: 1
thanks buddy.
got more than a few planed out for this month. still got "washes" "damage effects" "enc style figurines" and a few other lined up this month.
👍: 0 ⏩: 1

wouldn't wiping of excess, then just spreading the paint around the model until your brush is dry also count? cuz that is what i do, it allows you to get more paint on the model, but not gum up small details, it's like dry brushing and "wet" brushing in one...
👍: 0 ⏩: 1
think it would. i went pretty heavy on this, but kinda did that as well in the photos.
think some of it comes down to personal preference and style.
👍: 0 ⏩: 1
i just don't like wiping off that much paint before i use it, like i said, it's kind of a happy medium between looking good and staying cheap. and honestly full dry-brushing works better for me than full on wet brushing. if i could find a working camera those model ships i told you about were dry-brushed entirely (at least the "combi-brushing") and i think it worked well.
👍: 0 ⏩: 1
yea it is a happy medium. as i said its easy to learn but hard to master. sometime more is less and sometime its best to just go for it.
would love to see some photos dude,there has got to be some one you can borrow a camera from.hummmm..... always could ask around at the local collage or high school.
👍: 0 ⏩: 1
well less is more when do miniatures, and other small parts, like engines, but yeah, why dry brush the entire body of a corvette? dry brushing kills brushes faster.
and i might try that, there is a college down the road from my house! :3
👍: 0 ⏩: 1