HOME | DD
 enc86 — Tutorial : Basic Figurine
#basic #model #paint #scale #how #figure #figurine #tutorial
Published: 2015-01-29 19:59:55 +0000 UTC; Views: 1708; Favourites: 29; Downloads: 15
Redirect to original
Description
This is a tutorial i have been meaning to do for a long time now. a lot of the time i think figures (especially military model figures) are something that a lot of people are intimidated by or don't want to bother with. they can seem like a lot of work or hard to make them look natural. hopefully in this basic tutorial i can show you a very basic, no thrills way to make even a crappy stock figure look ok.Small disclaimer: I am not a master, and these are just the basics that you should know if you would like build/paint figures for scale models or dioramas. what works for me, may not for you and a lot of the time experimenting and patience is the key.these suggestions should work for most scales but the figure i will be using is a pretty basic 1/35. lacking detail and sporting a derp face, I honestly didn't put much work into him. the photos and tutorial write up took longer than the work i put into him, obviously if you put more work in and spend more time you will get better results.
INFO DUMP WARNING:
anyways as i said this is going to be very basics, bare bones, tutorial on scale figure building and painting. ill try to explain each step and throw out a few tips i have for it. learning these skills can go a long way and give to the ability to make better and better scale figurines.again this is all suggestions, don't take this as the only way or even the right way. in the end you've got to do whats going to work best for you and your project.
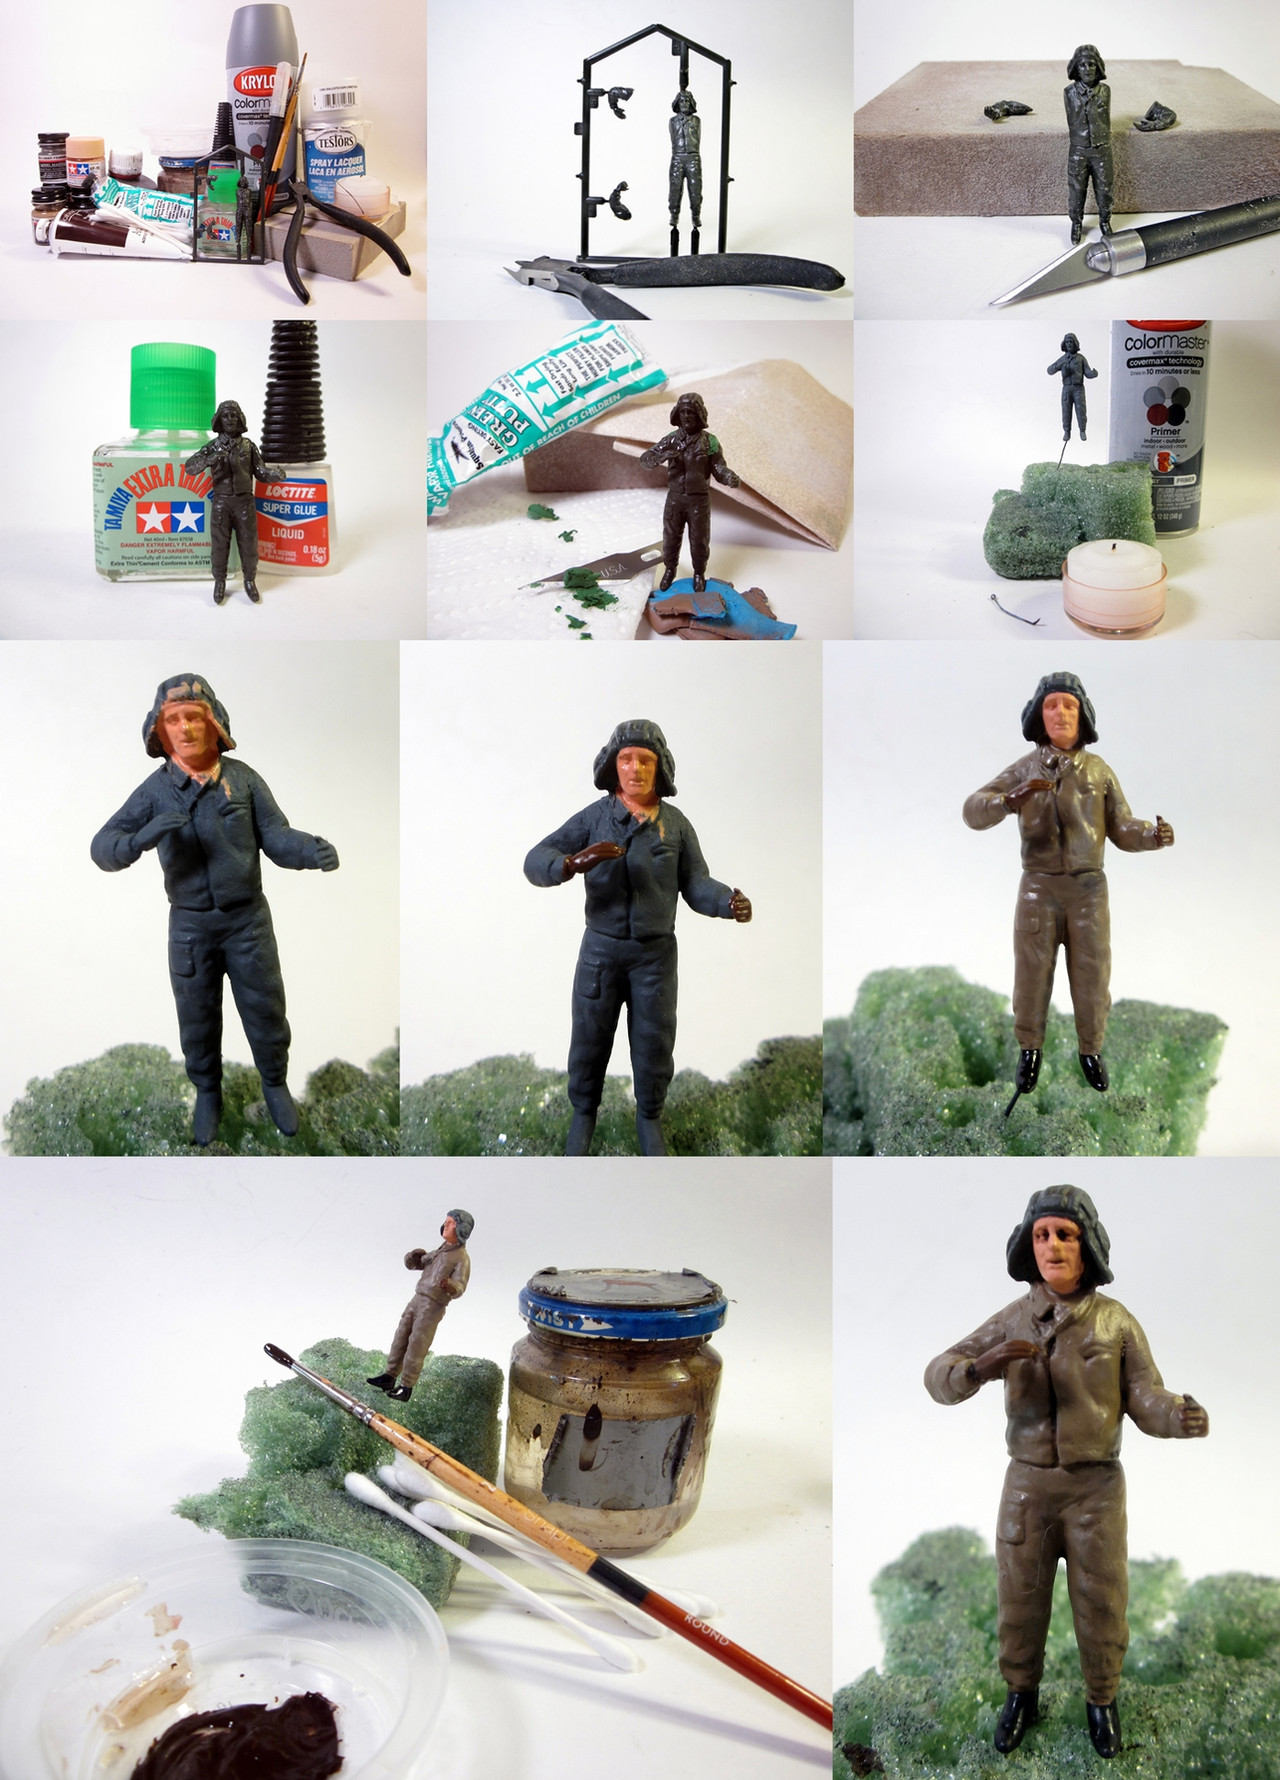
From left to right,top to bottom:
1: supply's and figure
here is ALL the materials,supply's,paint ect that will be used on this single figure. i know it seems like a lot but most are things that can be bought over time and should be in the tool box of every scale model and miniature artist.
Paint: Tools:
MM(model masters) dark tan water based brown art acrylic Hobby knife(fresh and sharp blade)
MM flat black krylon gray primer Hobby shears(side cutters ect)
MM leather testors flat top coat candle/sewing needle
MM euro gray enamel/water thinner sand paper/ sand paper sponge
Tamiya flat flesh q-tips and paper towel sheet
block of foam(to hold figure while painting)
Glues and Putty Brushes:
Tamiya extra thin 2 round X2 (one for flesh other for washes)
Lock tight super glue 3/0 round
squadron green putty
2: get you figure of choice and remove it from the plastic gate/tree/spruce whatever. use the side cutters to get as close to the figure as possible. this is a stock 1/35 figure from a tamyia T62a and has a pretty typical goofy face. my recommendation would be buy a set of nicer figures and do head swaps when you encounter a face only a mother could love. having a set or two of figures will allow you to do a lot more and sometimes a basic arm/head swap can do wonders.
3: using your hobby knife remove any nubs and remove the molding seam(there will be a line or seam down most plastic figurines) i use the side of my blade to scrap off that line a bit, then i sand the parts down with a fine grit sanding sponge.
4: using to two different glues can really help with arm and limb placement. i use a TINY amount of super glue to place arms, and check how they look(can be gently removed if placement is off) when placement of the limbs looks good, i use the plastic cement to fix them permanently.
5: some times there will be gaps between the limbs and body.sometimes if the gap is really small just a bit of sanding will fix it. if the gap is bigger place a dab of putty into the area and smooth it out a bit( i use a knife blade) once dry sand down using fit grit sandpaper and sand paper sponge.
6: just about ready for paint, i like to heat up a pin and melt it into a place on the figurine that will not be seen. the pin will allow you to work on the figure without having to hold the figure. remember to be very careful with the hot needle as not to hurt your self or the figurine. when you are all done with the figure all you have to do is twist the pin and it will come right out(there are loads of alternative to the heated pin, super gluing to a cork or plastic bit is one)
after the figure is "pinned" i like to give them a coat of primer. i know a lot of people skip priming but i like to do it because it will highlight any mistakes and crate a smooth foundation and give paint something to grip onto.
7: once the primer has dried, flesh is next up. flesh color typically will need a couple(if not 3) very thin coats. do not try to get the flesh all in one coat, you do not want to loose detail. with the flesh coat don't worry about getting it over lines or on other parts. the main priority is to just get the flesh tone down.
8: next up for painting will be the smaller details. on this figure i painted his helmet/hat euro gray and gloves leather. this would be the time to do holsters,belts,metals etc. anything thing tiny and "raised" should be painted here. its easy to go over a bit on the tiny details and fix them latter when working on the bigger parts(jacket etc)
9: next up dark tan for his jacket and pants and black for his shoes. i like to work from top to bottom. naturally the more colors, detail you can paint on the better but as you can see there really was not much to this figure.
10: after all the base paint as been painted, a nice wash can really make a figure look a lot better. of course there is fancier techniques that can be done, but starting out just mix up some art acrylic paint(in this case brown) and water. use that thinned mixture to paint over the parts(working from head down, in small segments) then wipe away the paint with a q-tip. the paint will stay in the recess and create dept. sometimes you will have to do the washes a few times to get the detail you want, but if your patience it will make the figure look pretty good. its also worth saying i never paint the eyes, always just using washes to bring out that detail.
11: pretty much done, just don't forget to top coat, to protect your work. while this guy looks kinda doofy, and weird up close, he will look alright from a distance sitting in a tank, example:
in closing a little bit of work and some simple steps can make even a old stock figurine look good. it never hurts to have extra heads and arms on hand and any extra work/love will pay off. just remember to be patience and not get discouraged as anybody that makes scale figures knows failure. hopefully some of this helped and has given you some ideas on how to make/paint scale figures for you projects.
As always questions,comments and suggestions welcome.
Related content


Comments: 35


welcome, hopefully i can find the time to do more tutorials in the future.
👍: 0 ⏩: 0

Hmm, I prefer holding them in my hand so I have more feeling concerning pressure of the brush and such.
But probably the best advice is starting with skin after priming, to paint inside to outside to make it less likely to mess up what you have already painted.

👍: 0 ⏩: 1
hummm i understand! i have seen people(tried it before) glue the figure to something like cork. i could see how feeling the pressuse might work to your advatge. for me i look for how the brush "spreads" and my natural shake lol. i think i have just got wayyyy to use to doing this way. i "pin" alot of tiny detail and stowage as well. lol it would be funny to look on the underside of my stowage, tons of little tiny pin holes.
yes exactly . its going to be much easier to get the good flesh coverage before trying to paint any details.
👍: 0 ⏩: 0

WHOA! Nice job bro! The second pic looks like he is being strung up by the neck! Good thing he made it out ok and you need a few trim brushes next time you go hobby shopping dude. Fatty McFatsalot brush is quite hard to do detail work with? No need to go crazy with high dollar brushes but find a pack with various sizes for cheap. The key is to look for a mid grade pack with the plastic protectors over the bristles. Eight dollar pack is good enough for horseshoes and hand grenades pal!
 (Wink)")
👍: 0 ⏩: 1
thanks bro!
lol yea he does in that second photo!
good call about the brushes, i have a TON of those and custom cut brushes on hand. just for this tutorial i wanted to grab standard everyday brushes. fattlymcfatty brush at the end is actually alright for washes as accuracy is not really a issue.
👍: 0 ⏩: 1
Got to have a mid-grade fatty on hand too!
👍: 0 ⏩: 0

oh man, this is going to help a lot with my current built I have going on >.< I always have trouble with getting flesh tones worked out and done, something always seems off about it >.> My current build,(that humvee I've been working) has a figure on top manning a machine gun, and when I painted his face, it turned out rather bright for some reason. Luckly, most of his face is covered by a mask thing so you cant tell very well unless you get right up close to it. >.<
This will definitely help me with my next build tho! Thanks for making this! ^-^
👍: 0 ⏩: 1
ahhh thanks a ton! knowing it helped one person make all the work worth it for me. happy i could give you some ideas and hope to see that humvee soon!
👍: 0 ⏩: 1
I may go back and slightly re-do that machine gunner at some point to be honest. Im always looking for tutorials on this kind of stuff ^-^
Im actually going to post some pictures of the humvee in just a few mins. I have gotten a lot done since the last time you saw it. Added much more stowage and some extra bits a such. I am quite pleased with it, but I still feel it needs more work honestly. There may also be some things I'll go back and re-do, but thats for another day >u<
👍: 0 ⏩: 1
yea some of it will be just you getting better at it the more you do/ get use to.
ahhhh great dude, ill check them out in a couple mins.sounds like you have got a bunch done.
👍: 0 ⏩: 1
Well, luckily I recently bought a ton of figure kits, so I'll have plenty of practice lol I also have two other models that haven't been touched yet lol Ones an M2 Bradly and the other is an F-82G fighter in 1/72 scale which I got for x-mas.
I also have a few older models I want go back and fix up, so I have quite a bit to keep me busy lol XD
👍: 0 ⏩: 1
ahhhhh lol yea dude, you are ready to rock then.
freaking Bradly is aweosme, that was like my second 1/35, love that tank. the other is really really wild and a classic.
nice, yea older model are prime for the bashing/fixing!
👍: 0 ⏩: 1
The Bradley was the last one my local hobby store had in stock for 1/35 so I jumped at the chance of getting it lol
I actually have a really old model I got from a local antique store from back in 1965 lol it wasn't ever built but it was of a WWII fighter that I absolutely love. The P-40 <3 An awesome plane imo ^-^ I may take some pics of it at some point. Still needs a little work tho Im afraid. There were a couple missing pieces to it that'll be difficult to work around. I may just have to scratch build them >.<
👍: 0 ⏩: 1
ahhhh it was fate then XD
that sounds really cool, be cool to see a shot of a vintage kit like that.
👍: 0 ⏩: 0

thanks! i try to do more tutorials in the future as well.
👍: 0 ⏩: 0

thanks dude!
hopefully ill get better at them over time, but its a fun challenge to sit down and write/photo one. will not be the last.
👍: 0 ⏩: 1

I look forward to your next write-up. ")
👍: 0 ⏩: 0

thanks friend!
really is a bit of a challenge to figure out and take photos as i went. sure ill get better at it over time.
👍: 0 ⏩: 0

Thanks buddy, happy that i can try to share some info, even if its just basic.
hopefully if i keep doing the, ill get better/fast at them and can do more advanced things.
👍: 0 ⏩: 0

Thanks dude!
i gotta get more into practice with them, both the photos and writing. at least get better at them so they feel like less work XD
👍: 0 ⏩: 0

Yay! Another tutorial! I have the same exact green stuff tube as you
Ahh I still remember when I panted small people when I was a kid, looked nothing like that! This is a really helpful tutorial for someone like me, who's never painted something that small properly.
What's that stuff he's standing on in the fifth picture?
👍: 0 ⏩: 1
yea that putty is pretty dang useful no matter what you are building. stinks and can be tricky to get use to, but worth it if you need to spot fit a gap in something(easier/cheaper to work with than mixing up some epoxy)
hopefully it helps someone, thanks buddy! really is just the basics and using a pretty cheap figure. seeings how i don't normally use stock figure(they get throw in parts bin) i thought this guy might be suited for a "basics" tutorial. really just simple steps and work like this make even the worst figure passable.
ahhh the blueish stuff(has a bit of paint on it too) is "teachers tack" or "Poster Putty" ect...its this cheap putty that can hold stuff but does not leave a residue. i use it allot when holding parts for pimeing as such. need to stand him up and that was close at hand.
👍: 0 ⏩: 1
Yeah I agree, used it on the Stormtrooper helmet and the Lair.
You're welcome! I sure it'll help someone!
Aaaah I know that stuff! I should probably get some of that for myself.
👍: 0 ⏩: 1
ahh nice!
thanks agian dude. i wish the photos had been better but i was kinda rushing/ did this over two afternoons. once i saw what i had got, there was no turning back. but it is what it is, and i know i can do better on future tutorials. its just getting use to them and getting more into practice of doing them.
yea its good to have on hand. tons of times when i paint tiny stuff(stowage especially) i take an old model box, and stretch out the putty into a long line over the box. then just place the parts on the line of tack. it will hold pretty good and let you prime a ton of stuff hands free.
👍: 0 ⏩: 1
Hey don't mention it! Don't worry about it, the pics are good! I think your tutorials have been awesome, if they'll be better I don't really know what to expect
👍: 0 ⏩: 1
lol thanks again dude. think i just want things to be prefect. a tutorial is kinda challenging in its own way.
👍: 0 ⏩: 1
I think we both try to make our stuff perfect, I think it's a good goal. It's like the ultimate challenge to ourselves. I can imagine that, maybe I'll get in to the tutorial stuff myself someday.
👍: 0 ⏩: 0