HOME | DD

eShredder — Tutorial: Eyes Part 2

Published: 2013-07-25 20:44:18 +0000 UTC; Views: 1483; Favourites: 29; Downloads: 9
Redirect to original
Description 
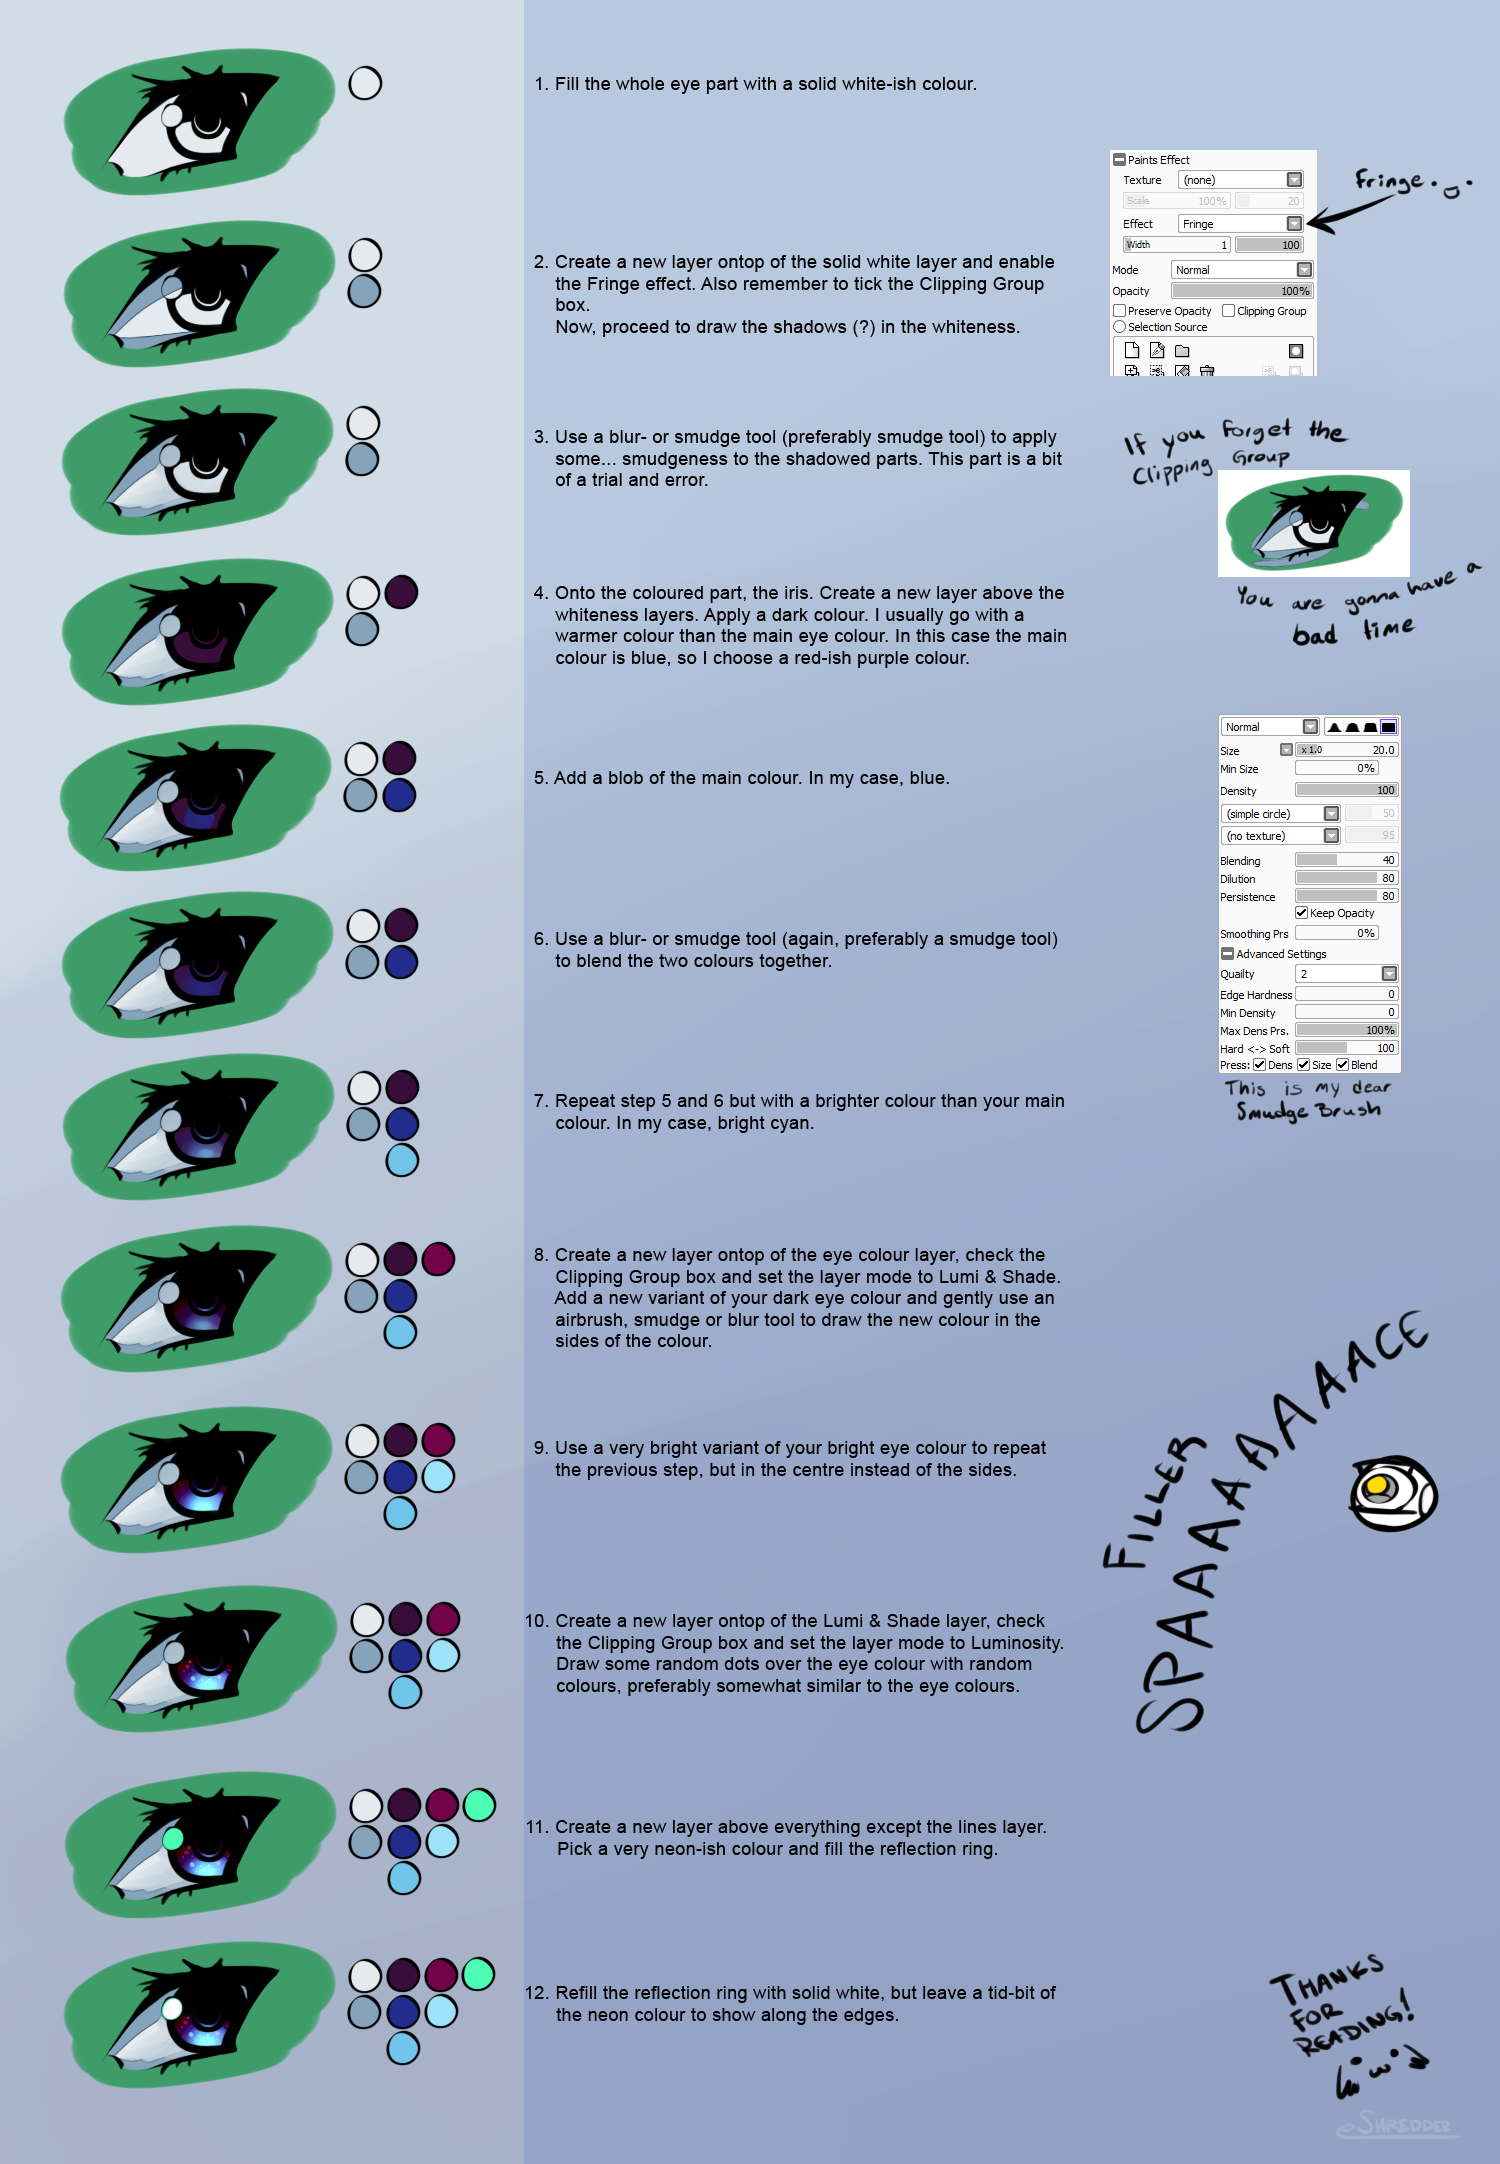
Well well well. I did it. I actually did it. I finished part 2 of the tutorial! Just a heads up now, this tutorial requires Paint Tool SAI, unless you know how your respective program can achieve the very same effects and results with layer modes and whatnot.

I found out that writing with the tablet is a real pain, so I borrowed Photoshop's text tool to get some better writing done.

Just like last time, this is not THE way to colour eyes, just my way to do it.
  • Fill the whole eye part with a solid white-ish colour. My default choice of whiteness is a very bright and mid-to-low saturated blue colour.
  • Create a new layer ontop of the solid white layer and enable the Fringe effect which creates this outline effect for the layer. Also remember to tick the Clipping Group box. Now, proceed to draw the shadows (?) in the whiteness.
  • Use a blur- or smudge tool (preferably smudge tool) to apply some... smudgeness to the shadowed parts. This part is a bit of a trial and error.
  • Onto the coloured part, the iris. Create a new layer above the whiteness layers. Apply a dark colour. I usually go with a warmer colour than the main eye colour. In this case the main colour is blue, so I choose a red-ish purple colour.
  • Add a blob of the main colour. In my case, blue.
  • Use a blur- or smudge tool (again, preferably a smudge tool) to blend the two colours together.
  • Repeat step 5 and 6 but with a brighter colour than your main colour. In my case, bright cyan.
  • Create a new layer ontop of the eye colour layer, check the Clipping Group box and set the layer mode to Lumi & Shade. Add a new variant of your dark eye colour and gently use an airbrush, smudge or blur tool to draw the new colour in the sides of the colour.
  • Use a very bright variant of your bright eye colour to repeat the previous step, but in the centre instead of the sides.
  • Create a new layer ontop of the Lumi & Shade layer, check the Clipping Group box and set the layer mode to Luminosity. Draw some random dots over the eye colour with random colours, preferably somewhat similar to the eye colours. If you feel like going all rainbow over the eye, please do so. I have not tried myself so I don't know how it will end up.
  • Create a new layer above everything except the lines layer. Pick a very neon kind of colour and fill the reflection ring.
  • Refill the reflection ring with solid, pure white, but leave a tid-bit of the neon colour to show along the edges.


  • I still don't know how to explain most parts very well, so if something is unclear, just go ahead and ask. I still won't bite you. Or... maybe... I do wonder what human tastes like.
    ....
    After biting my own finger until it hurts I can confirm: It does not taste any good. Regrets. Regrets everywhere.

    Edit: Forgot to add one thing. The smudge brush is a custom Water Brush in SAI, for those who want to recreate it for themselves.
    Related content
    Comments: 4

    Samantha-dragon [2015-08-02 13:22:50 +0000 UTC]

    I can't get why is this tutorial placed in traditional cathegory?

    👍: 0 ⏩: 1

    eShredder In reply to Samantha-dragon [2015-08-02 22:08:58 +0000 UTC]

    Uuuh, not sure really. I haven't really been active at all on deviantArt for the past year or two, but I know for sure that I didn't place it in five different categories. My guess; deviantArt has updated the categories and this piece ended up in the traditional category automatically somehow.

    👍: 0 ⏩: 1

    Samantha-dragon In reply to eShredder [2015-08-03 12:59:28 +0000 UTC]

    I don't think so - I'm sure those cathegories are still the same for many years - at least in this section, I visit it here quite often So... reported as misplaced deviation.

    👍: 0 ⏩: 0

    supleted [2013-07-25 23:11:06 +0000 UTC]

    Or, if you want to be like Inky, just smudge red all over your eyes. Seriously, she did a whole description of talks on that.

    👍: 0 ⏩: 0