HOME | DD
 FleetingEmber — Zebra Step by Step

#zebra #stepbystepart
Published: 2019-06-08 11:08:24 +0000 UTC; Views: 10526; Favourites: 630; Downloads: 0
Redirect to original
Description
I'm running so behind on these now! Will be skipping a few so if there's any piece in particular I've done that anyone wants a step by step for do let me know.
As always, these are little step by step ramblings of how I went about painting and how everything came together. If anyone has any questions or clarifications on a stage, please ask!
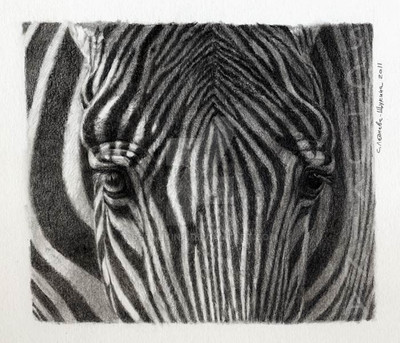
1 - Super rough (wonky!) sketch on a separate layer. I was really not feeling it, haha. Rough outline of stripes, again on another layer. Background is a neutral colour, slightly dark as I want a dark overall composition with the zebra fading into the darkness.
2 - Picked a cream colour for the white parts (zebras tend to not be bright white, as they can be dusty/dirty on their coats) Decided on the main light source coming from the right, so to show shadow I rubbed out the colour on the left hand side with a low opacity rubber. (This worked because my background was already darker) Same thing with the body in the background to show distance. I then have gone over with a basic fur brush on a new layer, super rough, just to get some idea of texture and fur direction.
3 - Starting to paint over the top now, keeping in mind which bits of the face would be facing upwards (so in light) and those facing downwards or to the side. For the white bits in shadow I have taken the cream colour and 'cooled' it, moving it towards the cooler tones and slightly darker, in this case an ever so slightly purple tone. This really helps to create more of a 3d effect. ALWAYS change your hue. Usually cooler tones in the shadows, and warmer in the light.
4 - This is a super awesome trick. Adding a gradient overlay layer, I changed the mode to darker colour and chose a gradient with blue tones. This introduced some lovely blues to the darker parts of the painting, which again, really helps introduce colour tones.
5 - Simple eye repaints and ear detailing. This is all ontop of everything now.
6 - More over paints to fix textures. I use a new layer on overlay with a very pale yellow to brush over areas in direct light to really make them pop.
7 - Final tweaks and fur detailing.
Finished piece -
-----------------------
Follow me on Instagram - www.instagram.com/fleeting_emb…
Related content


Comments: 19


 (Smile)")


👍: 0 ⏩: 1

Umm, I think this is the set I use mainly for fur -
👍: 0 ⏩: 1
👍: 0 ⏩: 0

👍: 0 ⏩: 1
Ahah, I think they're a little messy, but they do the job! Haha, thank you

👍: 0 ⏩: 0

Gotta love those blues!
👍: 0 ⏩: 0

This is very interesting...to me its new to see an artist start from dark colors, and then to light. I also keep forgetting that a painting always starts in a messy way, with the details gradually coming in last. Very amazing work, not that you needed to hear it from me but this was extremely inspirational.
👍: 0 ⏩: 1
I know right? I don't normally, I usually start as a middle grey and work into both darks and lights. But here I knew I wanted a dark background immediately. It worked quite well! Thank you!

👍: 0 ⏩: 0


