HOME | DD
 GENZOMAN — Cowabunga tutorial chapter 01

Published: 2008-10-24 20:10:05 +0000 UTC; Views: 309806; Favourites: 5705; Downloads: 14230
Redirect to original
Description
Ok, fiuuu, was a long time since i promised, but here is the tutorial


download for a full view version (high as hell now, lol) i hope to do a serie of tutorial. we call this chapter: "Chihuahua´s groove", hints and process of paint a characther. in future chapters, backgrounds, and other stuff


photoshop, intuos, etc... music: "Me cago en el amor" by the great Tonino Carotone!, this man is my spiritual master.
[link]
Version en español:
Mis disculpas, como es medio grafico,doy las explicaciones aqui, onda los subtitulos


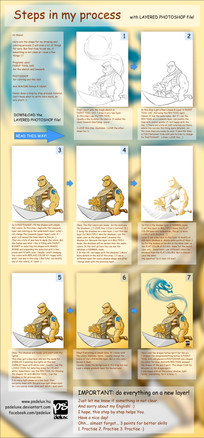
viñeta 1:Comienzo con un sketch bien sucio y basico en un layer nuevo... mas que nada buscar la pose para que el personaje quede puesto en todo el formato que vamos a usar. aqui no se hace nada en especial, sientanse libres y tiren rayas, lo ideal es soltarse.
viñeta 2: ahora pido un nuevo layer, le bajo la opacidad al boceto. y comienzo a entintar. Uso el brush por default de photoshop, eso si añado dinamics de forma y otras dinamicas en la caja de las brushes (esta en la esquina superior derecha de la pantalla de PS) al aplicar estos efectos, el pincel pasa de ser duro a ser suave y la tableta comienza a funcionar en base a la presion que ustedes apliquen, de esta manera se puede emular un look mas organico apliquen tambien a flow y opacity de brush, dejenlos en un rango entre el 80-90% para acentuar la presion de la tableta.... si quieren sentir un dibujo mas organico, prueben con colocar una hoja de papel roneo entre la tableta y el lapiz, notaran una diferencia


viñeta 3: Aqui comienza la etapa de "color"... pinto en escala de grises. por que se preguntaran? simple, el sol es nuestra unica fuente de luz, sin el todo seria oscuridad. la naturaleza funciona de esa forma "agregando luz a la sobmbra", es por ello que es mas facil agregar luces a un dibujo mas oscuro, que partir de una hoja en blanco. el color es un efecto secundario de la luz, el principal es producir volumenes. un poco como la musica donde existe el bajo y la melodia, uso dos tonos de gris, uno para el basico (que vendria a ser el bajo) y otro para la luz (que vendria a ser la melodia)... se capta la analogia?


 eso si, solo en una direccion (imitando el sol)
viñeta 4: ahora las sombras... aqui trato de no sobreproducir mucho, ya que facilmente muchas sombras mal puestas pueden quitarle equilibrio a la composicion. trato de evitar el exceso de negro a no ser que sea para representar una oscuridad total. como se pueden dar cuenta, las lines quedan un poco camufladas por la oscuridad... es una trampilla, eh?


viñeta 5: para que hice un dibujo entintado en un layer? para esta parte!, seleccionen el area, por ejemplo de la piel, pidan un layer nuevo y usen el tarro (en el layer nuevo) con el color que ustedes crean conveniente para la piel, lo mismo con el resto de los elemento... una vez que tengan ese layer con colores planos, denle opcion de multiply y bajenle la opacidad a unos 60-70%, donde el ojo les diga que se ve mejor. como pueden ver el color se blendea con los volumenes


 y voila. algunos elemenos como el escudo y la lanza los hice aparte.
viñeta 6: termio el personaje dandole algunos toques que lo sobresalgan un poco, como una luz secundaria (quien haya visto LOTR recordara facilmente su presencia), algunos puntos de luz, tipicos del anime y unas luces cyan de reflejo, que ayudan a restarle planitud a algunas areas. usualmente hago todo eso sobre el mismo layer del personaje, pero si gustan, pueden pedir un nuevo layer y bajarle la opacidad a un 90%, notaran que se blendearan mejor con el color. para suavizar algunas partes, uso la herramienta smudge. generalmente lo hago con el mismo pincel, pero ayuda para los detalles y el acabado. cuando estoy seguro, mezclo los layers (que en total deben ser el del dibujo y el de color) y aplico niveles o correcciones de color para que se lo mas cerca posible a lo que busco y listo... eso es todo amigos!
fin.-
Related content
Comments: 872

Gracias, tengo tiempo queriéndolo intentar. esto me da mucho animo para volverlo hacer.
👍: 0 ⏩: 0

This has been very helpful, thank you for sharing this ^^ <3
👍: 0 ⏩: 0

I´m probably doing something wrong, i'm trying to follow the tutorial and apply it on a sphere but it doesn't seem to give the same results.
👍: 0 ⏩: 0

THIS. IS. BADASS!!! (coming from a Greek person) XD
👍: 0 ⏩: 0

Pucha, todo bien hasta que llego al paso 5, al poner en Multiply se me ve horrible, definitivamente no como se deberia ver en tu imagen. ¿Consejos?
👍: 0 ⏩: 0

ESte tutorial me gusto mucho! la verdad me gustan mucho tus dibujos
👍: 0 ⏩: 0

hello
can you give me some advices for the coloring step?
then i tryed it out, the colors seemed much darker and dirty
could you give me an advice about good greyscales there the colloring works nice with your multipy way?
perhaps my works were just to dark in the end
and maybe i should just pick the colors from your tutorial...
but is this all or is were soething more?
should the greyscales be different for women?
👍: 0 ⏩: 0

This is a helpful tutorial for me for coloring my works. Thanks a lot!
👍: 0 ⏩: 0

You make it look so simple sadfa;dsofijdasf fhwhyyy
But at least now I know I'm not the only one that adds lame speech bubbles to whoever it is I'm drawing
👍: 0 ⏩: 0

that's really awesome! spartaaaa!!
your sense of humor soooo pleased me *wipes tears*
👍: 0 ⏩: 0

Could you make a tutorial on contrast? I oft hear my drawings are flat
👍: 0 ⏩: 0

One: love your understandable tutorial. Two: I love your Chihuahua! lol
👍: 0 ⏩: 0

I love your tutorials. Make things so much simpler. Now to practice practice practice I go.
👍: 0 ⏩: 0

Graciass Genzo, la verdad que yo no entendía en otros tutoriales de otros artistas el porqué de la escala de grises, y de la nada, saltaban a tener colores con buena sombra. Me has sacado de la duda, nuevamente, muchas gracias!
👍: 0 ⏩: 0

Genzo, mil gracias. Esto me ha servido muchisimo ya que me cuesta mas trabajo el arte digital que el tradicional. ¡ALABADO SEAS y EL PERRITO TAMBIEN *A*!
👍: 0 ⏩: 0

I wonder, why there is no fav.me link generated for that image
as sharing link for it is quite long
and gets broken on livestream
👍: 0 ⏩: 0

Wow this is soooo amazing and helpful. 
Lol go Pedobear~
👍: 0 ⏩: 0

Great tutorial and i just love the Chihuahua and all of his impressions !
👍: 0 ⏩: 0

Una duda....este si tienes tiempo de sobra... podrías hacer un tutorial de la anatomía humana (en hombres y en mujeres)?
👍: 0 ⏩: 0

you just made my art so much better with this tut, thx <3
👍: 0 ⏩: 0

Oh god... i'm actually trying to learn how to paint in PS without good results... but with your tutorial my coloring looks hundred times better.
Hope you'll continue this tutorial, they're awesome 
Thank you so much
👍: 0 ⏩: 0

Holy crap!...that is a way better simplification then other shadings that I've seen!
👍: 0 ⏩: 0

Increíble tutorial, esto es de mucha ayuda, gracias ^_^
👍: 0 ⏩: 0

Thank you so much for this tutorial! I wondered for long how you've been able to colour like this :'D
Just I also have a little problem from the 4th to the 5th step. I tried to balance the colour layer on multiply 80% but the colours came out dull. Only when I change the grey layer to something colourful, it comes closer to what you did ... Still, how are you able to let your colours shine on multiply setting? If I colour like that, my shadows look pale and not so saturated :/
Here's what I mean. Sorry for slapping it over your tutorial like this 
It would be great if you answered! :'D
👍: 0 ⏩: 0

Hello, it looks like you haven't replied to any comments in awhile here, but I'll try anyway. I have tried and tried this tutorial and keep failing. Between steps 4 and 5, when you place the flat colors in a new layer with multiply at 60-70%, the colors I choose are bland in comparison to the ones shown in step 5 of your tutorial. Yours are brighter and more saturated. I have even tried your exact picture in the tutorial, and the colors I choose still come out bland. I did see you comment to someone that you adjust levels, etc. later. Do you adjust them significantly to make them so bright and saturated or is there another step I am missing or misunderstanding? Please help. I'm used to placing a given color on a given part, such as hair or skin, then shading that color, but want to learn this method because I really admire your work.
👍: 0 ⏩: 1

I usually merge both layers and edit with levels or color balance
its just a quick edit to get a color more similar to what i have in mind.
👍: 0 ⏩: 1

Thank you for your reply! Is the step 5 part how your colors look after you've merged them and done those edits?
👍: 0 ⏩: 0

Hi Genzoman, you're amazing!! And your tutorials too! I know you're very busy but I just have a little (stupid) question... I use CS3, so my brushes box is a bit different, and I failed when tried to smooth the pencil tool... to be honest, i never thought this was possible! I'm tranining painting and your tutorial is very helpful!
Thank you very much!
👍: 0 ⏩: 0

Woooow!!! Lo que daria por aprender a dibujar asi! 

👍: 0 ⏩: 0

i will trying all those good advices and am very eager to work the grayscale steps.
I and my friends admire your skill 
thnks for the tutorials.
👍: 0 ⏩: 0

Genzo, I have yet to go through the tutorial itself, but this deserves a fav if only for the chihuahua
👍: 0 ⏩: 0

no mames porque este no es daily deviation .___. exigo una explicacion ahora messmoo!
👍: 0 ⏩: 0

A proposito, tu que Photoshop usas?
Yo combino entre Paint Tool Sai y PS CS3.
👍: 0 ⏩: 0
| Next =>


