HOME | DD
 gregor-kari — Enchanted Crystal Tutorial

#crystal #learntodraw #magic #paint #shading #magicalcrystal #howtorender #paintcrystals #leantopaint #gem #howtodraw #tutorial #howtopaint #crystalgems #renderingtutorial #crystaltutorial #shadertutorial
Published: 2021-06-21 14:35:02 +0000 UTC; Views: 283985; Favourites: 849; Downloads: 103
Redirect to original
Description
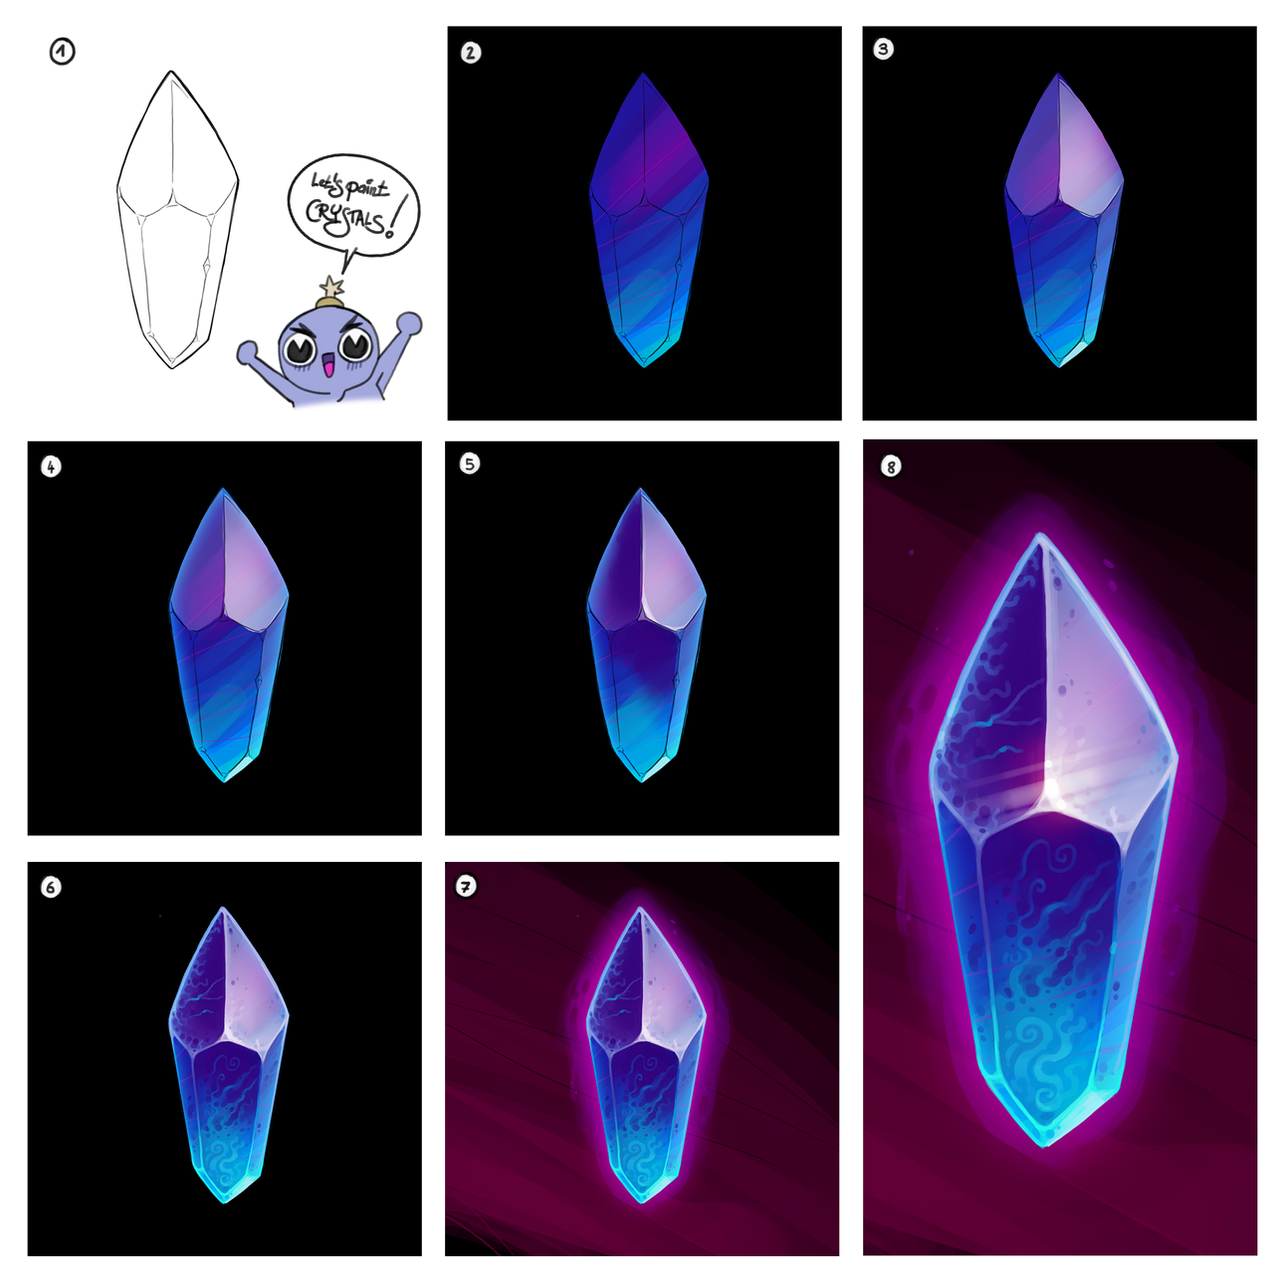
As one of my very first deviations is still the most popular one, I decided to do a little follow up and create something, that should be fun and easy to follow for anyone who has a 2D painting software or some acrylic paint. Let's do it.1) Start with a fairly simple drawing. Make the corners slightly rounded, so it looks nice and friendly. You can come up with strange shapes too, but sometimes less is more, so I recommend to start with something simple.
2) Fill out the background and create a layer underneath the drawing. Use the lasso tool to select the silhouette and fill it. Alpha-lock it and add some colors. Use large and gentle strokes. Experiment with different colors. Keep in mind, it doesn't have to be a soft gradient. Also note, that I made the bottom brighter, as it will make the crystal look like it glows from underneath.
3) create a new layer at the very top and use the lasso tool and the soft round brush and add some white. Because it is less saturated than the glowing colors I used in step 2, it will give the impression of reflected light. Use the opacity slider and adjust the intensity of your reflection.
4) Go to the layer with the silhouette and add an inner glow effect. I choose a pale blue. You can paint this by hand, but since we are going to refine it later, a layer style-effect is good enough.
5) add some darkness around the highlight area to increase the contrast and give the crystal a sense of volume. At this point I also add some extra highlights at some of the edges because I am curious and want to see how well the crystal is going to pop from the canvas..
6) Use the color picker and your favorite brush to paint details. Here you can be on the conservative side, look for references and try to recreate a realistic impression or a crystal, or you can let your imagination run wild and create your personal crystal magic. I went with some swirly elements, maybe you can come up with something too?
7) Go to your bottom layer and start painting a background. I always like to leave my brush strokes visible, as it adds a little bit of a personality and I don't hide the fact that I painted it in Photoshop.
8) Add some special effects to the highlight. First paint some white dots, copy them and apply a motion blur effect. The motion blur effect, applied only once, always looks a bit weak. So I recommend copying that layer again and applying the same effect again. Now it should look nice and smooth. Then make a new layer, switch it to color dodge and add with a soft round brush some color. This will bring the highlight really to live.
Related content
Comments: 9

👍: 2 ⏩: 1

👍: 0 ⏩: 0

👍: 2 ⏩: 0

👍: 2 ⏩: 0

👍: 1 ⏩: 0

👍: 0 ⏩: 1

👍: 0 ⏩: 0

👍: 1 ⏩: 1

👍: 1 ⏩: 0


