HOME | DD
 Hadeki — Watercolor Tutorial

Published: 2010-12-24 10:24:29 +0000 UTC; Views: 2441; Favourites: 10; Downloads: 59
Redirect to original
Description
Okay, well... this is super simple, but I wanted to show you all how I work and maybe help a few people get started with this awesome medium.Feel free to ask me anything and I'll try to help.

----------------------------------
Tools:
I always have brushes, paints, liquid frisket, watercolor pencils, paper, tape, water, and... paper towels. You should always try to find tools that work for your way of working. I guess just keep painting and figure out what you like to use.
----------------------------------
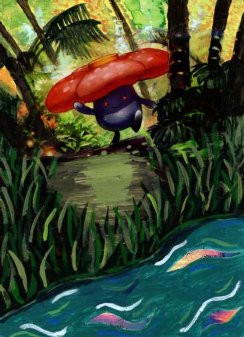
1.
Of course, start with a sketch. I usually transfer the sketch to watercolor paper just by eyeballing it (not tracing anything or using transfer paper). When I put the drawing onto the watercolor paper, I prefer to use watercolor pencils, as you can see in figure 2. Graphite tends to make things a little messy for me.
2.
Tape down the edges of the paper. I do this just so I get clean lines around the painting. Plus I like working on a block - a pad of multiple sheets of watercolor paper glued together on a cardboard backing - and if the painting gets too wet the paper tends to buckle; so the more tape the better, ha ha.
3.
Liquid frisket. I am telling you this is the best invention ever... It's, like, liquid latex and it's a god in the watercolor world (for me, at least). Here I used it to save the edges of the figure, snowflakes, and rabbits. Once I finished painting the background, I removed the frisket using my fingers or an eraser and...
4.
Ta-dah. A perfectly preserved figure in front of a completed background. Liquid frisket at it's finest folks. The type I use is Grumbacher's "Misket Liquid Frisket". I hate that title. There are lots of kinds, but I prefer the Grumbacher one because they add an orange pigment so you can see it easily on the surface of your paper.
5.
Here I did a little bit of underpainting among the objects. The girl's dress, hair, hat, etc. I painted light enough to be able to go over easily, but dark enough so I could see what colors I wanted where.
6.
And after adding lots and lots of details here and there, we're done.
Finished product: [link ]
----------------------------------
Inspirations:
I love this person's work... it's so clean and elegant. I strive to be more like them.
She's very popular on here, and for good reason. She may be my favorite artist on Deviant Art...
I've watched this person for a long time. They're traditional and digital and it's all amazing.
Same with this person; traditional and digital. Their work is so meticulous and amazing...
Related content


Comments: 2

Really like the step by step procedure here, very nice!
👍: 0 ⏩: 1

