HOME | DD
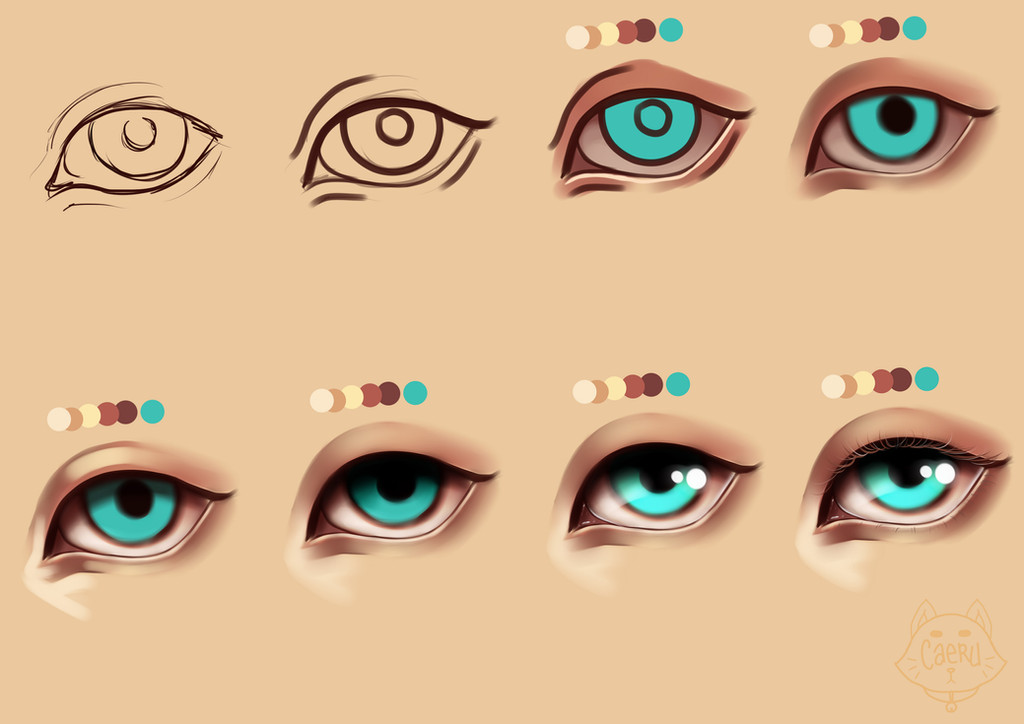
 HalanLore — Painting An Eye Tutorial

#almond #brown #eye #lore #paint #possibly #step #tutorial #halan #philota #an #useful
Published: 2016-12-16 18:25:18 +0000 UTC; Views: 3547; Favourites: 148; Downloads: 0
Redirect to original
Description
Textless Version Available here! : sta.sh/02by373nk5zfYoutube Video Process Here: For all the nitty gritty details that made this step by step possible.
Wooh! Made in Paint Tool Sai, I've been wanting to make something cool and potentially helpful like this for awhile! Let me know what you think? What would you be interested in seeing me do?
If this inspires you to draw something let me know! I'd be excited to see what you do!
Related content


Comments: 8

wow this is really pretty what brush settings did you use
👍: 0 ⏩: 1

If you watch the linked video on the left hand side you'll see on the left hand side, in the bottom left corner area the brush I'm using is highlighted. You can see the basic brush settings there below the brush menu. Um and the brushes I'm using aren't exactly sai standard even though they're similar? I got them from a website I can't seem to find anymore. I downloaded this thing called sai-pack that came with brushes. This was years ago and googling it isn't making it come up with anything! It was a custom brush set and could also translate sai from Japanese to English. (even though when I got sai it already officially came in English?)
I did however! Find this: painttoolsaibrushes.splstc.com… Which is a tutorial on customizing paint tool sai brushes. Also this
which has a selection of nice looking sai brushes.
Was there a specific brush you were particularly curious about that I used in this video? Like the inkpen, watercolor brush, or marker tool?
👍: 0 ⏩: 0

thank you!! amazing tutorial and the result is awesome!!!

👍: 0 ⏩: 1
I am really glad you enjoyed it ")
👍: 0 ⏩: 0

tuts like this are useful but i think this could be improved somewhat.
the order of the first six steps isn't clear. are you going in rows or columns? maybe you can number them.
can you add a bit more details about the shine step? is it 100% white? what compositing mode? is the iris a separate layer to the highlights?
is there a reason why the lashes are left to the last step? in fact you haven't even explained where you added them.
i don't mean to be harsh or anything, just trying to help make this even better.
👍: 0 ⏩: 1
Huh. Well it's all rows.
Since the main point of this tutorial is supposed to be a quick cheat sheat/reference for the youtube video process I didn't delve too deep into the luminosity step since it is actually a multi step process in my drawings. (one big effect lots and lots of little layers) It's really whatever colors you like, I used pale yellow, brown, orange, red, at varying layers and varying opacities to achieve this effect. The iris effect is caused by pale brown of the eye with an overlay effect, with a lower opacity.
I recommend the youtube video for watching if you're interested in all the nitty gritty details, no one really wants to read this much text. At least not in their quick graphics in this format.
What do you mean by compositing mode? Do you mean the layer settings? I'm not sure what you're getting at.
Always leave complex details for last. Always. You ever had your heart broken because you perfected one little corner of the drawing first and then you had to paint over it because it actually was in the wrong spot or something? It sucks.
👍: 0 ⏩: 1
thanks for clarifying some matters. yeah i agree you don't want to face a "wall of text" but expanding a bit more for beginners might be helpful. there's no way i could replicate all of these steps just by reading the tutorial. i suspect that someone who doesn't need the extra clarification probably doesn't need the tutorial anyway.
it's rows, that's good, but it might not be obvious to all. if all content is in one row or one column there's no problem, but in a 2d layout it helps the reader to provide a bit of guidance. the easiest way i think is to number the steps.
compositing mode? layer mode? idk what most people call it. it's the compositing operation that is used when merging a layer or group with what's below it, e.g., normal, multiply, hard light, burn, ... also what opacity you used. again, i don't need mundane details, but a few more of the basic principles to guide me on my way.
👍: 0 ⏩: 1
I appreciate the effort you went through with your critism. I won't make any changes to this tutorial but I am planning on creating a narrated tutorial (for an eye, maybe a different shaped eye) and it's good to know what people might be interested in. Otherwise I'll just say 'um' and 'like' a lot
I think that's what I'm calling the 'layer settings' because it changes what that particular layer does.
👍: 0 ⏩: 0